background image

7

More Modes

Sabbath Mode

For guidance on usage and a complete list of models with 

Sabbath Mode, visit 

www.star-k.org

.

The Sabbath Mode sets the oven to remain on in a bake setting 

until disabled.
When the Sabbath Mode is activated, only the Bake cycle will 

operate. All other cooking and cleaning cycles are disabled. No 

tones will sound, and the displays will not indicate temperature 

changes. When the oven door is opened or closed, the oven light 

will not turn on or off, and the heating elements will not turn on or 

off immediately.
If a cook timer is set, the countdown will appear. The timer will 

countdown once the timer is set.

NOTE:

 If a power failure happens while Sabbath Mode is running, 

the oven will show Sabbath Mode is on, but the Bake cycle will 

not be on. If the oven door is opened during this time, the oven 

light will not turn on.

To enable and activate Sabbath Mode:

1. 

Press the Settings keypad.

2. 

Select MORE MODES.

3. 

Select SABBATH MODE.

4. 

Press SABBATH MODE again to enable Sabbath Mode 

(Sabbath Mode is preset to off).

5. 

(Optional) For timed cooking in Sabbath Mode, press ADD 

A COOK TIME, enter the desired cook time and then press 

NEXT.

6. 

Select START.

To Disable and Exit Sabbath Mode:

1. 

Press the Oven Power or Cancel Keypad.

2. 

Press and hold the display screen for three seconds.

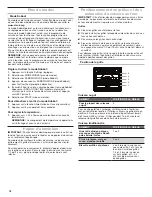
To Adjust Temperature:

1. 

Press the +/- 25 on the display screen to select the new 

temperature.

NOTE:

 The temperature adjustment will not appear on the 

display, and no tones will sound.

Aluminum Foil

IMPORTANT:

 To avoid permanent damage to the oven bottom 

finish, do not line the oven bottom with any type of foil or liner.
For best cooking results, do not cover entire oven rack with foil 

because air must be able to move freely.
To catch spills, place foil on rack below dish. Make sure foil is at 

least 1/2" (1.3 cm) larger than the dish and that it is turned up at 

the edges.

Positioning Racks and Bakeware

IMPORTANT:

 To avoid permanent damage to the porcelain 

finish, do not place food or bakeware directly on the oven door or 

bottom.

Racks


Position racks before turning on the oven.


Do not position racks with bakeware on them.


Make sure racks are level.


Place food so it will not rise into the broil element. Allow at 

least 1/2" (1.3 cm) between pans and the broil element.

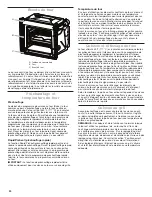
To move a rack, pull it out to the stop position, raise the front 

edge, and then lift it out. Use the following illustration and charts 

as a guide for positioning racks.

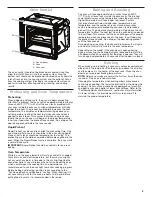
Rack Positions

Broiling

FOOD

RACK POSITION

Most broiling

5

For hamburger patties to have a well-seared exterior and a rare 

interior, use a flat rack in position 5. Cook over a drip tray filled 

with 2 cups (500 ml) of water.  Broil for 15-30 minutes and turn 

two thirds of the way through cooking.

Traditional Cooking

FOOD

RACK POSITION

Large roasts, turkeys, angel 

food, bundt cakes, quick 

breads, pies

1 or 2

Yeast breads, casseroles, 

meat and poultry

2 or 3

Cookies, biscuits, muffins, 

cakes

3 or 4 when single rack 

baking; 1 and 4 when double-

rack baking; 1, 3, and 5 when 

triple-rack baking; and 1, 3, 4, 

and 5 when quadruple-rack 

baking.

Baking Layer Cakes on Two Racks

For best results when baking cakes on two racks, use rack 

positions 1 and 4 with the Bake function. Place the cakes on the 

racks as shown. 

Baking Cookies on Two Racks

For best results when baking cookies on two racks, use rack 

positions 1 and 4.

Bakeware

To cook food evenly, hot air must be able to circulate. Allow 2" 

(5.0 cm) of space around bakeware and oven walls.
Use the following chart as a guide.

NUMBER OF PAN(S)

POSITION ON RACK

1

Center of rack.

2

Side by side or slightly staggered.

3 or 4

Refer to the previous illustration.

NOTE:

 Bakeware materials and color may affect results. Dark, 

dull, non-stick, or glass pans may require shorter baking times, 

in contrast insulated or stainless steel pans may require longer 

baking times. Follow bakeware manufacturer’s recommendations.

5
4
3
2
1

Summary of Contents for W11260125A

Page 1: ...our website at www jennair com In Canada call 1 800 JENNAIR 1 800 536 6247 or visit our website at www jennair ca Guide d utilisation et d entretien Pour des questions à propos des caractéristiques du fonctionnement rendement des pièces accessoires ou dépannage composer le 1 800 JENNAIR 1 800 536 6247 ou visiter notre site Web au www jennair com Au Canada composer le 1 800 JENNAIR 1 800 536 6247 o...

Page 2: ...13 Accessories 13 TABLE DES MATIÈRES SÉCURITÉ DU FOUR 14 UTILISATION DU FOUR 15 Guide des caractéristiques 15 Tableau tactile 15 Affichage 15 Affichage du menu 15 Réglage et mode démonstration 15 Modes de cuisson 16 Favorites recettes favorites 16 Cuisson assistée 16 Settings réglages 17 Plus de modes 18 Papier d aluminium 18 Positionnement des grilles et des ustensiles de cuisson au four 18 Acces...

Page 3: ...o Not Use Water on Grease Fires Smother fire or flame or use dry chemical or foam type extinguisher Use Only Dry Potholders Moist or damp potholders on hot surfaces may result in burns from steam Do not let potholder touch hot heating elements Do not use a towel or other bulky cloth Use Care When Opening Door Let hot air or steam escape before removing or replacing food Do Not Heat Unopened Food C...

Page 4: ... right to explore the different options and features For more information about the individual controls see their respective sections in this manual Display The display is for both the menu and oven function controls The touch panel allows you to scroll through the oven menus The display is very sensitive and requires only a light touch to activate and control When an oven is in use the display wi...

Page 5: ... to cook ready made food stored at room or refrigerated temperatures such as biscuits or to reheat already cooked food Follow the instructions on the packaging Specialty Functions Convect Roast Used for cooking large cuts of meat Turn the meat during cooking for even browning and baste the meat periodically to keep it moist Specialty Functions Eco True Convect Used for cooking stuffed cuts of meat...

Page 6: ...elect CONTROL LOCK 3 Control Lock will display 4 Scroll up to unlock No keypads will function Preferences Times and Dates Set time and date preferences NOTE If user is connected to Wi Fi time and date will be set automatically Your Meal Times Adjust when breakfast lunch dinner is shown Time Date Time Format AM PM vs 24 hour Military Time Sound Volume Set sound volume preferences Timers and Alerts ...

Page 7: ...t is turned up at the edges Positioning Racks and Bakeware IMPORTANT To avoid permanent damage to the porcelain finish do not place food or bakeware directly on the oven door or bottom Racks Position racks before turning on the oven Do not position racks with bakeware on them Make sure racks are level Place food so it will not rise into the broil element Allow at least 1 2 1 3 cm between pans and ...

Page 8: ...y by sliding it across the shelf guides making sure that the side with the raised edge is facing upwards Other accessories such as the drip tray and the baking tray are inserted horizontally in the same way as the wire shelf Removing and Refitting the Shelf Guides To remove the shelf guides lift the guides up and then gently pull the lower part out of its seating The shelf guides can now be remove...

Page 9: ...g position racks according to the Positioning Racks and Bakeware section When roasting it is not necessary to wait for the oven preheat cycle to end before putting food in unless it is recommended in the recipe Baking and Roasting The oven will take approximately 6 minutes to reach 350 F 177 C with all oven racks inside the oven cavity The preheat cycle rapidly increases the temperature inside the...

Page 10: ...1 hour and 15 minutes for light soil 1 hour and 40 minutes for medium soil and 2 hours for heavy soil Once the oven has completely cooled remove ash with a damp cloth To avoid breaking the glass do not apply a cool damp cloth to the inner door glass before it has completely cooled The oven lights will not work during the Self Cleaning cycle NOTE The oven has a two speed cooling fan motor During th...

Page 11: ...T on some models Do not use abrasive cleaners cleaners with bleach rust removers ammonia or sodium hydroxide lye because paint surface may stain CONTROL PANEL AND OVEN DOOR EXTERIOR To avoid damage do not use abrasive cleaners steel wool pads gritty washcloths or abrasive paper towels Cleaning Method Glass cleaner and soft cloth or sponge Apply glass cleaner to soft cloth or sponge not directly on...

Page 12: ...d causing warm air to exit from the oven vent Long preheat times Not all cycles require preheating See cycle instructions for preheat recommendations Most cycles preheat to 350 F 177 C in 6 minutes Higher temperatures will take more time Removing unused oven racks prior to preheating can help reduce preheat time Self Cleaning cycle will not operate The oven door is open Close the oven door all the...

Page 13: ...es For further assistance If you need further assistance you can write with any questions or concerns at JennAir Brand Home Appliances Customer eXperience Center 553 Benson Road Benton Harbor MI 49022 2692 Please include a daytime phone number in your correspondence In Canada Call the JennAir Canada LP Customer eXperience Centre toll free 1 800 JENNAIR 1 800 536 6247 Our consultants provide assist...

Page 14: ...itaines de four mouillées ou humides sur des surfaces chaudes peuvent provoquer des brûlures provenant de la vapeur Ne pas laisser les mitaines de four toucher les éléments chauffants Ne pas utiliser une serviette ou un tissu épais Exercer une grande prudence lors de l ouverture de la porte Laisser l air chaud ou la vapeur s échapper avant d enlever ou de remplacer un plat Ne pas faire chauffer de...

Page 15: ...her pour l activer Naviguer vers le haut le bas la gauche ou la droite pour explorer les différentes options et fonctions Pour plus d information sur chaque commande voir leurs sections respectives dans ce manuel Affichage L affichage est pour le menu et les commandes de fonctionnement du four L écran tactile permet de faire défiler les menus du four L affichage est très sensible il suffit d un lé...

Page 16: ... levage des pains Fonctions spéciales Convenience Foods plats cuisinés Utilisée pour cuire des aliments prêts à servir conservés à température ambiante ou réfrigérée tels que des petits pains au babeurre ou pour réchauffer des aliments déjà cuits Suivre les instructions sur l emballage Fonctions spéciales Convect Roast rôtissage par convection Utilisée pour la cuisson de gros morceaux de viande Re...

Page 17: ...ontrol Lock s affiche 4 Naviguer vers le haut pour déverrouiller Aucune touche ne fonctionnera Préférences Heures et dates Régler les préférences pour l heure et la date REMARQUE Si l appareil est connecté au réseau Wi Fi l heure et la date se règlent automatiquement Vos heures de repas Régler quand déjeuner dîner souper s affiche Heure Date Format de l heure AM PM ou 24 heures Volume sonore Régle...

Page 18: ...uminium IMPORTANT Pour éviter des dommages permanents au fini du fond du four ne pas recouvrir le fond avec du papier d aluminium ou un revêtement quelconque Pour obtenir les meilleurs résultats de cuisson ne pas couvrir entièrement la grille d aluminium car l air doit pouvoir circuler librement Pour récupérer les renversements placer du papier d aluminium sur la grille sous le plat S assurer que ...

Page 19: ...les jus de cuisson L utiliser pour la cuisson de tout produit de boulangerie et de pâtisserie mais aussi pour les rôtis poissons en papillote etc Glissières sur certains modèles Sonde de cuisson Pour faciliter l insertion ou le retrait des accessoires Permet de mesurer avec précision la température de l aliment durant la cuisson Grâce à ses quatre points de détection et à son support rigide elle p...

Page 20: ... le rôtissage placer les grilles comme indiqué à la section Positionnement des grilles et des ustensiles de cuisson au four Lors du rôtissage il n est pas nécessaire d attendre la fin du préchauffage du four avant d y placer la nourriture sauf si la recette le recommande Cuisson et rôtissage au four Le four atteint 350 F 177 C en 6 minutes environ lorsque toutes les grilles du four sont à l intéri...

Page 21: ...égères 1 heure et 40 minutes pour les saletés moyennes et 2 heures pour les saletés moyennes à intenses Lorsque le four a complètement refroidi retirer la cendre avec un chiffon humide Afin d éviter de briser le verre ne pas appliquer de chiffon humide et froid sur la partie interne du hublot de la porte avant qu il n ait complètement refroidi Les lampes du four ne fonctionnent pas durant le progr...

Page 22: ...nchiment de produits antirouille d ammoniaque ou d hydroxyde de sodium soude car la surface peinte pourrait se tacher TABLEAU DE COMMANDE ET EXTÉRIEUR DE LA PORTE DU FOUR Afin d éviter tout dommage ne pas utiliser de nettoyants abrasifs de tampons en laine d acier de chiffons de lavage rêches ou d essuie tout abrasifs Méthode de nettoyage Nettoyant à vitre et chiffon doux ou éponge Appliquer le ne...

Page 23: ...rogrammes ne nécessitent pas de préchauffage Voir les instructions de programme pour connaître les recommandations en ce qui concerne le préchauffage La plupart des programmes préchauffent à 350 F 177 C en 6 minutes Cette durée augmente pour des températures plus élevées Pour réduire la durée de préchauffage on peut retirer les grilles inutilisées avant de préchauffer le four Le programme d autone...

Page 24: ...ion à l adresse suivante JennAir Brand Home Appliances Customer eXperience Center 553 Benson Road Benton Harbor MI 49022 2692 Veuillez indiquer dans votre correspondance un numéro de téléphone où l on peut vous joindre dans la journée Au Canada Appelez sans frais le Centre eXpérience à la clientèle canadienne de JennAir au 1 800 JENNAIR 1 800 536 6247 Nos conseillers peuvent vous aider sur les poi...

Reviews: