background image

26

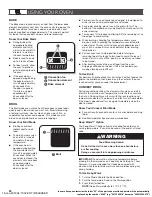
COOK TIMER (App Only)

The Cook Timer allows the oven to cook for a programmed 

length of time. The Cook Timer can be accessed through the 

app.
Follow the prompts in the app to use Cook Timer.

Know Your Cook Timer

The Cook Timer countdown is started several ways:


If the cycle does not require preheat, the Cook Time starts 

immediately as the cycle begins.


If a cycle requires preheat, the Cook Time can only be 

started through the app when the Start button is pressed.

TEMPERATURE PROBE (App Only)

The temperature probe is a tool to assist with evaluating the 

finish temperatures of meat, poultry and casseroles. It can 

be used during Bake, Convect Bake, and Convect Roast. 

The oven will beep when the food has reached the target 

temperature.

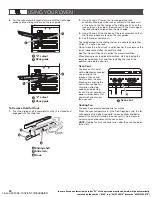
Know Your Temperature Probe


Always unplug and remove the temperature probe from the 

oven when removing food.

Before Using Temperature Probe:


Remove any racks above the food that are not in use.


Insert the probe into the food item. For meats, the probe tip 

should be located in the center of the thickest part of the 

meat and not into the fat or touching a bone.


For the most accurate temperature readings, insert as much 

of the probe shaft as possible into the food. Temperatures 

will be most accurate when more of the probe is inserted in 

the food.


Place food in oven and connect the temperature probe to 

the jack.


Keep probe as far away from heat source as possible. 

Close oven door.

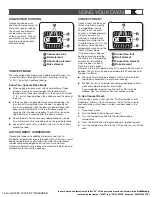
DELAY START (App Only)

Delay Start allows the oven(s) to be set to turn on at a certain 

time of day and cook for a set length of time.
Delay Start should not be used for food such as breads and 

cakes because they may not bake properly.
Delay Start is available with any cycle that has a Delay Start 

option. The Delay Start can be accessed through the app.
Follow the prompts in the app to use Delay Start.

NOTE:

 Do not use Delay Start for items that require a preheated 

oven, such as cakes, cookies and breads. If food is in the oven 

during preheat, it may become overcooked.

WARNING

Food Poisoning Hazard

Do not let food sit in oven more than one hour before 

or after cooking.
Doing so can result in food poisoning or sickness.

USING YOUR OVEN

16-Jan-2019 04:15:32 EST | RELEASED

In some European factories the letter "W" of the part code mentioned herein will be automatically

replaced by the number "4000" (e.g. "W12345678" becomes "400012345678")

Summary of Contents for PRO-STYLE JGRP748HM

Page 1: ...6247 or visit our website at www jennair ca Guide d utilisation et d entretien Pour des questions propos des caract ristiques du fonctionnement rendement des pi ces accessoires ou service aux U compo...

Page 2: ...ET CARACT RISTIQUES 41 Cuisini re 41 Int rieur du four 42 Boutons de commande 42 CARACT RISTIQUES DE LA TABLE DE CUISSON 48 Br leurs 48 Gril 49 Plaque frire chrom e 50 UTILISATION DU FOUR 51 Boutons...

Page 3: ...ion may result causing property damage personal injury or death Do not store or use gasoline or other flammable vapors and liquids in the vicinity of this or any other appliance WHAT TO DO IF YOU SMEL...

Page 4: ...n entire rack with materials such as aluminum foil Doing so blocks air flow through the oven and may cause carbon monoxide poisoning Aluminum foil linings may also trap heat causing a fire hazard CAUT...

Page 5: ...and surfaces near these openings oven doors and windows of oven doors Proper Installation The range when installed must be electrically grounded in accordance with local codes or in the absence of lo...

Page 6: ...s Drip tray on griddle models Side panels Console panel 1 2 3 4 5 6 7 Leveling rods behind kick plate Lower panel kick plate Oven doors Temperature knobs Mode knobs SAID Label 8 9 10 11 12 48 121 9 cm...

Page 7: ...Front Knob 30 76 2 CM OVEN INTERIOR 1 1 2 3 4 5 Halogen lights Broil elements Oven cavity sensor Temperature probe jack Convection fan s 1 2 3 4 5 NOTE Cooktop configuration features and controls may...

Page 8: ...F A Left Rear Knob B Left Front Knob C Oven Light Button D Mode Knob E Temperature Knob F Oven Start Button G Grill Knob H Right Rear Knob I Right Front Knob 36 91 4 CM NOTE Cooktop configuration feat...

Page 9: ...J Griddle Knob 48 121 9 CM NOTE Cooktop configuration features and controls may differ Indicator Lights D A C B E A Mode Knob Indicator Light B Remote Indicator C Temperature Knob Indicator Light D St...

Page 10: ...Bake Convect Roast and Broil Convect Broil Press the Start button to confirm mode change PARTS AND FEATURES Indicator Lights D A A B C C G D E F A Mode Knob Indicator Light B Remote Indicator C Temper...

Page 11: ...t has completed The light will turn solid white and a tone will sound when preheat is complete If there is no preheat for a cycle the preheat completes immediately and the light turns solid white NOTE...

Page 12: ...white when the unit is remote enabled All lights will turn off in Idle mode Griddle Cooktop ON Light Right Griddle indicator light The Griddle Cooktop On light illuminates blue when the griddle knob...

Page 13: ...ipped circuit breaker or blown fuse Check that the burner knob is pressed completely down on the valve shaft If the spark igniter still does not operate call a trained repair specialist When the burne...

Page 14: ...Upper main flame 2 Lower simmer flame Large Burner GRILL on some models The grill module consists of a cast iron grate a burner assembly deflector and a drip tray NOTE The burner assembly is not remo...

Page 15: ...e indicator light blinks to show that the griddle is preheating When preheat is complete the right griddle indicator lights solid To Use 1 Position drip tray 2 Push in and turn knob to desired tempera...

Page 16: ...Knob Temperature Knob and the Start button as a way to prompt for action When an action is prompted to be completed the associated indicator light feature will blink Examples Occurrence Prompt for act...

Page 17: ...cator lights will show white and the Start button will begin to blink prompting for action If an invalid combination has been selected the knob indicator lights will blink to show that the selected Mo...

Page 18: ...appliance is Remote Enabled Download the App The first step to get your appliance connected is to download the app on your mobile device The app will be your guide and walk you through all of the ste...

Page 19: ...adjacent rack levels begin by installing the lower rack first Bakeware To cook foods evenly center the dish under the broil element and allow 2 5 0 cm of space around pan and the oven wall to ensure...

Page 20: ...ect its ability to slide See the General Cleaning section for more information When placing racks in adjacent positions start by loading the lower rack positions first and then installing the rack in...

Page 21: ...roles Bake One rack 2 Chicken whole Convect Roast One rack 2 Frozen Foods Pizza Bake One rack 2 Meats thinner cuts and pieces Broil One rack 4 Meats thicker cuts and whole poultry Broil One rack 3 Tur...

Page 22: ...ing the temperature causes food to cook slower Thicker cuts and unevenly shaped pieces of meat fish and poultry may cook better at lower broiling temperatures Pull out oven rack to stop position befor...

Page 23: ...tion cooking 1 2 3 4 1 Convection fans 2 Broil element 3 Convection element 4 Bake element CONVECT ROAST Convect roast can be used for roasting meats poultry and vegetables During convect roast the br...

Page 24: ...temperature by 25 F 14 C from the temperature recommended on the package The bake time may be slightly less than stated on the package depending on the pizza type Convect Frozen Pizza is designed for...

Page 25: ...team Meats setting the internal temperature may increase 15 F to 20 F 5 C to 10 C during standing time therefore it is necessary to stop cooking and remove the meat at a lower internal temperature tha...

Page 26: ...at or touching a bone For the most accurate temperature readings insert as much of the probe shaft as possible into the food Temperatures will be most accurate when more of the probe is inserted in th...

Page 27: ...burner yourself Contact a trained repair specialist 3 Clean clogged burner ports Use a straight pin Do not enlarge or distort the port Do not use a wooden toothpick If the burner needs to be adjusted...

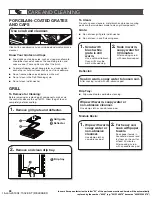
Page 28: ...abrasive scouring pads or other scrubbers made to clean grill components Grate Do not clean grill grate in dishwasher Do not clean in a self cleaning oven Deflector Drip Tray Allow cooktop to cool be...

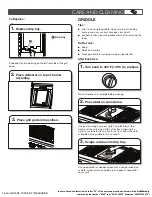
Page 29: ...nds Wait until preheat is complete before cleaning GRIDDLE Tips Prior to cleaning the griddle make sure that all cooktop burners and oven controls have been turned off For best results clean the gridd...

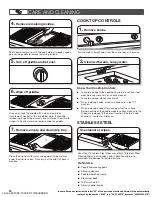
Page 30: ...leansers or an oven cleaner To avoid damage do not soak knobs When replacing knobs make sure knobs are in the Off position When replacing knobs after cleaning either the surface burner controls or the...

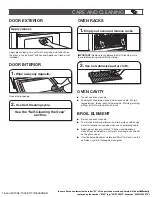
Page 31: ...ners To maintain optimal performance wipe surface with soapy water to remove soil residue when oven completely cools Apply glass cleaner or affresh Kitchen and Appliance cleaner not included to a soft...

Page 32: ...he oven door gasket The door gasket is essential for a good seal To Prepare Oven WARNING Burn Hazard Do not touch the oven during the Self Cleaning cycle Keep children away from oven during Self Clean...

Page 33: ...e the entire cooktop area may become hot To Stop Self Clean Any Time Move the Temperature Knob to OFF position to stop self clean If the oven temperature is too high the door will remain locked It wil...

Page 34: ...ont edge and pull away from the oven 3 Replace bulb Use a tissue or wear cotton gloves to handle the bulb To avoid damage or decreasing the life of the new bulb do not touch bulb with bare fingers 4 R...

Page 35: ...bottom straight sides and a well fitting lid The control knob is not set to the proper heat level Set the Cooktop Control to HI MED or LO depending upon the type of cooking you want to do The range is...

Page 36: ...while cooking Oven peeking releases oven heat and can result in longer cooking times Baked items are too brown on the top or bottom Move rack to a lower location to reduce top browning or to a higher...

Page 37: ...perience Center 553 Benson Road Benton Harbor MI 49022 2692 Please include a daytime phone number in your correspondence In Canada Call the JennAir Canada Customer eXperience Centre toll free 1 800 JE...

Page 38: ...venir causant des dommages au produit des blessures ou un d c s Ne pas entreposer ni utiliser de l essence ou d autres vapeurs ou liquides inflammables proximit de cet appareil ou de tout autre appare...

Page 39: ...OMPORTE DES ROULETTES POUR EN FACILITER LE D PLACEMENT POUR R DUIRE LE RISQUE DE BLESSURE LI AU BASCULEMENT DE L APPAREIL V RIFIER LA QUALIT DE LA R INSTALLATION DE LA CUISINI RE DANS LE DISPOSITIF AN...

Page 40: ...est chaud ne pas laisser les mitaines de four toucher l l ment chaud du four NE PAS TOUCHER LES L MENTS CHAUFFANTS OU LES SURFACES INT RIEURES DU FOUR Les l ments chauffants peuvent tre chauds m me s...

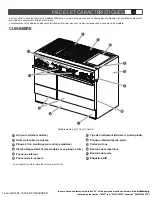
Page 41: ...s Plateau d gouttement sur mod les avec plaque frire Panneaux lat raux Panneau de la console 1 2 3 4 5 6 7 Tige de nivellement derri re le garde pieds Panneau inf rieur garde pieds Portes du four Bout...

Page 42: ...DU FOUR 1 1 2 3 4 5 Lampes halog ne l ments de cuisson au gril Capteur de la cavit du four Connecteur de la sonde thermom trique Ventilateurs de convection 1 2 3 4 5 REMARQUE La configuration les fonc...

Page 43: ...uton de lumi re du four D Bouton de mode E Bouton de temp rature F Bouton de mise en marche du four G Bouton de gril H Bouton arri re droit I Bouton avant droit 36 PO 91 4 CM REMARQUE La configuration...

Page 44: ...plaque frire 48 PO 121 9 CM REMARQUE La configuration les fonctions et les commandes de la table de cuisson peuvent tre diff rentes T moins lumineux D A C B E A T moin lumineux du bouton de mode B T m...

Page 45: ...n au four par convection r tissage par convection et cuisson au gril au gril par convection Appuyer sur le bouton de mise en marche pour confirmer le changement de mode T moins lumineux D A A B C C G...

Page 46: ...le r glage souhait T moin lumineux du bouton de temp rature Lorsqu une temp rature ou un r glage est s lectionn e et que le mode est valide les t moins de temp rature et de mode s illumineront en bla...

Page 47: ...e la lumi re Le bouton permet d allumer et d teindre la lumi re que la porte soit ouverte ou non T moin lumineux Wi Fi Le t moin lumineux Wi Fi s illumine en blanc lorsque la connexion Wi Fi avec l ap...

Page 48: ...t pas d clench ou si un fusible n est pas grill V rifier que le bouton de br leur est compl tement enfonc sur la tige de la soupape Si l allumeur ne fonctionne toujours pas appeler un technicien de r...

Page 49: ...leur 2 1 1 Flamme sup rieure principal 2 D bit thermique minimum flamme de mijotage Grand br leur GRIL sur certains mod les Le module du gril est constitu d une grille en fonte d un br leur d un d fl...

Page 50: ...a plaque frire et cuir jusqu la cuisson d sir e Utilisation 1 Mettre la hotte d vacuation au dessus de la cuisini re en marche 2 Pousser et tourner le bouton pour ALLUMER La flamme s allume en 1 4 sec...

Page 51: ...au gril par convection Appuyer sur le bouton de mise en marche pour confirmer le changement de mode T MOINS LUMINEUX Les t moins lumineux s illuminent et clignotent pour afficher l tat de l appareil...

Page 52: ...ur et Boutons de temp rature sur Wi Fi COMMENT METTRE EN MARCHE LE FOUR 1 R gler les boutons de mode et de temp rature sur la s lection souhait e REMARQUE Le bouton de mise en marche clignotera en bla...

Page 53: ...bouton de mise en marche pour lancer le programme Une s lection invalide du bouton de mise en marche a t effectu e Il y a une erreur avec l appareil Le pr chauffage est termin La minuterie de l applic...

Page 54: ...Fi 2 Trouvez le code SAID sur votre appareil Le code SAID peut tre balay ou saisi la main REMARQUE L tiquette SAID se trouve dans la partie inf rieure droite du panneau lat ral avant 3 Suivre les ins...

Page 55: ...rs du positionnement de grilles des niveaux adjacents commencer par installer la grille du bas Ustensiles de cuisson Pour cuire des aliments de fa on gale placer le plat au centre sous l l ment de cui...

Page 56: ...nuire ses facult s de glissement Voir la section Nettoyage g n ral pour plus de renseignements Lors du positionnement de grilles des niveaux adjacents commencer par installer la grille du bas puis pla...

Page 57: ...stant bien tendre l int rieur pr chauffer la l chefrite pendant 5 minutes et placer une grille en position 4 On doit cuire le 1er c t pendant environ 2 3 minutes La cuisson du deuxi me c t devrait pre...

Page 58: ...m pour en faciliter le nettoyage Enlever l exc s de graisse pour r duire les claboussures Entailler le gras r siduel sur les c t s pour viter que la viande ne se recroqueville Pendant la cuisson au gr...

Page 59: ...r convection et de cuisson au four s allument et s teignent par intermittence pour maintenir le four temp rature constante tandis que le ventilateur fait circuler l air chaud Il n est pas n cessaire d...

Page 60: ...temp rature de cuisson recommand e sur l emballage de 25 F 14 C La dur e de cuisson au four peut tre l g rement inf rieure celle qui est indiqu e sur l emballage selon le type de pizza La cuisson par...

Page 61: ...le four froid La dur e du r tissage peut n cessiter d tre r duite par rapport aux dur es du r tissage par convection ou de r tissage traditionnel Utiliser un thermom tre viande pour d terminer la cuis...

Page 62: ...mise en marche diff r e permet aux fours d tre programm s pour se mettre en marche une certaine heure et de cuire pendant une certaine dur e La mise en marche diff r e ne doit pas tre utilis e pour l...

Page 63: ...ur scell Contacter un technicien de r paration qualifi 3 Nettoyer les orifices de br leur obstru s Utiliser une pingle droite Ne pas agrandir ni d former l orifice Ne pas utiliser un cure dents en boi...

Page 64: ...fs ou autres accessoires de r curage pour nettoyer les parties du gril Grille Ne pas laver la grille du gril au lave vaisselle Ne pas la nettoyer dans un four autonettoyant D flecteur Plateau d goutte...

Page 65: ...RIRE Astuces Avant de nettoyer la plaque frire v rifier que tous les br leurs de la table de cuisson et du four sont teints et que les commandes du four sont plac es sur arr t Pour obtenir de bons r s...

Page 66: ...s ou de nettoyant pour four Afin d viter toute d t rioration ne pas laisser tremper les boutons de commande Lors de la r installation des boutons s assurer que chaque bouton est la position OFF arr t...

Page 67: ...nserver un rendement optimal essuyer la surface l aide d une eau savonneuse pour retirer les r sidus lorsque le four a enti rement refroidi Ajouter du nettoyant vitre ou du nettoyant pour cuisine et a...

Page 68: ...joint de la porte est essentiel pour une bonne tanch it Pr paration du four Risque de br lures Ne pas toucher le four au cours du programme d autonettoyage Garder les enfants loin du four au cours du...

Page 69: ...son peut devenir chaude Pour arr ter le programme d autonettoyage tout moment Placer le bouton de temp rature sur OFF arr t pour arr ter l autonettoyage Si la temp rature du four est trop lev e la por...

Page 70: ...nt et d gager du four 3 Remplacer l ampoule Utiliser un mouchoir de papier ou des gants de coton pour ma nipuler l ampoule Pour viter d endommager ou de r duire la long vit de l ampoule neuve ne pas t...

Page 71: ...3 cm hors de la zone de cuisson La cuisson ne produit pas les r sultats escompt s Le bon ustensile de cuisson n est pas utilis Utiliser des ustensiles de cuisson d un poids moyen lourd fabriqu s de ma...

Page 72: ...t pas r partie de fa on uniforme dans le plat S assurer que votre appareil et vos grilles sont de niveau et v rifier que la p te est de niveau dans le plat La dur e de cuisson utilis e n est pas appro...

Page 73: ...omer eXperience Center 553 Benson Road Benton Harbor MI 49022 2692 Veuillez indiquer dans votre correspondance un num ro de t l phone o l on peut vous joindre dans la journ e Au Canada Appelez sans fr...

Page 74: ...REMARQUES 16 Jan 2019 04 15 32 EST RELEASED In some European factories the letter W of the part code mentioned herein will be automatically replaced by the number 4000 e g W12345678 becomes 4000123456...

Page 75: ...REMARQUES 16 Jan 2019 04 15 32 EST RELEASED In some European factories the letter W of the part code mentioned herein will be automatically replaced by the number 4000 e g W12345678 becomes 4000123456...

Page 76: ...cense in Canada Tous droits r serv s Utilis sous licence au Canada 16 Jan 2019 04 15 32 EST RELEASED In some European factories the letter W of the part code mentioned herein will be automatically rep...

Reviews: