background image

29

Shelves, Bins, and Drawers

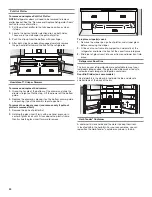
Fold-Away Glass Shelf

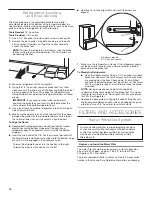
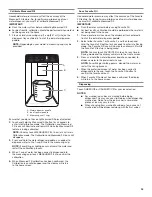
Some shelves will tuck away to create room for taller objects. 

Some models have 2 fold-away glass shelves.

1.

  To retract the front section of the shelf, push the adjustable 

portion of the shelf as far back as needed toward the rear of 

the refrigerator.

2.

  Extend the front glass and front trim of the shelf by pulling the 

retracted portion of the shelf outward until it is fully extended.

Important information to know about glass shelves 
and covers:

Do not clean glass shelves or covers with warm water when 
they are cold. Shelves and covers may break if exposed to 
sudden temperature changes or impact, such as bumping. 
Tempered glass is designed to shatter into many small, 
pebble-size pieces. This is normal. Glass shelves and covers 
are heavy. Use both hands when removing them to avoid 
dropping.

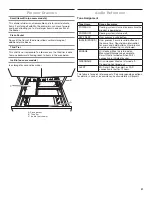
Shelves and Shelf Frames

The shelves in your refrigerator are adjustable to meet your 

individual storage needs.
Storing similar food items together in your refrigerator and 

adjusting the shelves to fit different heights of items will make 

finding the exact item you want easier. It will also reduce the 

amount of time the refrigerator door is open and save energy.

Shelf Height Adjustment

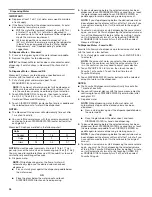
Shelf height can be adjusted by changing the adjustable shelf 

mounts between their vertical and horizontal positions. 

1.

  Carefully lift the shelf off the shelf mounts and turn the flipper 

to the desired orientation. 

2.

  Repeat for remaining shelf mounts. 

3.

   Apply pressure to the top of the shelf to ensure the shelf is 

properly seated on the shelf mounts.

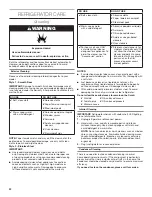
To remove and replace shelves:
1.

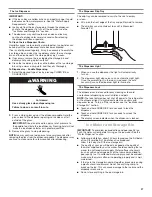
  Make sure adjustable shelf mounts are in the lower position 

before removing shelves. Also doors will need to be open at 

a 90˚ angle. If open wider, it will make it harder to remove the 

shelves.

2.

  Remove the middle shelf or top shelf by lifting it up and out  

of the shelf supports. Then pull the shelf forward and tilt down 

to a vertical position. Turn the shelf at an angle and pull out of 

the refrigerator.

NOTES: 


Will need to remove middle shelf first before removing  

top shelf. 


Infinity-slide glass shelves should be pushed back in.  

When tilted up, make sure glass does not slide to front.

3.

  Remove the bottom shelf by lifting it up and out of the  

shelf supports. Then pull the shelf forward and tilt up to a 

vertical position. Turn the shelf at an angle and pull out of  

the refrigerator.

4.

  Replace the middle and top shelves by putting the shelf in 

the refrigerator at an angle with the shelf front down. Lift the 

front of the shelf up and in until rear shelf drops into the shelf 

supports. Lower the front of the shelf and make sure that the 

shelf is in position.

5.

  Replace the bottom shelf by putting the shelf in the 

refrigerator at an angle with the shelf up. Lift the front of 

the shelf down and in until rear shelf drops into the shelf 

supports. Lower the front of the shelf and make sure that  

the shelf is in position.

Shelves with under-shelf lighting (on some models)

By moving LED lighting to a new spot under the shelves, this 

leading-edge technology improves interior refrigerator lighting  

and aids in locating storage items.

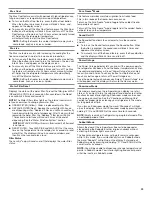
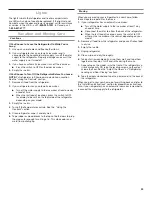
Wine Rack and/or Pan

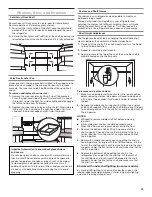
Under one shelf, there are brackets installed to the supports (one 

bracket on each support). The wine rack or pan rests in these 

brackets. The wine rack holds 2 bottles without taking up shelf 

space.

To remove and replace the wine rack:
1.

  Remove the wine rack/pan by lifting it up off the brackets. 

Press the right-hand side of the rack inward until it is free of 

its bracket. Lower the right-hand side slightly and disengage 

the left-hand side from its bracket.

2.

  Replace the wine rack/pan by inserting the left-hand side into 

its bracket. Press inward on the right-hand side until it will 

slide past the bracket edge and set it into its bracket.

Summary of Contents for JFFCC72EHL01

Page 1: ... privacy policy at www jennair com connect GUIDE D UTILISATION ET D ENTRETIEN Au Canada pour assistance installation ou service composez le 1 800 JENNAIR 1 800 536 6247 ou visitez notre site Web à www jennair ca JENNAIR FRENCH DOOR REFRIGERATOR RÉFRIGÉRATEUR JENNAIR AVEC PORTE À DOUBLE BATTANT Para obtener acceso a Instrucciones para el usuario del refrigerador en español o para obtener informació...

Page 2: ...PIÈCES ET CARACTÉRISTIQUES 47 Quoi de neuf en coulisse 48 POUR COMMENCER 49 CARACTÉRISTIQUES DE CONNEXION DU RÉFRIGÉRATEUR 50 CONFIGURATION DE LA CONNECTABILITÉ 51 INSTRUCTIONS D INSTALLATION 53 Déballage du réfrigérateur 53 Exigences d emplacement 53 Retrait et réinstallation des portes du réfrigérateur 54 Retrait et remplacement de l avant du tiroir de congélation 57 Spécifications électriques 5...

Page 3: ...your old refrigerator Use nonflammable cleaner Do not store or use petrol flammable liquids or gas in the vicinity of this or other electrical appliances The fumes can cause fires or explosions Do not store explosive substances such as aerosol cans with a flammable propellant in this refrigerator Do not use or place electrical devices inside the refrigerator compartments if they are not of the typ...

Page 4: ... sit for just a few days If you are getting rid of your old refrigerator please follow these instructions to help prevent accidents Before You Throw Away Your Old Refrigerator or Freezer Take off the doors Leave the shelves in place so that children may not easily climb inside Important information to know about disposal of refrigerants Dispose of refrigerator in accordance with Federal and Local ...

Page 5: ...ite items that are frequently filled like a coffee pot or a water bottle Fold Away Glass Shelf This special shelf provides a flexible storage option for tall items by allowing half the shelf to fold out of the way Pull Out Platter This full width slide out shelf is ideal for holding finished dishes waiting to be served or for ingredients needing more preparation Electronic Temperature Controlled P...

Page 6: ...ter filter cap with the cutout notch in the filter housing and insert filter Electrical Shock Hazard Plug into a grounded 3 prong outlet Do not remove ground prong Do not use an adapter Do not use an extension cord Failure to follow these instructions can result in death fire or electrical shock WARNING Once the filter is inserted turn the filter clockwise 90 1 4 turn until it locks into the housi...

Page 7: ...ality subject to change Subject to Terms of Service available at www jennair com connect Data rates may apply SMART FEATURES Smart Features help make your everyday a little more efficient by letting you remotely monitor manage and maintain your refrigerator Remote Temperature Control What it does Allows you to control your refrigerator remotely from your mobile device via the JennAir app What it d...

Page 8: ...atures for 24 hours Max Ice What it does Allows you to control your freezer remotely from your mobile device via the JennAir app What it does for you Lets you turn on off Max Ice remotely to increase ice production Reduces the set temperature to the lowest possible setting for 24 hours to maximize ice production Pure Freeze Mode Control What it does Allows you to receive status of your refrigerato...

Page 9: ...o repeat this connectivity set up process 4 Register your refrigerator in your user account NOTE If this is your first Smart Appliance you will need to download the JennAir app and create an online user account If you already have the app and a user account please skip ahead to Step 4 Register your refrigerator in your user account To disconnect Wi Fi press and hold Connect button between 7 and 15...

Page 10: ... breakfast type environments Catering and similar non retail applications To ensure proper ventilation for your refrigerator allow for a minimum 3 16 0 48 cm of space on each side and 1 4 0 64 cm at the top Allow for a minimum 1 2 54 cm space behind the refrigerator If your refrigerator has an ice maker allow extra space at the back for the water line connections When installing your refrigerator ...

Page 11: ...ove food and adjustable door or utility bins from doors Gather the required tools and read all instructions before removing doors TOOLS NEEDED Torx T25 screwdriver and a 2 Phillips screwdriver WARNING Electrical Shock Hazard Disconnect power before removing doors Failure to do so can result in death or electrical shock Water Dispenser Tubing Connection Wiring Plug Top Right Hinge Top Left Hinge A ...

Page 12: ...he hinge base is at a 90 angle to the bottom edge of the door A Hinge base turned to a 90 angle with the bottom edge of the door 5 Remove the hinge from the door Using a Torx T25 screwdriver reattach the bottom hinge to the refrigerator cabinet 6 The hinge is now reset and prepared for the door to be replaced See Replace Refrigerator Doors later in this section A B A 90 A Remove Refrigerator Doors...

Page 13: ... the left hand refrigerator door 3 Disconnect the wiring plug located on top of the door hinge Grasp each side of the wiring plug With your left thumb press down to release the catch and pull the sections of the plug apart NOTE Do not remove the green ground wire It should remain attached to the door hinge A Torx T25 screws B Ground wire Do not remove 4 Using the Torx T25 screwdriver remove the 2 ...

Page 14: ...e freezer drawer to its full extension 2 Loosen the 2 top screws that fasten the drawer front to the drawer glides The 2 screws 1 on the left hand side and 1 on the right hand side are located inside the drawer front 3 Remove the 2 screws at the bottom inside the drawer front that fasten the drawer front to the drawer glides 4 Lift up on the drawer front to release the screws from the drawer glide...

Page 15: ... pressure of the water supply coming out of a reverse osmosis system and supplying the water inlet valve of the refrigerator needs to be between 35 and 120 psi 241 and 827 kPa If a reverse osmosis water filtration system is connected to your home cold water supply the water pressure to the reverse osmosis system needs to be a minimum of 40 to 60 psi 276 to 414 kPa Check to see whether the sediment...

Page 16: ...d Allow 3 days to completely fill the ice storage bin Electrical Shock Hazard Plug into a grounded 3 prong outlet Do not remove ground prong Do not use an adapter Do not use an extension cord Failure to follow these instructions can result in death fire or electrical shock WARNING A B C D 3 Turn on water supply to refrigerator and check for leaks Correct any leaks 4 If ice is desired turn on the i...

Page 17: ...this extra tightening A Shoulder screw B Setscrews inside the handle 2 Firmly push the handle toward the drawer until the handle base is flush against the drawer 3 Insert the short end of the hex key into the left hand hole and slightly rotate the hex key until key is engaged in the setscrew 4 Using a left to right motion tighten the setscrew a quarter turn at a time just until setscrew begins to ...

Page 18: ...l the doors are aligned 3 Move the refrigerator to its final location 4 Using the 1 4 hex driver lower the brake feet Turn them clockwise until the rollers are off the floor and both brake feet are snug against the floor This keeps the refrigerator from rolling forward when opening the refrigerator doors or freezer drawer IMPORTANT If you need to make further adjustments involving the brake feet y...

Page 19: ...r Filter Status Lights The Water Filter status lights will help you know when to change your water filter The app will also send notifications to your mobile device and tell you the status of the JennAir app for the filter life ORDER FILTER yellow It is almost time to change the water filter Order Filter display is ON all of the time but OFF in Showroom mode and Sabbath mode REPLACE FILTER red Rep...

Page 20: ...erver can be installed in either the crisper or the refrigerated drawers CAUTION IRRITANT MAY IRRITATE EYES AND SKIN DANGEROUS FUMES FORM WHEN MIXED WITH OTHER PRODUCTS Do not mix with cleaning products containing ammonia bleach or acids Do not get in eyes on skin or clothing Do not breathe dust Keep out of reach of children FIRST AID TREATMENT Contains potassium permanganate If swallowed call a P...

Page 21: ... S A order Part W10355010 In Canada order Part W10355010B Water Filter In U S A order Part EDR2RXD1 In Canada order Part EDR2RXD1B Air Filter Order Part W10311524 or AIR1 Produce Preserver Starter kit Order Part P1KL6S1CS Produce Preserver Refill kit Order Part P1KC6R1 Herb Tender Container Order Part W10882409 REFRIGERATOR USE Opening and Closing Doors There are 2 refrigerator compartment doors T...

Page 22: ...e View Temperature Set Points 1 Touch for refrigerator or for freezer toggle through temperature set points NOTE To view temperature in degrees Celsius touch and hold the F C button for 3 seconds and the temperature display will change To return to Fahrenheit touch and hold F C for 3 seconds and the temperature display will change To activate Temperature mode for Pantry Drawer touch DRAWER and tog...

Page 23: ...countdown and then flash the icon and play a tone Filter Status The JennAir app will send an alert that displays the water filter status Pure Freeze Mode This feature minimizes moisture migration from frozen food This in turn reduces the freezer burn occurrence To turn on the Pure Freeze mode toggle to the coldest freezer temperature set point To turn off the Pure Freeze mode toggle from the colde...

Page 24: ...sing system forces air from the water line and filter and prepares the water filter for use Additional flushing may be required in some households NOTE As air is cleared from the system water may spurt out of the dispenser 1 Using a sturdy container depress and hold the water dispenser paddle for 5 seconds 2 Release the dispenser paddle for 5 seconds Repeat steps 1 and 2 until water begins to flow...

Page 25: ... confirmed the Calibration icon will disappear and the display will return to the home screen B A C Save Favorite Fill Household water pressure may affect the accuracy of the Favorite Fill feature So for optimum performance of your water dispenser you must first calibrate Measured Fill IMPORTANT Flush the water system before saving Favorite Fill For best results calibration should be performed whe...

Page 26: ...ing before the selected volume has been dispensed touch DISPENSE WATER a second time or touch the water dispenser paddle Touch DISPENSE WATER or paddle again to resume dispensing remaining amount NOTE If you stop dispensing before the desired volume has been dispensed the display will turn off after 1 minute If you have not resumed by then it will reset back to the original amount 6 To select a ne...

Page 27: ...arry to the sink to empty or clean Lift up on the front edge of the tray and pull forward to remove The drip tray can also slide out to assist in Measured Favorite Fill Calibration Door Ajar Replace Filter Order Filter a1 oz b1 L a2 oz b2 L a3 oz b3 L Dispense The Dispenser Light 1 When you use the dispenser the light will automatically turn on 2 The dispenser light also serves as an automatic nig...

Page 28: ...ely 3 2 lbs 1 5 kg of ice per day under normal operation To increase ice production select the Max Ice feature from the control panel The ice maker should produce approximately 4 2 lbs 1 9 kg of ice per day See the Using the Controls section Style 2 Ice Maker in the Freezer on some models Turn the Ice Maker On Off To turn the ice maker on touch Max Ice on the display on the left inner door panel T...

Page 29: ...lves 2 Remove the middle shelf or top shelf by lifting it up and out of the shelf supports Then pull the shelf forward and tilt down to a vertical position Turn the shelf at an angle and pull out of the refrigerator NOTES Will need to remove middle shelf first before removing top shelf Infinity slide glass shelves should be pushed back in When tilted up make sure glass does not slide to front 3 Re...

Page 30: ...move only if pull out platter is removed first 1 Remove the pull out platter first 2 Holding the glass insert firmly with one hand press up in center of glass insert until it rises above the plastic frame Gently slide the glass insert forward to remove To replace crisper s cover 1 Remove the crisper pan pull out platter and crisper glass before removing the crisper 2 Fit back of cover frame into s...

Page 31: ...eference Tone Assignment Tone Name Usage Examples POWER ON Cooling system is turned on every time the product is powered on POWER OFF Cooling system is turned off KEY PRESS User presses a valid button INVALID ERROR User presses 2 or more valid buttons at the same time Count down interruption for press and hold buttons User presses pad when dispensing is not allowed ENGAGE UI is locked Max Ice is t...

Page 32: ...cidic or vinegar based cleaners Oven cleaners For heavy soil use ONLY a stainless steel cleaner designed for appliances To order the cleaner see the Accessories section Stainless steel cleaner is for stainless steel parts only Do not allow the stainless steel cleaner and polish to come into contact with any plastic parts such as the trim pieces dispenser covers or door gaskets NOTES If unintention...

Page 33: ...rature controls See the Using the Controls section 5 Clean refrigerator wipe it and dry well 6 Tape rubber or wood blocks to the tops of both doors to prop them open far enough for air to get in This stops odor and mold from building up Moving When you are moving your refrigerator to a new home follow these steps to prepare it for the move 1 If your refrigerator has an automatic ice maker Turn off...

Page 34: ... may be necessary to install a Wi Fi range extender Wi Fi icon does not light at all after touching and holding CONNECT Something may be wrong with the refrigerator Unplug or disconnect refrigerator power for 30 seconds Return power Repeat Wi Fi connecting process Verify that the refrigerator operates correctly except for not being able to connect Call for possible additional troubleshooting Refri...

Page 35: ...ollowing installation for the refrigerator to cool completely NOTE Adjusting the temperature controls to the coldest setting will not cool either compartment more quickly Refrigerator control is in Showroom mode on some models If the refrigerator is in Showroom mode cooling is turned off and Showroom will be illuminated on the control panel See the Using the Controls section for more information T...

Page 36: ...r drawer is opened call for service or assistance Doors have been open longer than 10 minutes Close the doors and drawer to reset and open to resume lighted task The door switch is not sensing the door opening Ensure there are no magnets or electronic devices within 3 7 6 cm of the hinge cover The Temperature Controls UI does not turn on The door switch is not sensing the door opening Ensure there...

Page 37: ...djust the controls a setting colder Check the temperature in 24 hours See the Using the Controls section The door s are opened often or not closed completely Allows warm air to enter refrigerator Minimize door openings and keep doors fully closed A large load of food was recently added Allow several hours for refrigerator to return to normal temperature Temperature is too cold in the refrigerator ...

Page 38: ...y If it does not close completely see The doors will not close completely in this table A large amount of ice was recently removed Allow sufficient time for ice maker to produce more ice See the Ice Maker and Storage Bin section for ice production rates An ice cube is jammed in the ice maker Remove ice from the ice maker with a plastic utensil A water filter is installed on the refrigerator Remove...

Page 39: ...nd before using a new water filter See the Water and Ice Dispensers section for water filter flushing instructions The water filter needs to be replaced Replace the disposable water filter at least every 6 months or when indicated See the Water Filtration System section The water and ice dispenser will not operate properly The refrigerator is not connected to a water supply or the water supply shu...

Page 40: ...the ice delivery chute Switch from crushed ice to cubed ice to clear the ice dispenser Then switch back to crushed ice Water is leaking or dripping from the dispenser system NOTE A few drops of water after dispensing is normal The glass was not held under the dispenser long enough Hold the glass under the dispenser 2 to 3 seconds after releasing the dispenser lever Ice continues to flow from the d...

Page 41: ... do so can result in death explosion or fire To view an animation showing how to adjust and align the doors refer to the Product Help FAQ section of the brand website and search for Refrigerator Leveling and Door Closing First try the solutions suggested here or visit our website at www jennair custhelp com TROUBLESHOOTING If you experience Possible Causes Solution Ice and Water cont Crushed or cu...

Page 42: ... each antenna type indicated Antenna types not included in this list having a gain greater than the maximum gain indicated for that type are strictly prohibited for use with this device To comply with FCC and Industry Canada RF radiation exposure limits for general population the antenna s used for this transmitter must be installed such that a minimum separation distance of 20 cm is maintained be...

Page 43: ...15 All rights reserved The following statements refer to those portions of the software copyrighted by Swedish Institute of Computer Science Copyright c 2001 2004 Swedish Institute of Computer Science All rights reserved Redistribution and use in source and binary forms with or without modification are permitted provided that the following conditions are met 1 Redistributions of source code must r...

Page 44: ...nfection before or after the system Systems certified for cyst reduction may be used on disinfected waters that may contain filterable cysts EPA Est No 082047 TWN 001 Refer to the Warranty section in the User Instructions or User Guide for the Manufacturer s limited warranty name and telephone number Application Guidelines Water Supply Parameters System tested and certified by NSF International ag...

Page 45: ...the country in which it was purchased This limited warranty is effective from the date of original consumer purchase Proof of original purchase date is required to obtain service under this limited warranty 1 Commercial non residential multiple family use or use inconsistent with published user operator or installation instructions 2 In home instruction on how to use your product 3 Service to corr...

Reviews: