background image

Using The Remote Control

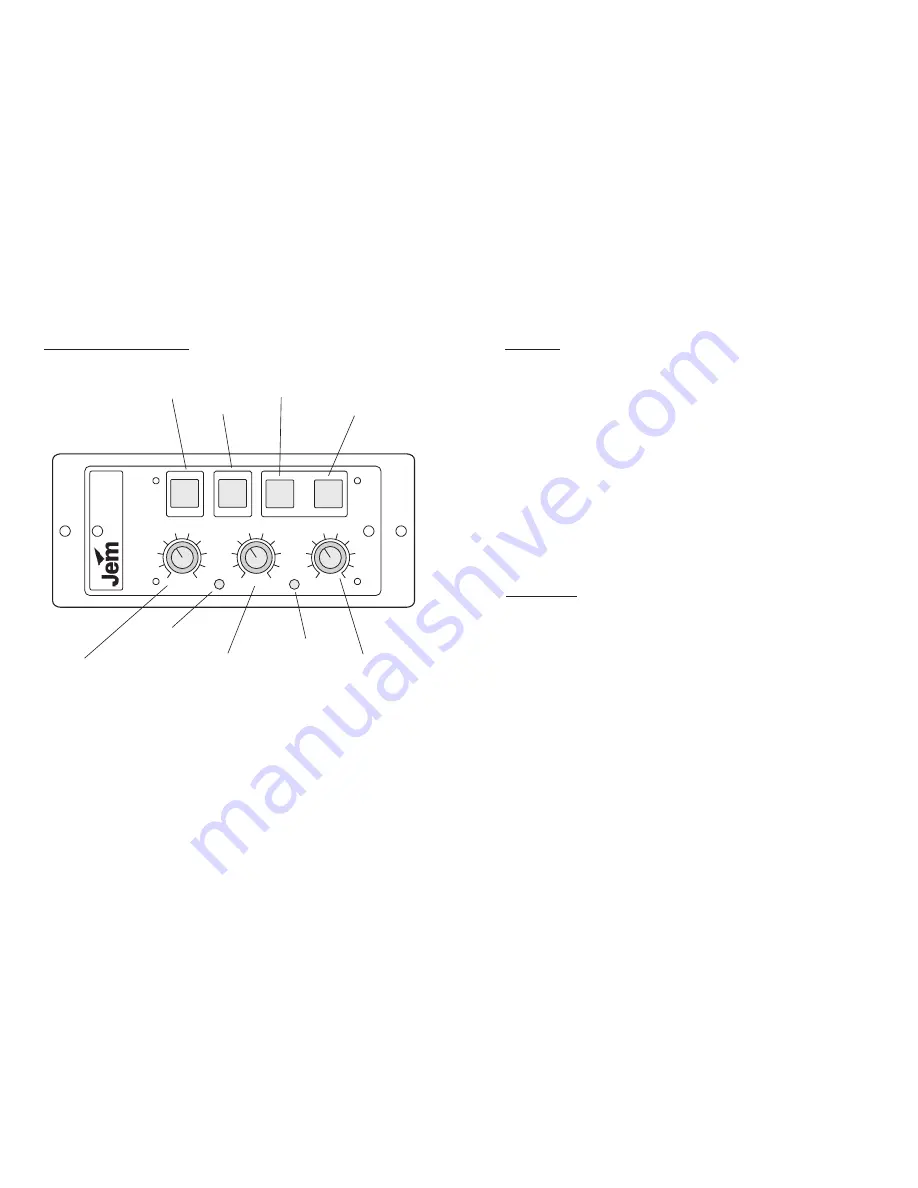
Fog Button

Stand-by Button

Timer Value Button

Timer Engage Button

Output Control

Power LED

Delay Time Control

Timer Cycle LED

Run Time Control

The

comes with a comprehensive controller that allows the

user to manually fire the machine or set a well featured timer to operate the

machine. When the “ready” LED is lit on the top of the machine, the remote

becomes functional and the “Fog” button will operate the machine when

pressed. Sometimes a pre-determined amount of smoke is needed and the

remote has a timer that will operate over a wide range of time

periods. The x8 timer value gives even greater flexibility when a longer

delay and run time are needed.

ZR12-AL

ZR12-AL

PAGE 6

MARTIN MANUFACTURING (UK) PLC

ON

TIMER

ON

1

1

1

2

2

2

3

3

3

4

4

4

5

5

5

6

6

6

7

7

7

8

8

8

9

9

9

POWER

CYCLE

MUL

TI-FUNCTION

CONTROLLER

OUTPUT

DELAY

RUN

FOG

x8

STAND-BY

ON

ZR12-AL USER GUIDE

Functions

FOG BUTTON: Will when the machine has reached operating temperature fire

the machine when pressed and held.

STAND-BY BUTTON: This turns the machines electronics on and off.

TIMER VALUE BUTTON: When the timer is being used, the timer values can be

adjusted by a factor of 8, i.e. a 5 second minimum run time becomes 40 seconds &

a 10 second delay time becomes 1 minute 20 seconds.

TIMER ENGAGE: This will engage the timer to fire the machine according to the

present settings.

OUTPUT CONTROL: Turning this knob clockwise will increase the output of the

machine, if turned fully anti-clockwise there will be no output.

DELAY TIME CONTROL: This will adjust the amount of time the machine waits

between operating when the timer is engaged.

RUN TIME CONTROL: This will adjust the time the machine will operate for

when the timer is engaged.

POWER LED: This LED will light when the machine is switched on

CYCLE LED: This LED will light when the timer is engaged and the machine is

operating.

Timer Values

Maximum = 18 seconds

Minimum = 2 seconds

Run Time: X1 mode

Maximum = 2 minutes 24 seconds

Minimum = 16 seconds

Run Time: X8 mode

Maximum = 18 seconds

Minimum = 2 seconds

Delay Time: X1 mode

Maximum = 2 minutes 24 seconds

Minimum = 16 seconds

Delay Time: X8 mode

An extension lead is available from JEM for using the controller out of

the machine.

PAGE 7

MARTIN MANUFACTURING (UK) PLC

ZR12-AL USER GUIDE

Summary of Contents for ZR12-AL

Page 1: ...ACTURED BY MARTIN MANUFACTURING UK PLC BELVOIR WAY FAIRFIELD INDUSTRIAL ESTATE LOUTH LINCOLNSHIRE LN11 0LQ TEL 01507 604399 FAX 01507 601956 ZR12 AL USER GUIDE VERSION 1 4 MARTIN MANUFACTURING UK PLC ZR12 AL ...

Page 2: ...as MARTIN MANUFACTURING UK PLC Fluids Suitable For This Machine Pro Smoke Super Regular DJ Pro Smoke High Density Pro Smoke Studio ZR12 AL USER GUIDE ZR12 AL USER GUIDE How To Contact Us MARTIN MANUFACTURING UK PLC Address Telephone Fax Email jem martin dk Website Http www jemsmoke com Martin Manufacturing uk Plc Belvoir Way Fairfield Industrial Estate Louth Lincolnshire LN11 0LQ 44 0 1507 604399 ...

Page 3: ...dify or change the specification of this product without prior notice No part of this publication shall be copied without permission Martin Manufacturing UK 1999 Introduction Safety Machine Layout Getting Started Using The Remote Control Using The Analogue Link The ZR12 AL Ducting Kit Trouble Shooting How To Contact Us ZR12 AL USER GUIDE ...

Page 4: ...ng A multi function controller enables the user to operate the machine manually using the FOG button or set the timer for auuotmatic operation The timer has a new feature called x8 mode this allows the timer values to be adjusted from x1 to x8 giving the user more variation in the timer settings There is also a ducting kit for applications where the effect is needed in an area away from the ZR12 F...

Page 5: ...ous and could cause damage to the machine Always check the voltage is correct for use with the machine the voltage setting is printed on the serial label Always read the user guide before operating the machine smoke machines need to be operated carefully to avoid risk Never touch the nozzle at the front of the machine the nozzle can stay hot for up to 10 hours Do not remove the cover or attempt to...

Page 6: ...uired This is done by using the JEM ducting adaptor and a length of 100 mm 4 ducting pipe The length can be anything from a couple of metres up to 20 metres or further There are one or two things to beware of when using smoke machines with ducting Firstly if there are bends to redirect the smoke they could cause condensation to form Also an air space must be provided between the output of the mach...

Page 7: ...t to the power supply and switch the mains switch on at the rear of the machine This will light when switched on now de press the grey stand by button the machine will now heat up which takes around 7 8 minutes While it heats up you should check the level in the fluid container the container can hold up to 2 5 litres of fluid NOTE Do not allow the to run out of fluid Serious damage may occur if th...

Page 8: ...urns the machines electronics on and off TIMER VALUE BUTTON When the timer is being used the timer values can be adjusted by a factor of 8 i e a 5 second minimum run time becomes 40 seconds a 10 second delay time becomes 1 minute 20 seconds TIMER ENGAGE This will engage the timer to fire the machine according to the present settings OUTPUT CONTROL Turning this knob clockwise will increase the outp...

Reviews: