background image

22

Storage and Transportation of the Generator

When transporting the generator, set the 3-in-1  
start switch to Off. Keep the generator level to  
prevent fuel spillage. 
•  Remove any debris that has collected on the 

generator and around the muffler and control 
panel. Use a brush or vacuum to remove dirt.

•  Inspect air cooling slots. Remove any debris.
•  For short-term storage, start the generator once 

every 7 days. 

•  For semi-long term storage, add fuel stabilizer 

to prevent stale fuel from causing acid and gum 
deposits in the fuel system and carburetor.

•  For long-term storage, drain the fuel.
•  Store indoors to prevent freezing of unit and use a  

protective cover to protect from dust. 

•  The generator must be shipped, run, and stored 

in the upright position. 

Engine Long Term Storage

•  Remove the spark plug and pour about 


1 teaspoon of 10W30 engine oil into the spark 
plug hole. Reinstall the spark plug. Turn fuel 
valve knob to the OFF position pull the recoil 
starter cord several times to coat the cylinder 
walls with oil.

•  Slowly pull the recoil starter cord until you feel 

the engine build compression (when you feel 
resistance). Leave the engine in this state as 
this will prevent corrosion on the cylinder walls 
when stored for a long period of time.

Transport & Storage

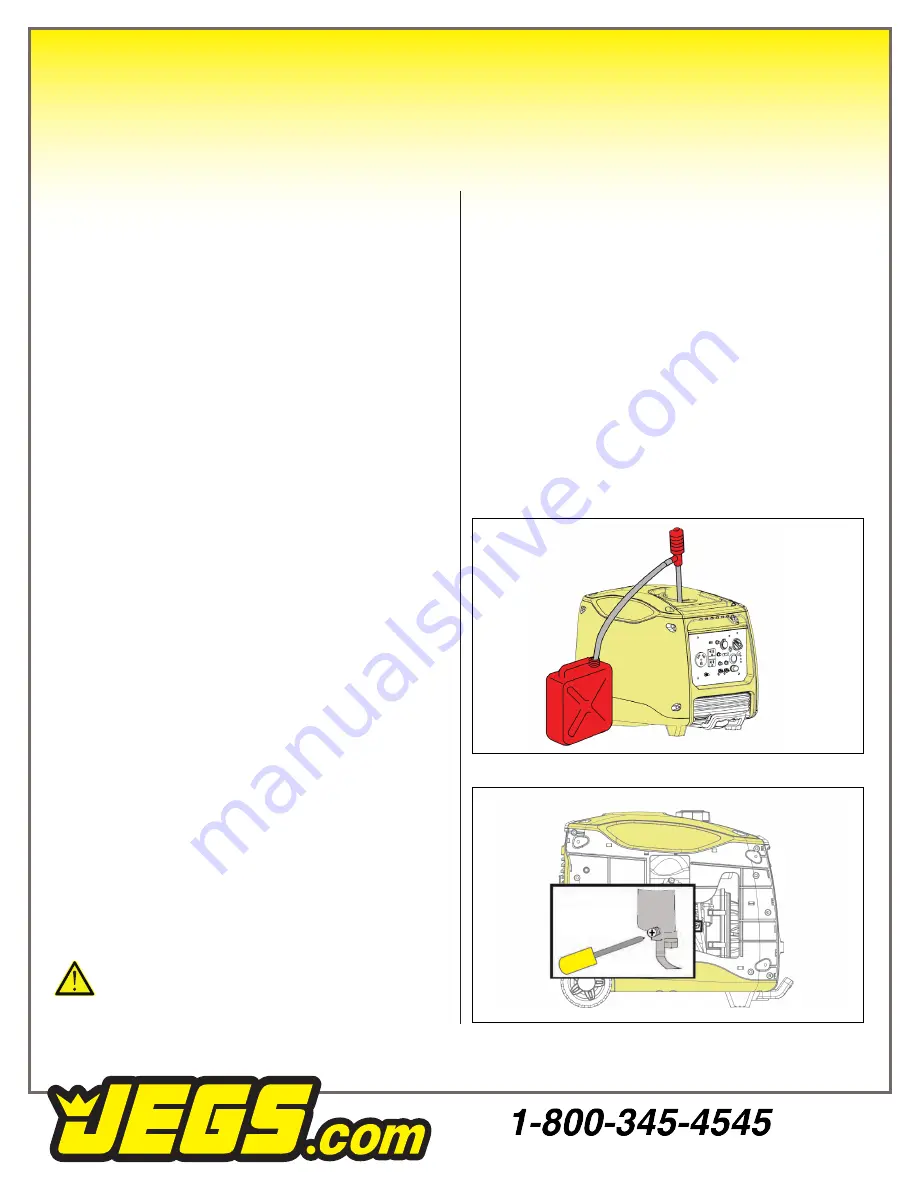
How to Drain Fuel

•  Turn OFF the engine, move the battery switch 

to OFF, turn the fuel valve to OPEN, remove the 
fuel cap and the debris screen underneath the 
fuel cap.

•  Empty the fuel tank using a siphon and an ap-

proved gasoline container.

•  Position a container under the carburetor drain 

tube. Loosen the drain valve screw.

•  Allow fuel to completely drain and re-tighten the 

drain valve screw.

•  Turn the fuel valve to CLOSED and replace the 

fuel cap.

Siphon

Carburetor
Drain Screw

Drain Tube

The drain tube is just used for drain fuel.

Summary of Contents for 86012

Page 1: ...User Guide for 86012 Inverter Generator 4500 Watt Rated 3700 Watt ...

Page 2: ...Building electrical system Adding Fuel 10 Battery Installation 11 Adding Checking Oil 11 Operation 12 17 How to Start Engine 12 How to Stop Engine 13 Pairing Remote Fob 13 Attaching Electronic Devices 14 Charging a 12 Volt Battery 14 AC Parallel Operation 15 Do Not Overload Generator 16 Wattage Reference Guide 17 Maintenance 18 21 Maintenance Schedule 18 Checking Spark Plug 19 Changing Oil 20 How ...

Page 3: ... Port Internal Battery Battery On Off Switch Start Indicator Economy Switch Fuel On Off Knob One Push Start Circuit Breaker Generator Status Light Carry Handles Recoil Handle Oil Access Cover Fuel Tank Cap Engine Service Panel Never Flat Wheels Telescoping Handle 6 7 8 9 15 16 17 18 19 20 21 22 10 3 4 5 11 12 13 14 1 2 3 4 5 6 7 8 9 10 11 12 13 14 15 16 17 18 19 20 21 22 ...

Page 4: ... system for this generator is compliant with all standards set by the US EPA Model Source 555 86012 Rated AC Voltage Rated Frequency AC Current Rated Output Maximum Output USB Outlet Cigarette Outlet Displacement Engine Type Engine Oil Type Engine Oil Capacity Fuel Tank Type AC Output DC Output Engine 120V 60Hz 20A 30A RV 3700W 4500W 5V DC 1 5A 12V DC 8A 224cc Single Cylinder 4 Stroke OHV Air Cool...

Page 5: ...d for carbon monoxide protection The engine exhaust contains chemicals that can cause cancer and birth defects To reduce the risk of serious injury use caution when lifting the generator Never exceed the generator s wattage amperage capacity This may damage the generator and or connected devices Never start or stop the engine with electrical devices plugged into the receptacles Failure to do so co...

Page 6: ...nit Only operate the generator on a level surface If connected to a structure connect the ground terminal to an appropriate ground This generator produces high voltage which may result in burns electrocution causing serious injury or death Never handle the generator electrical devices or any cord while standing in water while barefoot or when hands or feet are wet Always keep the generator dry Nev...

Page 7: ... or make adjustments to this unit while it is running Never insert objects into cooling slots Never operate this unit if there are any broken or missing parts Improper treatment of this generator can shorten it s life Always repair this unit as specified in this manual Shut generator off if electrical output is missing unit vibrates excessively or begins to smoke spark or emit flames Safety Rules ...

Page 8: ...matically The engine will not start until the proper amount of oil is in the crank case Engine Overload Indicator Light If the engine overload indicator light comes on the generator s wattage amperage capacity has been exceeded by connected electrical devices or by a power surge When this occurs the green AC Pilot Indicator Light will go off The engine will continue to run but the red Engine Overl...

Page 9: ...r back to the I position Engine Economy Control When the Engine Economy switch is turned to the ON position the economy control unit automatically determines the generator s proper Control Panel Functions Cont engine speed based on the connected electronic load This results in superior fuel economy and reduces noise When the Economy switch is turned to the OFF position the engine runs at the rated...

Page 10: ...ctor where a grounding electrode system is required by NEC Article 250 34 A The equipment grounding conductors of the generator receptacles are bonded to the generator s frame Where the generator supplies power to cord and plug connected equipment like power tools the frame of the generator is not required by the NEC to be connected to an earthen ground electrode The generator neutral conductor is...

Page 11: ... comply with all electrical codes and applicable laws Never directly connect the generator to a household power source Adding Fuel Set generator outdoors in a well ventilated area away from structures and people Slowly remove fuel cap Insert a funnel into the fuel tank and carefully pour gasoline into the tank until fuel level reaches 1 inches below the top of the neck Be careful not to overfill t...

Page 12: ...ck clean then reinsert dipstick without re threading Specifications Recommended Oil SAE 10W 30 Oil Capacity 20 2 oz 0 6 L This generator has been shipped without engine oil You must add oil before operating this unit Always check the oil level before each use 11 Battery Installation 1 Loosen four Phillips screws but do not remove them from the side panel 2 Carefully lift all four edges of the side...

Page 13: ...ds MUST be disconnected from generator Battery ON OFF Switched to ON position Turn the FUEL VALVE Knob to ON Push Button Start Push and hold down the Start Button for no more than 1 second and then release This will tell the generator to automatically set the choke and begin the starting sequence If it fails to start successfully repeat this step If it fails to start after 5 attempts refer to the ...

Page 14: ...for the start light on the control panel to flash green Within 3 seconds press any button on the remote FOB for about 1 second and release Make sure the green light has stopped flashing to indicate successful pairing How to Stop the Engine Turn the FUEL VALVE Knob to the OFF position Disconnect any electrical devices All loads MUST be disconnected from the generator Never start or stop the engine ...

Page 15: ...ot indicator light is on 5 When the engine has stabilized plug in and turn on first load It is strongly recommended to plug in devices with the largest output first and the smallest output last to help prevent overloading the generator 6 Allow generator output to stabilize engine and attached devices run evenly before plugging in the next load Charging a 12 Volt Battery This generator can be used ...

Page 16: ...n first load Operation Cont Allow generator output to stabilize after the first electrical device is added to an AC receptacle on the parallel cable kit before plugging in the next electrical load Limit start up time to 3 seconds for load requiring maximum output For continuous operation do not exceed the rated output Note It is strongly recommended to plug in devices with the largest electrical d...

Page 17: ...r to the power a generator must supply to start an electrical device This power surge for starting a device usually lasts between 2 3 seconds but this additional output must be considered when selecting the electrical devices you plan to attach to the generator Operating voltage and frequency requirement of all electrical equipment should be verified prior to plug ging them into this generator Dam...

Page 18: ...1500 1500 1500 3500 4000 1200 1150 700 5400 1250 1000 Surge Watts 75 ea 2200 2350 2000 3000 800 300 3600 6000 400 1800 900 1000 1500 1500 2000 3500 4000 1200 2400 1500 6750 1250 1000 Family Room X Box or PlayStation AM FM Radio DVD TV or Monitor 40 in Home Office Fax Machine Computer Printer Copy Machine Power Tools 1000W Work Light Airless Sprayer 1 3 hp Reciprocating Saw Circular Saw 7 1 2 in Mi...

Page 19: ...nit in a clean and dry area Before inspecting or servicing this machine make sure the engine is off and no parts are moving Disconnect the spark plug wire and move it away from the spark plug Carburetor Adjustment The carburetor is low emission and is equipped with a non adjustable idle mixture valve After 8 Hours or Daily After first 5 Hours Annually 25 hr Usage Annually 100 hr Usage Clean debris...

Page 20: ...ench through the opening on the outside of the cover Turn the wrench counter clockwise to loosen and remove spark plug Check for discoloration and clean carbon deposits from the electrode with a wire brush Check the electrode gap and slowly adjust to 0 024 0 028 in 0 6 0 7mm if necessary Reinstall spark plug and tighten to 15 ft lbs 20 0Nm of torque If spark plug is worn replace only with an equiv...

Page 21: ...ions Do not use special additives Outdoor temperatures determine the proper oil viscosity for the engine Use the chart to select the best viscosity for the outdoor temperature range expected Do not tilt generator when adding oil This could result in overfilling which could damage the engine Make sure no foreign matter enters the crankcase Air Filter A dirty air filter will reduce the lifespan of t...

Page 22: ...amage If damaged replace with parts specifically designed for this unit Install spark arrester Align the spark arrester projection with hole in the muffler pipe Install the muffler screen and muffler cap Install the outer casing and tighten the screws Avoid contacting hot areas with this unit Use caution around the muffler cylinder and other engine parts as they can be extremely hot Allow hot comp...

Page 23: ...pour about 1 teaspoon of 10W30 engine oil into the spark plug hole Reinstall the spark plug Turn fuel valve knob to the OFF position pull the recoil starter cord several times to coat the cylinder walls with oil Slowly pull the recoil starter cord until you feel the engine build compression when you feel resistance Leave the engine in this state as this will prevent corrosion on the cylinder walls...

Page 24: ...16 3 Clean or replace fuel filter 4 Contact tech sales 5 See above solution 4 1 On Off switch set to Off 2 Dirty air filter 3 Clogged fuel filter 4 Out of fuel or stale fuel 5 Spark plug wire disconnected from spark plug 6 Bad spark plug 7 Water in fuel 8 Fuel knob on Off position 9 Low oil level 10 Engine has flooded 1 Turn switch to On 2 Clean or replace air filter 3 Clean or replace fuel filter...

Page 25: ...Wiring Diagram 24 ...

Reviews: