background image

245

Once Android Auto™ is up and running on your


Uconnect system, the following features can be


utilized using your smartphone’s data plan:

Google Maps™ for navigation

Google Play Music, Spotify, iHeart Radio,


etc. for music

Hands-free calling and texting for communica

-

tion

Hundreds of compatible apps and many more!

NOTE:


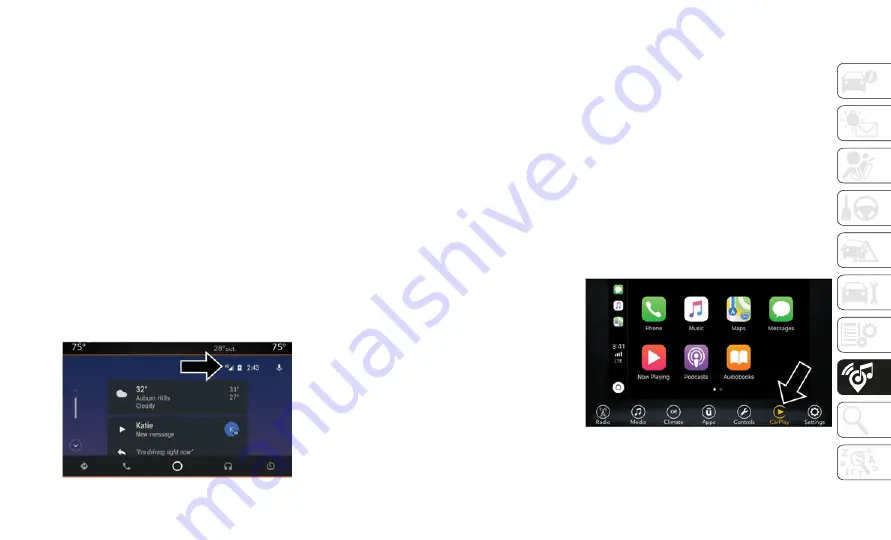
To use Android Auto™, make sure you are in an


area  with  cellular  coverage.  Android  Auto™


may  use  cellular  data,  and  your  cellular


coverage is shown in the upper right corner of


the  radio  screen.  Once  Android  Auto™  has


made  a  connection  through  USB,  Android


Auto™ will also connect via Bluetooth®.

Google Maps™ Data And Cellular Coverage

NOTE:


Requires  compatible  smartphone  running


Android™ 5.0 (Lollipop) or higher and down

-

load app on Google Play. Android™, Android


Auto™  and  Google  Play  are  trademarks  of


Google Inc.

Apple CarPlay® Integration — If Equipped

NOTE:


Feature availability depends on your carrier


and  mobile  phone  manufacturer.  Some


Apple CarPlay® features may or may not be


available in every region and/or language.

Uconnect  works  seamlessly  with  Apple


CarPlay®,  the  smarter,  more  secure way  to


use  your  iPhone®  in  the  car,  and  stay


focused  on  the  road.  Use  your  Uconnect


touchscreen display, the vehicle's knobs and


controls,  and  your  voice  with  Siri  to  get


access  to  Apple  Music®,  Maps,  Messages,


and more.

To  use Apple  CarPlay®, make sure  you  are


using iPhone® 5 or later, have Siri enabled


in  Settings,  that  your  iPhone®  is  unlocked


for  the  very first  connection  only, and  then


use the following procedure:

1. Connect  your  iPhone®  to  one  of  the


media USB ports in your vehicle.

NOTE:


Be sure to use the factory-provided Lightning


cable  that  came  with  your  phone,  as after

-

market cables may not work.

2. Once the device is connected and recog

-

nized, Apple CarPlay® should automati

-

cally launch, but you can also launch it


by touching the Apple CarPlay® icon on


the touchscreen, located under Apps.

Apple CarPlay®

Summary of Contents for Gladiator 2020

Page 1: ...2020 GLADIATOR USER GUIDE ALL NEW...

Page 2: ...attention off the road Use of any electrical devices such as cellular telephones computers portable radios vehicle navigation or other devices by the driver while the vehicle is moving is dangerous an...

Page 3: ...ost things you will need to operate and maintain the vehicle including emer gency information When it comes to service remember that an authorized dealer knows your Jeep vehicle best has factory train...

Page 4: ...nd clearance and a higher center of gravity than many passenger vehicles It is capable of performing better in a wide variety of off road applications Driven in an unsafe manner all vehicles can go ou...

Page 5: ...TING TO KNOW YOUR VEHICLE GETTING TO KNOW YOUR INSTRUMENT PANEL SAFETY STARTING AND OPERATING IN CASE OF EMERGENCY SERVICING AND MAINTENANCE TECHNICAL SPECIFICATIONS MULTIMEDIA CUSTOMER ASSISTANCE IND...

Page 6: ...lding Rear Seat 24 HEAD RESTRAINTS 25 Front Head Restraints 26 Rear Head Restraints 26 STEERING WHEEL 27 Tilt Telescoping Steering Column 27 Heated Steering Wheel If Equipped 28 EXTERIOR LIGHTS 28 Hea...

Page 7: ...AND MESSAGES 61 Red Warning Lights 61 Yellow Warning Lights 64 Yellow Indicator Lights 67 Green Indicator Lights 68 White Indicator Lights 69 Gray Indicator Lights 69 Blue Indicator Lights 69 ONBOARD...

Page 8: ...ION IF EQUIPPED 146 Automatic Mode 147 Possible Reasons The Engine Does Not Autostop 147 To Start The Engine While In Autostop Mode 148 To Manually Turn Off The Stop Start System 148 To Manually Turn...

Page 9: ...P STARTING 191 Preparations For Jump Start 191 Jump Starting Procedure 193 IF YOUR ENGINE OVERHEATS 194 MANUAL PARK RELEASE 195 FREEING A STUCK VEHICLE 196 TOWING A DISABLED VEHICLE 197 Four Wheel Dri...

Page 10: ...WITH 7 INCH DISPLAY 241 Uconnect 4 At A Glance 241 Drag Drop Menu Bar 243 Radio 243 Android Auto If Equipped 244 Apple CarPlay Integration If Equipped 245 UCONNECT 4C 4C NAV WITH 8 4 INCH DISPLAY 246...

Page 11: ...eply 280 Climate 281 Navigation 4C NAV If Equipped 281 SiriusXM Guardian 4C 4C NAV If Equipped 282 Register 4C 4C NAV 282 Vehicle Health Report Alert 4C 4C NAV 283 Mobile App 4C 4C NAV 283 SiriusXM Tr...

Page 12: ...ush and release the key fob unlock button once to unlock the driver s door only or twice to unlock all the doors and tailgate This setting is adjustable through the Uconnect Settings When the key fob...

Page 13: ...conforme aux CNR d Innovation Science and Economic Devel opment applicables aux appareils radio exempts de licence L exploitation est autoris e aux deux conditions suivantes 1 l appareil ne doit pas...

Page 14: ...n the Owner s Manual for further information WARNING When exiting the vehicle always remove the key fob from the vehicle and lock your vehicle Never leave children alone in a vehicle or with access to...

Page 15: ...ol System heated seats if equipped and heated steering wheel if equipped in temperatures below 40 F 4 4 C Refer to those sections in Getting To Know Your Vehicle in the Owner s Manual for further info...

Page 16: ...ration is subject to the following two conditions 1 This device may not cause harmful inter ference and 2 This device must accept any interference received including interference that may cause undesi...

Page 17: ...tion Push the lock button on the key fob 3 If any doors are open close them NOTE The Vehicle Security Alarm will not arm if you lock the doors using the manual door lock To Disarm The System The Vehic...

Page 18: ...been raining snowing on the Passive Entry door handle the unlock sensitivity can be affected resulting in a slower response time If the vehicle is unlocked by Passive Entry and no door is opened withi...

Page 19: ...a Passive Entry key fob inside the vehicle the vehicle will unlock and alert the customer If Passive Entry is disabled using the Uconnect system the key protection described in this section remains a...

Page 20: ...must accept any interference received including interference that may cause undesired operation Le pr sent appareil est conforme aux CNR d Innovation Science and Economic Devel opment applicables aux...

Page 21: ...el by sliding the plastic panel along the door frame toward the seats until the tabs are detached Wiring Access Door NOTE Do not force open this will break the plastic cover WARNING All occupants must...

Page 22: ...oor 7 With the door in the open position remove the check bolt from the door check attachment on the bodyside using a T40 Torx head driver Door Check 8 With the door open lift the door with the help o...

Page 23: ...with the doors removed as you will lose the protection they can provide This procedure is furnished for use during off road operation only WARNING All occupants must wear seat belts during off road op...

Page 24: ...n guiding the door into place when reinstalling When reinstalling the check arm attachment bolt bolt torque should be between 11 76 ft lb 16 N m and 27 9 ft lb 38 N m SEATS Seats are a part of the Occ...

Page 25: ...sting the seat while driving may be dangerous Moving a seat while driving could result in loss of control which could cause a collision and serious injury or death Seats should be adjusted before fast...

Page 26: ...tion using the vehicle key Each seatback must be unlocked to release for folding Release Strap Locations Rear Seat Folded Flat To raise the seatback to the proper position manually lift the seatback u...

Page 27: ...ws 1 Lift upward on each section of the seat bottom Lift From Beneath Seat Left Side Shown 2 Raise the seat bottom upward into the Stadium Position Stadium Position To return the seat bottom to the no...

Page 28: ...r seat is equipped with nonadjust able but foldable outboard head restraints as well as an adjustable removable center head restraint WARNING All occupants including the driver should not operate a ve...

Page 29: ...NOTE Lower the center head restraint to avoid contact with the center console when folding the seat down STEERING WHEEL Tilt Telescoping Steering Column The Tilt Telescoping Steering Column feature al...

Page 30: ...e Start On models that are equipped with remote start the heated steering wheel can be programmed to come on during a remote start This feature can be programmed through the Uconnect system Refer to U...

Page 31: ...se it is recommended to use the low beam headlights to reduce glare to other vehicles With the headlight switch activated push the Multifunction Lever toward the instru ment panel to switch the headli...

Page 32: ...a very fast flash rate check for a defective outside light bulb If an indicator fails to light when the lever is moved it would suggest that the indicator bulb is defective Lights On Reminder The Lig...

Page 33: ...tion the wipers will operate for two or three wipe cycles Then the wipers will turn off Mist Feature Push upward on the wiper lever to activate a single wipe to clear off road mist or spray from a pas...

Page 34: ...mate Controls system is designed to make the vehicle feel comfortable in all types of weather The Automatic Climate Controls system allows you to adjust heat and air conditioning settings by pressing...

Page 35: ...4C 4C NAV With 8 4 inch Display Automatic Climate Controls Specific instructions on how to adjust the heat and air conditioning settings are detailed in the following Automatic Climate Control Descrip...

Page 36: ...mode and outside air mode Recirculation can be used when outside conditions such as smoke odors dust or high humidity are present Recirculation can be used in all modes Recirculation may be unavailab...

Page 37: ...rear window defroster is on The rear window defroster automatically turns off after 10 minutes Driver And Passenger Temperature Up And Down Buttons Provides the driver and passenger with independent t...

Page 38: ...Control Press the button to adjust airflow distribution The airflow distribution mode can be adjusted so air comes from the instrument panel outlets floor outlets defrost outlets and demist outlets P...

Page 39: ...lower than expected check the front of the A C condenser located in front of the radi ator for an accumulation of dirt or insects Clean with a gentle water spray from the front of the radiator and thr...

Page 40: ...tempera ture settings for cold or hot vehicles The system automatically adjusts the tempera ture mode and blower speed to provide comfort as quickly as possible The temperature can be displayed in U...

Page 41: ...convenience a tool kit is provided with your vehicle located in the center console This kit includes the necessary tools required for the operations described in the following sections All pieces fit...

Page 42: ...ner Pull outward to disengage completely from its retainer at the door frame 3 Pull the assembly up and out from the bottom and then down and away from the vehicle to remove Repeat on other side Rear...

Page 43: ...oward the front of the vehicle guiding the top into the closed position 3 From inside the vehicle pull the handle on the header latch downward to engage the hook into its receiver Then pull the handle...

Page 44: ...ft side panel one at the front the rear and outside unlocking them from the roof Roof Panel Lock Locations 3 Unlatch the left side header panel latch located at the top of the windshield 4 Remove the...

Page 45: ...rearward of the back doors using the 50 Torx head driver 6 Also remove the four Torx head screws that secure the hard top to the back of the cab of the vehicle using the 50 Torx head driver Rear Faste...

Page 46: ...resulting from both tops being installed at the same time For complete owner information refer to your Owner s Manual for further details CAUTION The front panel s must be positioned properly to ensur...

Page 47: ...tches TAILGATE Opening Tailgate Release Handle To open the tailgate pull the release handle located on the center of the tailgate and guide it to the lowered position The tailgate is dampened to provi...

Page 48: ...nd the tail gate 2 NOTE Failure to support the load at these two forward locations could result in damage Three 2x4 boards are needed to provide support at locations 1 and 2 Each board will need to be...

Page 49: ...eLink button Before You Begin Programming HomeLink For more efficient programming and accu rate transmission of the radio frequency signal it is recommended that a new battery be placed in the hand he...

Page 50: ...steps below NOTE All HomeLink buttons are programmed using this procedure You do not need to erase all channels when programming addi tional buttons 1 Place the ignition switch into the ON RUN positio...

Page 51: ...o this Canadian law some U S gate operators are designed to time out in the same manner The procedure may need to be preformed multiple times to successfully pair the device to your HomeLink buttons R...

Page 52: ...iones 1 es posible que este equipo o dispositivo no cause interferencia perjudicial y 2 este equipo o dispositivo debe aceptar cualquier interferencia incluyendo la que pueda causar su operaci n no de...

Page 53: ...death Do not insert any objects into the recep tacles Do not touch with wet hands Close the lid when not in use If this outlet is mishandled it may cause an electric shock and failure CAUTION Many acc...

Page 54: ...ry Switches If Equipped Four auxiliary switches are located in the lower switch bank of the instrument panel and can be used to power various electrical devices The functionality of the auxiliary swit...

Page 55: ...of splices and heat shrink tubing are provided with the auxiliary switches to aid in the connection installation of your electrical devices Wire Color Chart Circuit Function Fuse Wire Color Locations...

Page 56: ...e utility rail cleat is seated in the detent and tighten the nut To remove the utlity rail cleats from the utility rail remove the screw located in the center of rail s end cap using a T30 Torx head d...

Page 57: ...en the tailgate to access the red Tonneau Cover release straps Release Strap Location 2 Pull one of the red release straps to disengage the rear locking mechanism NOTE Pulling either strap will releas...

Page 58: ...nneau Cover Installation To Install the Tonneau Cover proceed as follows 1 Position the rolled up Tonneau Cover on the truck bed and align it to the two fastener locations at the front of the bed Fast...

Page 59: ...E Make sure an audible click from both sides of the Tonneau Cover are heard to confirm that the latch is completely engaged Push Downward To Lock NOTE If desired the Tonneau Cover can be left in this...

Page 60: ...ff the vehicle particularly at high speeds resulting in personal injury or property damage Follow the roof rack cautions when carrying cargo on your roof rack CAUTION To avoid damage to the roof rack...

Page 61: ...stments Instrument Cluster Display Location And Controls The Instrument Cluster Display is located in the center of the instrument cluster 3 5 Inch Instrument Cluster Display Location 7 0 Inch Instrum...

Page 62: ...le Unless reset this message will continue to display each time you place the ignition in the ON RUN position To turn off the message temporarily push and release the OK button To reset the oil change...

Page 63: ...ssible Brake Warning Light This warning light monitors various brake functions including brake fluid level and parking brake application If the brake light turns on it may indicate that the parking br...

Page 64: ...ight This indicator will illuminate when a door is ajar open and not fully closed NOTE If the vehicle is moving there will also be a single chime Electric Power Steering Fault Warning Light This warni...

Page 65: ...will illuminate to indicate low engine oil pressure If the light turns on while driving stop the vehicle shut off the engine as soon as possible and contact an authorized dealer A chime will sound whe...

Page 66: ...If the ESC Indicator Light comes on continuously with the engine running a malfunction has been detected in the ESC system If this warning light remains on after several ignition cycles and the vehicl...

Page 67: ...ice is required It is recom mended you drive to the nearest service center and have the vehicle serviced imme diately Service Forward Collision Warning FCW Light If Equipped This warning light will il...

Page 68: ...can lead to tire failure Under inflation also reduces fuel efficiency and tire tread life and may affect the vehicle s handling and stopping ability Please note that the TPMS is not a substitute for...

Page 69: ...xle Lock Indicator Light This light indicates when the front rear or both axles have been locked The telltale will display the lock icon on the front and rear axles to indicate the current lock status...

Page 70: ...d rear axles as needed This will provide maximum traction in dry and slippery condi tions Cruise Control SET Indicator Light If Equipped With A Premium Instrument Cluster This indicator light will ill...

Page 71: ...e button on the instrument panel NOTE If the vehicle is not in Four Wheel Drive Low 4WD 4L To Enter Selec Speed Shift to 4WD Low will appear in the instrument cluster display Gray Indicator Lights Cru...

Page 72: ...ight MIL is func tioning and is not on when the engine is running and that the OBD II system is ready for testing Normally the OBD II system will be ready The OBD II system may not be ready if your ve...

Page 73: ...em is not ready and you should not proceed to the I M station The MIL will not flash at all and will remain fully illuminated until you place the ignition in the off position or start the engine This...

Page 74: ...S is designed to function with the Original Equipment Manufacturer OEM tires Modi fication may result in degraded ABS perfor mance WARNING The ABS contains sophisticated elec tronic equipment that may...

Page 75: ...ze the vehicle s braking capability during emergency braking maneuvers The system detects an emergency braking situa tion by sensing the rate and amount of brake application and then applies optimum p...

Page 76: ...ng or understeering of the vehicle by applying the brake of the appropriate wheel s to assist in counteracting the oversteer or understeer condition Engine power may also be reduced to help the vehicl...

Page 77: ...G Electronic Stability Control ESC cannot prevent the natural laws of physics from acting on the vehicle nor can it increase the traction afforded by prevailing road conditions ESC cannot prevent acci...

Page 78: ...cted The ESC Activation Malfunction Indicator Light located in the instrument cluster starts to flash as soon as the tires lose trac tion and the ESC system becomes active The ESC Activation Malfuncti...

Page 79: ...n the door must be closed If the doors are detached then the driver s seatbelt must be buckled The vehicle must be on a sufficient grade The gear selection must match vehicle uphill direction i e vehi...

Page 80: ...ottle application 3 Active feature is enabled and actively controlling vehicle speed Enabling SSC SSC is enabled by pushing the SSC switch but the following conditions must also be met to enable SSC T...

Page 81: ...g level of aggressive ness Driver Override The driver may override SSC activation with throttle or brake application at any time Deactivating SSC SSC will be deactivated but remain available if any of...

Page 82: ...ntrol System TCS monitors the amount of wheel spin of each of the driven wheels If wheel spin is detected the TCS may apply brake pressure to the spin ning wheel s and or reduce engine power to provid...

Page 83: ...of the side mirror Warning Indicator lamps when a motorcycle or any small object remains at the side of the vehicle for extended periods of time more than a couple of seconds The area on the tailligh...

Page 84: ...er is alerted using both the visual and audible alarms including reducing the radio volume Modes Of Operation Three selectable modes of operation are available in the Uconnect System Refer to Uconnect...

Page 85: ...vehicle This device complies with Part 15 of the FCC Rules and with Innovation Science and Economic Development Canada license exempt RSS standard s Operation is subject to the following two condition...

Page 86: ...ce L exploitation est autoris e aux deux conditions suivantes 1 l appareil ne doit pas produire de brouil lage et 2 l utilisateur de l appareil doit accepter tout brouillage radio lectrique subi m me...

Page 87: ...he vehicle may need to be driven for up to 20 minutes above 15 mph 24 km h in order for the TPMS to receive this informa tion For example your vehicle may have a recommended cold parked for more than...

Page 88: ...essure levels Sensors mounted to each wheel as part of the valve stem transmit tire pressure readings to the receiver module Tire Pressure Monitoring Display NOTE It is particularly important for you...

Page 89: ...RE SYSTEM message for a minimum of five seconds and then display dashes in place of the pres sure value to indicate which sensor is not being received If the ignition is cycled this sequence will repe...

Page 90: ...a low pressure road tire the next ignition switch cycle will still show the TPMS Warning Light to be on a chime to sound an Inflate to XX message to appear in the instrument cluster and the graphic di...

Page 91: ...values Up to two sets of preset pressure values can be stored in the Uconnect System for the front and rear axle Once you select the tire pres sures for the front and rear axles that you want to infla...

Page 92: ...displayed as long as no system fault exists General Information The following regulatory statement applies to all Radio Frequency RF devices equipped in this vehicle This device complies with Part 15...

Page 93: ...n this section for further information 3 If a child from 2 to 12 years old not in a rear facing child restraint must ride in the front passenger seat move the seat as far back as possible and use the...

Page 94: ...will turn on and remain on until both outboard front seat belts are buckled The outboard front passenger seat BeltAlert is not active when an outboard front passenger seat is unoccu pied BeltAlert Wa...

Page 95: ...n a collision The air bags work with your seat belt to restrain you properly In some collisions the air bags won t deploy at all Always wear your seat belt even though you have air bags In a collision...

Page 96: ...The lap portion could ride too high on your body possibly causing internal injuries Always buckle your seat belt into the buckle nearest you A seat belt that is too loose will not protect you properly...

Page 97: ...r will withdraw any slack in the shoulder belt 6 To release the seat belt push the red button on the buckle The seat belt will automatically retract to its stowed posi tion If necessary slide the latc...

Page 98: ...en when the webbing is fully extended and the adjustable upper shoulder belt anchorage if equipped is in its lowest posi tion an authorized dealer can provide you with a Seat Belt Extender The Seat Be...

Page 99: ...nsioners are triggered by the Occu pant Restraint Controller ORC Like the air bags the pretensioners are single use items A deployed pretensioner or a deployed air bag must be replaced immediately Ene...

Page 100: ...rasp the shoulder portion and pull downward until the entire seat belt is extracted 3 Allow the seat belt to retract As the seat belt retracts you will hear a clicking sound This indicates the seat be...

Page 101: ...pant Restraint Controller ORC Air Bag Warning Light Steering Wheel and Column Instrument Panel Knee Impact Bolsters Driver and Front Passenger Air Bags Seat Belt Buckle Switch Supplemental Side Air Ba...

Page 102: ...ing the Occupant Restraint Controller ORC may also be disabled In this condition the air bags may not be ready to inflate for your protection Have an authorized dealer service the air bag system immed...

Page 103: ...has an Occupant Classification System OCS in the front passenger seat The OCS is designed to activate or deactivate the Passenger Advanced Front Air Bag depending on the occupant s seated weight It i...

Page 104: ...a collision requiring the front air bags it signals the inflator units A large quantity of non toxic gas is generated to inflate the front air bags The steering wheel hub trim cover and the upper pass...

Page 105: ...the ORC The ORC uses the classification to determine whether it should activate or deactivate the Passenger Advanced Front Air Bag In order for the OCS to operate as designed it is important for the f...

Page 106: ...Passenger Air Bag Disable PAD System Front Passenger Seat Occupant Status Front Passenger Advanced Air Bag Disabled Indicator Light PAD Status Front Passenger Air Bag Status Unoccupied seat Unbuckled...

Page 107: ...ASSENGER AIR BAG OFF NOTE If the seat belt is buckled for an empty seat the PAD Indicator Light will illuminate If The PAD Indicator Light Is Illuminated For An Adult Passenger If an adult passenger i...

Page 108: ...ht which may result in deactivation or activation of the Passenger Advanced Front Air Bag in a collision This does not mean that the OCS is working improperly Decreasing the front passenger s seated w...

Page 109: ...n the front passenger seat is seated improperly the occupant may provide an output signal to the OCS that is different from the occupant s properly seated weight input This may result in serious injur...

Page 110: ...ehicle Do not replace the seat cover or cushion with an aftermarket seat cover or cushion Do not add a secondary seat cover or mat At no time should any Supplemental Restraint System SRS component or...

Page 111: ...and with such a high force that it could injure occupants if they are not seated properly or if items are positioned in the area where the SAB inflates Children are at an even greater risk of injury f...

Page 112: ...han it takes to blink your eyes NOTE Air bag covers may not be obvious in the inte rior trim but they will open during air bag deployment WARNING Occupants including children who are up against or ver...

Page 113: ...em icals They are not permanent and normally heal quickly However if you haven t healed significantly within a few days or if you have any blistering see your doctor immediately As the air bags deflat...

Page 114: ...d remove the key from the ignition switch to avoid draining the battery Carefully check the vehicle for fuel leaks in the engine compartment and on the ground near the engine compartment and fuel tank...

Page 115: ...ment is required and access to the vehicle or the EDR is needed In addition to the vehicle manufacturer other parties such as law enforcement that have the special equipment can read the information i...

Page 116: ...quired to hold even an infant on your lap could become so great that you could not hold the child no matter how strong you are The child and others could be badly injured or killed Any child riding in...

Page 117: ...in a forward facing child seat with a harness for as long as possible up to the highest weight or height allowed by the child seat All children whose weight or height is above the forward facing limit...

Page 118: ...questions was no then the child still needs to use a booster seat in this vehicle If the child is using the lap shoulder belt check seat belt fit periodically and make sure the seat belt buckle is lat...

Page 119: ...stall LATCH equipped child seats without using the vehicle s seat belts Some seating positions may have a top tether anchorage but no lower anchorages In these seating positions the seat belt must be...

Page 120: ...SAFETY 118 LATCH Positions For Installing Child Restraints In This Vehicle LATCH Positions Lower Anchorage Symbol 2 Anchor ages Per Seating Position Top Tether Anchorage Symbol...

Page 121: ...rd facing child restraint Booster seats may be attached to the LATCH anchorages if allowed by the booster seat manufacturer See your booster seat owner s manual for more information Can a child seat b...

Page 122: ...rigid bar or a flexible strap on each side Each will have a hook or connector to attach to the lower anchorage and a way to tighten the connection to the anchorage Forward facing child restraints Can...

Page 123: ...n For some second row seats you may need to recline the seat and or raise the head restraint if adjustable to get a better fit If the rear seat can be moved forward and rearward in the vehicle you may...

Page 124: ...tight around the child restraint so that it is not necessary to use a locking clip The ALR retractor can be switched into a locked mode by pulling all of the webbing out of the retractor and then lett...

Page 125: ...the child restraint for using the Tether Anchor with the seat belt to attach a forward facing child restraint Weight limit of the Child Restraint Always use the tether anchor when using the seat belt...

Page 126: ...retractor Then allow the webbing to retract back into the retractor As the webbing retracts you will hear a clicking sound This means the seat belt is now in the Automatic Locking mode 6 Try to pull t...

Page 127: ...restraint on the seat and adjust the tether strap so that it will reach over the seat back under the head restraint and to the tether anchor directly behind the seat 2 Release the seat back by pulling...

Page 128: ...at to secure a child restraint top tether strap If your vehicle is equipped with a split rear seat make sure the tether strap does not slip into the opening between the seatbacks as you remove slack i...

Page 129: ...ight seconds as a bulb check when the ignition switch is first turned to ON RUN If the light is either not on during starting stays on or turns on while driving have the system inspected at an authori...

Page 130: ...ic make model and year of your vehicle ONLY use the driver s side floor mat on the driver s side floor area To check for interference with the vehicle properly parked with the engine off fully depress...

Page 131: ...indicator lights on the instrument panel Door Latches Check for proper closing latching and locking Fluid Leaks Check area under the vehicle after overnight parking for fuel coolant oil or other fluid...

Page 132: ...or it could roll 4 If the gear selector is in NEUTRAL and the vehicle speed is below 5 mph 8 km h pushing the ENGINE START STOP button once will turn the engine off The ignition will remain in the ACC...

Page 133: ...is not in PARK and the driver turns off the engine the vehicle may AutoPark AutoPark will engage when all of these conditions are met Vehicle is equipped with an 8 speed trans mission Driver door is...

Page 134: ...gage ONLY when vehicle speed is 1 2 mph 2 0 km h or less The MESSAGE Vehicle Speed is Too High to Shift to P will be displayed in the instrument cluster if vehicle speed is above 1 2 mph 2 0 km h 4WD...

Page 135: ...consume some oil during its first few thousand miles kilometers of operation This should be considered a normal part of the break in and not inter preted as a problem MANUAL TRANSMISSION IF EQUIPPED N...

Page 136: ...is idling in NEUTRAL with the clutch engaged clutch pedal released but it may also be heard when driving The noise may also be more noticeable when the transmission is warm This noise is normal and i...

Page 137: ...amage to the clutch system Shifting into lower gear and releasing the clutch may result in engine damage When descending a hill be very careful to downshift one gear at a time to prevent overspeeding...

Page 138: ...hicle The transmission may not engage PARK if the vehicle is moving Always bring the vehicle to a complete stop before shifting to PARK and verify that the transmission gear position indicator solidly...

Page 139: ...le Transmission Gear Selector The transmission gear selector provides PARK REVERSE NEUTRAL DRIVE and MANUAL AutoStick shift positions Manual shifts can be made using the AutoStick shift control Toggli...

Page 140: ...hift or downshift is chosen except as described below The transmission will automatically down shift as the vehicle slows to prevent engine lugging and will display the current gear The transmission w...

Page 141: ...another vehicle Refer to Recreational Towing in Starting And Operating for further information 4L Four Wheel Drive Low Range This range provides low speed four wheel drive It maxi mizes torque to the...

Page 142: ...wheel drive provides improved traction there is a tendency to exceed safe turning and stopping speeds Do not go faster than road conditions permit Shifting Procedures 2H To 4H Or 4H To 2H Shifting bet...

Page 143: ...xle Lock Switch Panel This feature will only activate when the following conditions are met Ignition in RUN position vehicle in 4L Four Wheel Drive Low Range Vehicle speed should be 10 mph 16 km h or...

Page 144: ...and right suspension height differences This condition is due to driving surface differences or vehicle loading In order for the stabilizer sway bar to discon nect reconnect the right and left halves...

Page 145: ...ration Rock Crawl and controllability focus change in shifting schedule when rock crawling pedal calibration shifted to de gain and low range operates at lower vehicle speeds Traction Control Aggressi...

Page 146: ...l go into STOP START READY and if all other conditions are met can go into a STOP START AUTOSTOP ACTIVE Autostop mode To Activate The Autostop Mode The Following Must Occur The system must be in STOP...

Page 147: ...not pressed with sufficient pressure Other Factors Which Can Inhibit Autostop Include Accelerator pedal input Vehicle speed threshold not achieved from previous auto stop Steering angle beyond thresho...

Page 148: ...the Starting And Operating section located in your Owner s Manual for further informa tion System Malfunction If there is a malfunction in the Stop Start system the system will not shut down the engin...

Page 149: ...ased The engine will shut down the tachometer will fall to the Stop Start position the STOP START AUTOSTOP ACTIVE message will appear and the heater air conditioning HVAC air flow will be reduced Poss...

Page 150: ...ditions that will cause the engine to start automatically while in STOP START AUTOSTOP ACTIVE mode The Engine Will Start Automatically When Actual cabin temperature is significantly different than tem...

Page 151: ...dealer SPEED CONTROL When engaged the Speed Control takes over accelerator operations at speeds greater than 20 mph 32 km h The Speed Control buttons are located on the right side of the steering whe...

Page 152: ...y the same as Speed Control with only a couple of differences With this option you can set a specified distance you would like to main tain between you and the vehicle in front of you If the ACC senso...

Page 153: ...e speed will only be determined by the position of the accelerator pedal To Resume If there is a set speed in memory push the RES resume button and then remove your foot from the accelerator pedal The...

Page 154: ...is set the set speed can be decreased by pushing the SET button The driver s preferred units can be selected through the instrument panel settings Refer to Getting To Know Your Instrument Panel in th...

Page 155: ...etting Decrease button and release Each time the button is pushed the distance setting decreases by one bar shorter General Information The following regulatory statement applies to all Radio Frequenc...

Page 156: ...tal direction depending on the location type and orienta tion of the obstacle Enabling And Disabling ParkSense ParkSense can be enabled and disabled with the ParkSense switch located on the switch pan...

Page 157: ...check carefully behind your vehicle look behind you and be sure to check for pedestrians animals other vehicles obstructions and blind spots before backing up You are responsible for safety and must c...

Page 158: ...he obstacle ParkSense Warning Display The ParkSense Warning screen will only be displayed if Sound and Display is selected from the Customer Programmable Features section of the UConnect System Refer...

Page 159: ...s Center None 6th Solid 5th Solid 4th Solid 3rd Flashing 2nd Flashing 1st Flashing Arcs Right None None None None None 2nd Flashing 1st Flashing Audible Alert Chime None Single 1 2 Second Tone for rea...

Page 160: ...Rear ParkSense is disabled or requires service The Front or Rear ParkSense switch LED will be off when the Front or Rear system is enabled If the Front or Rear ParkSense switch is pushed and the syst...

Page 161: ...ll reduce the volume of the radio when it is sounding a tone Clean the ParkSense sensors regularly taking care not to scratch or damage them The sensors must not be covered with ice snow slush mud dir...

Page 162: ...a delay turned on the rear Camera image will be displayed for up to 10 seconds unless the vehicle speed exceeds 8 mph 13 km h the transmission is shifted into PARK the ignition is placed in the OFF po...

Page 163: ...ct Settings in Multimedia in the Owner s Manual for further information Different colored zones indicate the distance to the rear of the vehicle NOTE If snow ice mud or any foreign substance builds up...

Page 164: ...w is active the TrailCam image will be displayed for up to 10 seconds unless the vehicle speed exceeds 8 mph 13 km h the transmission is shifted into PARK the ignition is placed in the OFF position or...

Page 165: ...ost or damaged be sure the replacement cap is the correct one for this vehicle Fuel Filler Door Fuel Filler Cap WARNING Never have any smoking materials lit in or near the vehicle when the fuel door i...

Page 166: ...reset button to turn the message off If the problem persists the message will appear the next time the vehicle is started This might indicate a damaged cap If the problem is detected twice in a row th...

Page 167: ...sion Tow Package 11 100 lbs 5 035 kg 55 ft2 5 11 m2 6 000 lbs 2 722 kg 600 lbs 272 kg Sport S Automatic Transmission Max Tow Package 12 800 lbs 5 806 kg 55 ft2 5 11 m2 7 650 lbs 3 470 kg 765 lbs 347 k...

Page 168: ...ransfer case in NEUTRAL N Tow in forward direction Dolly Tow Front NOT ALLOWED Rear NOT ALLOWED On Trailer ALL OK NOTE When towing your vehicle always follow applicable state and provincial laws Conta...

Page 169: ...e procedure outlined under Shifting Into NEUTRAL N to be certain that the transfer case is fully in NEUTRAL N Otherwise internal damage will result Towing this vehicle in violation of the above requir...

Page 170: ...e transfer case out of NEUTRAL N the engine should remain off to avoid gear clash 8 Shift the automatic transmission into PARK or place manual transmission in NEUTRAL 9 Release the brake pedal 10 Disc...

Page 171: ...Hazard Warning flashers may wear down your battery ASSIST AND SOS SYSTEM IF EQUIPPED Assist And SOS Buttons If equipped the overhead console contains an ASSIST and an SOS button NOTE Your vehicle may...

Page 172: ...vehicle and a SOS operator is made the SOS Call system may transmit the following important vehicle information to a SOS operator Indication that the occupant placed a SOS Call The vehicle brand The...

Page 173: ...g on or near the vehicle s operable network and GPS antennas You could prevent operable network and GPS signal reception which can prevent your vehicle from placing an emergency call An operable netwo...

Page 174: ...and GPS antennas You could prevent LTE voice data or 4G data and GPS signal reception which can prevent your vehicle from placing an emergency call An oper able LTE voice data or 4G data network conne...

Page 175: ...appareil ne doit pas produire de brouil lage et 2 l utilisateur de l appareil doit accepter tout brouillage radio lectrique subi m me si le brouillage est susceptible d en compromettre le fonctionneme...

Page 176: ...hara Rubicon Turn Lamp 7440NA Base Sahara Rubicon Park DRL Lamp 7443 Front Side Marker Lamps 2 LED Serviced At Authorized Dealer Base Fog Lamps PSX24W Premium Fog Lamps LED Serviced At Authorized Deal...

Page 177: ...n the socket assembly a quarter turn counterclockwise and remove from housing Pull the bulb straight from the socket to replace LED Front Side Marker 1 Remove the front wheel liner fasteners to access...

Page 178: ...CHMSL The stop lamp is mounted on the tailgate If service is needed obtain the LED assembly from an authorized dealer License Plate Lamps See an authorized dealer to replace these LED assemblies FUSES...

Page 179: ...idge fuses mini fuses and relays The PDC top cover is labeled with each serviceable fuse relay loca tion function and size Power Distribution Center If a general protection fuse for safety systems air...

Page 180: ...avy Duty Electrical Pkg SWITCH BANK HD ELEC F16 Spare F17 Spare F18 10 Amp Red Air Conditioning Clutch AC CLUTCH F19 Spare F20 30 Amp Pink Central Body Controller CBC 1 INTERIOR LIGHTS F21 Spare F22 1...

Page 181: ...Airbag Disable Lamps AIRBAG DISABLE LMPS F34 10 Amp Red Electronic Stability Control ESC Electric Hydraulic Power Steering EHPS Smart Bar Control Module SBCM WAKE UP F35 30 Amp Pink BRAKE VAC PMP If E...

Page 182: ...iew Mirror ISRVM Compass Module CSGM F52 20 Amp Yellow Cigar Lighter F53 10 Amp Red Wireless Speaker If Equipped F54 Spare F55 10 Amp Red Central Vision Processing Module CVPM or Parktronics Module F5...

Page 183: ...quipped F73 Spare F74 Spare F75 Spare F76 20 Amp Yellow ECM GAS PCM DSL F77 10 Amp Red Heated Mirrors F78 Spare F79 20 Amp Yellow SMART BAR CTRL MOD F80 15 Amp Blue Powertrain Control Module PCM Solen...

Page 184: ...Amp Green HD ACCY 1 If Equipped F94 10 Amp Red Tire Pressure Monitor TPM RF Hub system CORAX F95 Spare F96 10 Amp Red PWR MIRROR SW F97 20 Amp Yellow RADIO TBM F98 10 Amp Red SW BANK HD ELEC OFF ROAD...

Page 185: ...rous electrical system overload If a properly rated fuse continues to blow it indicates a problem in the circuit that must be corrected WARNING Do not attempt to change a tire on the side of the vehic...

Page 186: ...ol bag straps from the jack and remove tools from bag Jack And Tool Bag 4 Remove tool kit and assemble tools Jack And Tool Bag There are two ways to assemble the tools Assembled For Spare Tire Lowerin...

Page 187: ...ng the tool to the winch mechanism be sure the large flared end opening on extension 4 is positioned correctly over the winch mechanism adjusting nut Damage to the lug wrench extensions and winch mech...

Page 188: ...r of the wheel Pulling The Retainer Through The Center Of The Wheel NOTE The winch mechanism is designed for use with the extension tubes only Use of an air wrench or other power tools is not recom me...

Page 189: ...Hazard Warning flashers Apply the parking brake firmly and shift an automatic transmission in PARK a manual transmission to REVERSE Block the wheel diagonally opposite the wheel to be raised Never sta...

Page 190: ...nect the jack handle driver to the extension then to the lug wrench Assembled Jack And Tools 4 Operate the jack from the front or the rear of the vehicle Place the jack under the axle tube as shown Do...

Page 191: ...l lug nuts are properly seated against the wheel 12 Remove the jack assembly and wheel blocks 13 Secure the jack and tools in their proper locations To Stow The Flat Or Spare CAUTION Before raising th...

Page 192: ...Wrench And Extension Tubes Assembled And In Position 4 Rotate the lug wrench handle clockwise until the wheel is drawn into place against the underside of the vehicle Continue to rotate until you feel...

Page 193: ...may experience abrupt stopping rapid acceleration or sharp turns A loose jack tools or bracket or other objects in the vehicle may move around with force resulting in serious injury WARNING Do not att...

Page 194: ...icle within the jumper cable s reach apply the parking brake and make sure the ignition is OFF If a fast charger is used while the battery is in the vehicle disconnect both vehicle battery cables befo...

Page 195: ...ted remove the jumper cables in the reverse sequence Disconnecting The Jumper Cables 1 Disconnect the negative end of the jumper cable from the engine ground of the vehicle with the discharged battery...

Page 196: ...o floor and the blower control to high This allows the heater core to act as a supple ment to the radiator and aids in removing heat from the engine cooling system CAUTION Accessories plugged into the...

Page 197: ...he tether strap up and to the left until the release lever locks into place in the vertical position The vehicle is now out of PARK P and can be moved Release the parking brake only when the vehicle i...

Page 198: ...EUTRAL N for more than 2 seconds you must press the brake pedal to engage DRIVE or REVERSE Push the ESC OFF switch to place the Electronic Stability Control ESC system in Partial OFF mode before rocki...

Page 199: ...ot the ACC position If the vehicle s battery is discharged refer to Manual Park Release in this section for instructions on shifting the automatic trans mission out of PARK in order to move the vehicl...

Page 200: ...Accident Response System EARS function EVENT DATA RECORDER EDR This vehicle is equipped with an Event Data Recorder EDR The main purpose of an EDR is to record data that will assist in understanding...

Page 201: ...il change indicator message after completing the scheduled oil change If a scheduled oil change is performed by someone other than an authorized dealer the message can be reset by referring to the ste...

Page 202: ...the first sign of irregular wear even if it occurs before the oil indicator system turns on Inspect battery and clean and tighten terminals as required Inspect the CV Universal joints Inspect brake p...

Page 203: ...itional Inspections Inspect the CV Universal joints X X X X X X X X X X X X X X Inspect front suspension rear suspension tie rod ends and replace if necessary X X X X X X X Inspect the front and rear...

Page 204: ...ert operation or more than 50 of your driving is at sustained high speeds during hot weather above 90 F 32 C X X X X X Change transfer case fluid if using your vehicle for any of the following police...

Page 205: ...age or time passed whichever comes first 20 000 30 000 40 000 50 000 60 000 70 000 80 000 90 000 100 000 110 000 120 000 130 000 140 000 150 000 Or Years 2 3 4 5 6 7 8 9 10 11 12 13 14 15 Or Kilometer...

Page 206: ...6L Engine 1 Power Distribution Center Fuses 6 Engine Coolant Pressure Cap 2 Battery 7 Brake Fluid Reservoir 3 Engine Oil Dipstick 8 Washer Fluid Cap 4 Engine Oil Fill 9 Power Steering Fluid Reservoir...

Page 207: ...e This rating information can be found on most washer fluid containers Maintenance Free Battery Your vehicle is equipped with a mainte nance free battery You will never have to add water nor is period...

Page 208: ...l posts and free of corrosion If a fast charger is used while the battery is in the vehicle disconnect both vehicle battery cables before connecting the charger to the battery Do not use a fast charge...

Page 209: ...oved by the manufacturer for your air conditioning system Some unapproved refrigerants are flammable and can explode injuring you Other unapproved refrigerants or lubricants can cause the system to fa...

Page 210: ...rs to remove salt or dirt from a dry windshield Avoid using the wiper blades to remove frost or ice from the windshield Keep the blade rubber out of contact with petroleum prod ucts such as engine oil...

Page 211: ...gh the opening in the wiper blade 4 Slide the wiper blade up into the hook on the wiper arm latch engagement will be accompanied by an audible click 5 Gently lower the wiper blade onto the glass Cooli...

Page 212: ...der area before removing cap With disc brakes fluid level can be expected to fall as the brake pads wear Brake fluid level should be checked when pads are replaced If the brake fluid is abnormally low...

Page 213: ...therefore the trans mission has no dipstick An authorized dealer can check your transmission fluid level using special service tools If you notice fluid leakage or transmission malfunction visit an au...

Page 214: ...he sidewall preceding the size designation Example LT235 85R16 Temporary spare tires are designed for temporary emergency use only Temporary high pressure compact spare tires have the letter T or S mo...

Page 215: ...orresponding to its load index under certain operating conditions The maximum speed corresponding to the speed symbol should only be achieved under specified operating conditions i e tire pressure veh...

Page 216: ...rtment of Transportation This symbol certifies that the tire is in compliance with the US Department of Transportation tire safety standards and is approved for highway use MA Code representing the ti...

Page 217: ...ation pressure is defined as the tire pressure after the vehicle has not been driven for at least three hours or driven less than 1 mile 1 6 km after sitting for a minimum of three hours Inflation pre...

Page 218: ...kg or XXX lbs on the Tire and Loading Information placard The combined weight of occupants cargo luggage and trailer tongue weight if applicable should never exceed the weight referenced here Steps Fo...

Page 219: ...er load from your trailer will be transferred to your vehicle The following table shows exam ples on how to calculate total load cargo luggage and towing capacities of your vehicle with varying seatin...

Page 220: ...tributes to a comfort able ride Overinflation produces a jarring and uncomfortable ride Tire Inflation Pressures The proper cold tire inflation pressure is listed on the driver s side B Pillar or rear...

Page 221: ...in mind when checking tire pressure inside a garage especially in the Winter Example If garage temperature 68 F 20 C and the outside temperature 32 F 0 C then the cold tire inflation pressure should b...

Page 222: ...erinflated tire condition please replace the TPM sensor as it is not designed to be reused when driven under run flat mode 14 psi 96 kPa condition NOTE TPM Sensor must be replaced after driving the ve...

Page 223: ...unted tires in a cool dry place with as little exposure to light as possible Protect tires from contact with oil grease and gasoline Replacement Tires The tires on your new vehicle provide a balance o...

Page 224: ...ice or snow For more information contact an authorized dealer Summer tires do not contain the all season designation or mountain snowflake symbol on the tire sidewall Use Summer tires only in sets of...

Page 225: ...ignated for temporary emer gency use Spare Tire Matching Original Equipped Tire And Wheel If Equipped Your vehicle may be equipped with a spare tire and wheel equivalent in look and func tion to the o...

Page 226: ...sh wheels with the same soap solution recommended for the body of the vehicle and remember to always wash when the surfaces are not hot to the touch Your wheels are susceptible to deterioration caused...

Page 227: ...ction device manufacturer Install on Rear Tires Only 245 75R17 tire with the use of a traction device that meets the SAE type Class S specification is recommended CAUTION Avoid products or automatic c...

Page 228: ...avoid damage to your vehicle or tires observe the following precautions Because of restricted traction device clearance between tires and other suspension components it is important that only tractio...

Page 229: ...ades The Traction grades from highest to lowest are AA A B and C These grades represent the tire s ability to stop on wet pavement as measured under controlled conditions on speci fied government test...

Page 230: ...or this tire is established for a tire that is properly inflated and not overloaded Excessive speed under inflation or excessive loading either separately or in combination can cause heat buildup and...

Page 231: ...If insects tar or other similar deposits have accumulated on your vehicle use Mopar Super Kleen Bug and Tar Remover to remove Use a high quality cleaner wax such as Mopar Cleaner Wax to remove road fi...

Page 232: ...leaner or equivalent or a mild foaming cleaner on the entire top but support the top from underneath Rinsing Be sure to remove all traces of cleaner by rinsing the top thoroughly with clean water Reme...

Page 233: ...hesives are hard to remove and may damage the windows INTERIORS Seats And Fabric Parts Use Mopar Total Clean to clean fabric uphol stery and carpeting Seat Belt Maintenance Do not bleach dye or clean...

Page 234: ...clean your leather upholstery Application of a leather conditioner is not required to maintain the original condition NOTE If equipped with light colored leather it tends to show any foreign material...

Page 235: ...nd reinstalled on the vehicle the lug nuts bolts should be torqued using a properly calibrated torque wrench using a high quality six sided hex deep wall socket Torque Specifications Use only authoriz...

Page 236: ...lant We recommend you use Mopar Antifreeze Coolant 10 Year 150 000 Mile Formula OAT Organic Additive Technology or equivalent meeting the requirements of FCA Material Standard MS 90032 Engine Oil 3 6L...

Page 237: ...ifreeze is introduced into the cooling system in an emergency the cooling system will need to be drained flushed and refilled with fresh OAT coolant conforming to MS 90032 by an authorized dealer as s...

Page 238: ...Mopar ATF 4 Automatic Transmission Fluid Axle Differential Front Axles We recommend you use Mopar Gear Axle Lubricant SAE 75W85 API GL 5 Axle Differential Rear M200 Sales Code DRZ We recommend you use...

Page 239: ...it durability and performance as your Wrangler For the full line of Authentic Jeep Acces sories by Mopar visit your local dealership or online at mopar com for U S residents and mopar ca for Canadian...

Page 240: ...er may contact you directly regarding software updates To help further improve vehicle security and minimize the potential risk of a secu rity breach vehicle owners should Routinely check www driveuco...

Page 241: ...h Display Radio Buttons Audio Setting 1 Push the SETTINGS button on the face plate 2 Scroll down and press the Audio button on the touchscreen to open the Audio menu 3 The Audio Menu shows the followi...

Page 242: ...resets in each of the radio modes There are four visible presets at the top of the radio screen Pressing the All button on the touchscreen on the radio home screen displays all of the preset stations...

Page 243: ...language to understand what you mean and responds back to confirm your requests The system is designed to keep your eyes on the road and your hands on the wheel by letting Siri help you perform useful...

Page 244: ...on the touchscreen or press and drag the Speaker Icon to adjust the Balance Fade Equalizer Press the Equalizer button on the touch screen to activate the Equalizer screen Press the or buttons on the t...

Page 245: ...h Display Radio To access the Radio mode press the Radio button on the touchscreen Selecting Radio Stations Press the desired radio band AM FM or SXM button on the touchscreen Seek Up Seek Down Press...

Page 246: ...allows you to project your smartphone and a number of its apps onto the touch screen radio display Android Auto auto matically brings you useful information and organizes it into simple cards that app...

Page 247: ...Equipped NOTE Feature availability depends on your carrier and mobile phone manufacturer Some Apple CarPlay features may or may not be available in every region and or language Uconnect works seamless...

Page 248: ...e is a trademark of Apple Inc registered in the US and other countries Apple terms of use and privacy statements apply UCONNECT 4C 4C NAV WITH 8 4 INCH DISPLAY Uconnect 4C 4C NAV At A Glance Uconnect...

Page 249: ...utton on the touchscreen and select a theme Audio Settings Press the Audio button on the touchscreen to activate the Audio settings screen to adjust Balance Fade Equalizer and Speed Adjusted Volume Yo...

Page 250: ...o replace an existing shortcut in the main menu bar The new app shortcut that was dragged down onto the main menu bar will now be an active App shortcut NOTE This feature is only available if the vehi...

Page 251: ...tion beep HD Radio If Equipped HD Radio available on Uconnect 4C 4C NAV operates similar to a conventional radio except it allows broadcasters to transmit a high quality digital signal With an HD Rad...

Page 252: ...system displays the Android Auto home screen Android Auto automati cally launches but if it does not refer to the Uconnect Owner s Manual Supple ment for the procedure to enable the feature AutoShow Y...

Page 253: ...d start a new route using Android Auto via voice or any other method a pop up appears asking if you would like to switch from Uconnect naviga tion to smartphone navigation A pop up also appears asking...

Page 254: ...Android Auto Phone Apps The Android Auto App will display all the compatible apps that are available to use with Android Auto every time it is launched You must have the compatible app downloaded and...

Page 255: ...Apple CarPlay app then drag and drop the selected App to replace an existing shortcut in the main menu bar Apple CarPlay Once Apple CarPlay is up and running on your Uconnect system the following feat...

Page 256: ...to Maps To use your Apple Maps for navigation on your Uconnect system launch Apple CarPlay and push and hold the VR button on the steering wheel to use Siri to set your desired destination Alternative...

Page 257: ...onal Data and System Information if equipped through buttons on the touch screen Push the SETTINGS button Uconnect 3 or press the Apps button Uconnect 4 or 4C located near the bottom of the touchscree...

Page 258: ...Place an SOS Call to a SiriusXM Guardian operator who can connect you to emergency responders Remotely lock unlock your doors and start your vehicle from virtually anywhere using the Uconnect App from...

Page 259: ...ect Customer Care to speak with a SiriusXM Guardian Customer Care agent who will activate services in your vehicle or select Enter Email to acti vate on the web Why sign up for SiriusXM Guardian Here...

Page 260: ...usXM Guardian services and applications in this vehicle Only use Uconnect features and SiriusXM Guardian services when it is safe to do so Failure to do so may result in an accident involving serious...

Page 261: ...h such recording and monitoring in accordance with regulatory requirements You acknowledge agree and consent to any recording moni toring or sharing of information obtained through any such call recor...

Page 262: ...n Care agent will ask for the stolen vehicle report number issued by local law enforcement As long as your vehicle has a SiriusXM Guardian subscription and an operable network connection the agent may...

Page 263: ...tance You can send a request to your vehicle in one of two ways 1 Using the Uconnect App from a compat ible device 2 From the Mopar Owner Connect website After 15 minutes if you have not entered your...

Page 264: ...riusXM Guardian Notifications Vehicle Finder If Equipped The Vehicle Finder feature of the Uconnect Mobile App allows you to find the location of your vehicle when you can t remember where it s parked...

Page 265: ...your device up to an hour after the vehicle is turned off NOTE Two devices can be plugged in at the same time and both ports will provide charging capabilities Only one port can transfer data to the s...

Page 266: ...USB On The Back Of The Center Console When a new device or smartphone is plugged into the USB ports the following message will display depending on the device being utilized Device Plugged In Message...

Page 267: ...t From the main Navigation menu press the Where To button on the touchscreen and then press the Points of Interest button on the touchscreen Select a category and then a subcategory if necessary Selec...

Page 268: ...your Home loca tion select the Save Home button located on the lower left hand side of your touch screen To delete a saved Home location or other saved locations so you can save a new Home location pr...

Page 269: ...ormation on traffic speed acci dents construction and road closings Traffic information from multiple sources including police and emergency services cameras and road sensors Coast to coast delivery o...

Page 270: ...onnect System 7 Uconnect Phone Settings Menu 8 Text Messaging 9 Direct Dial Pad 10 Recent Call Log 11 Browse Phone Book 12 End Call 1 Voicemail 2 Mobile Phone Battery Life 3 Currently Paired Mobile Ph...

Page 271: ...ures For Uconnect Customer Care US resi dents visit UconnectPhone com or call 1 877 855 8400 Pairing Wirelessly Connecting Your Mobile Phone To The Uconnect System Mobile phone pairing is the process...

Page 272: ...ile the system is connecting Uconnect 4 With 7 inch Display Uconnect 4 1 Place the ignition in the ACC or ON RUN position 2 Press the Phone button in the Menu Bar on the touchscreen A message will dis...

Page 273: ...Press Add Devices Then proceed to follow on screen instruc tions to pair phone with vehicle NOTE Uconnect Phone will display an In prog ress screen while the system is connecting Pair Your iPhone Blu...

Page 274: ...ne audio device Bluetooth screen and the Uconnect system will reconnect to the Bluetooth device Pair Your Android Device Uconnect Device To search for available devices on your Bluetooth enabled Andro...

Page 275: ...o remove Uconnect from the list of devices in your phone s Bluetooth settings You are now ready to make hands free calls Press the Uconnect Phone button on your steering wheel to begin NOTE Refer to U...

Page 276: ...and say Cancel to cancel the help session Using Do Not Disturb With Do Not Disturb you can disable notifi cations from incoming calls and texts allowing you to keep your eyes on the road and hands on...

Page 277: ...xt Messaging iPhone 1 Press the Settings button on the mobile phone 2 Select Bluetooth Ensure Bluetooth is enabled and the mobile phone is paired to the Uconnect system 3 Select the i button located u...

Page 278: ...stem generates a pin code the default is 0000 Perform a hard reset in the mobile phone by removing the battery see your mobile phone s owner s manual for battery removal This should only be done as a...

Page 279: ...lume while facing straight ahead The microphone is positioned on the rearview mirror and aimed at the driver 4 Each time you give a Voice Command you must first push either the Voice Recognition VR or...

Page 280: ...on After the beep say Tune to ninety five point five FM Tune to Satellite Channel Hits 1 TIP At any time if you are not sure of what to say or want to learn a Voice Command push the VR button and say...

Page 281: ...een your system is ready Check UconnectPhone com for mobile phone compatibility and pairing instructions Push the VR button or Phone button After the beep say one of the following commands Call John S...

Page 282: ...the system prompts NOTE Only use the numbering listed Otherwise the system does not transpose the message TIP Your mobile phone must have the full imple mentation of the Message Access Profile MAP to...

Page 283: ...70 degrees TIP Voice command for climate may only be used to adjust the interior temperature of your vehicle Voice command will not work to adjust the heated seats or steering wheel if equipped Uconn...

Page 284: ...Unlock Send Go Vehicle Finder Stolen Vehicle Assistance Remote Vehicle Start Remote Horn Lights Roadside Assistance Call Vehicle Health Reports Vehicle Health Alert Performance Pages Plus If vehicle i...

Page 285: ...mote screen you can begin using Remote Door Lock Unlock Remote Vehicle Start and activate your horn and lights remotely if equipped 3 Press the Location button on the bottom menu bar of the app to bri...

Page 286: ...o Not Disturb With Do Not Disturb you can disable notifi cations from incoming calls and texts allowing you to keep your eyes on the road and hands on the wheel For your conve nience there is a counte...

Page 287: ...list of your smartphone s features Maps Music Phone Text Messages Additional Apps Android Auto On 7 inch Display Android Auto On 8 4 inch Display Refer to your Uconnect Owner s Manual Supplement for...

Page 288: ...lowing regulatory statement applies to all Radio Frequency RF devices equipped in this vehicle This device complies with Part 15 of the FCC Rules and with Innovation Science and Economic Development C...

Page 289: ...2019 FCA US LLC All rights reserved Mopar and Uconnect are registered trade marks and Mopar Owner Connect is a trade mark of FCA US LLC Android is a trademark of Google Inc SiriusXM and all related m...

Page 290: ...want you to be happy with our products and services Warranty service must be done by an autho rized dealer We strongly recommend that you take the vehicle to an authorized dealer They know your vehic...

Page 291: ...i sions and an Owner Identification Card in the mail within three weeks of the vehicle delivery date If you have any questions about the service contract call the manufac turer s Service Contract Nati...

Page 292: ...its best REPORTING SAFETY DEFECTS In The 50 United States And Washington D C If you believe that your vehicle has a defect that could cause a crash or cause injury or death you should immediately inf...

Page 293: ...ect the Owner s Manual and Glove Compartment Material from the left menu You can also purchase a copy by calling 1 877 426 5337 U S or 1 800 387 1143 Canada NOTE The Owner s Manual and User Guide elec...

Page 294: ...4 249 285 Apps 252 Communication 252 Maps 251 Music 251 Antifreeze Engine Coolant 234 Anti Lock Brake System ABS 72 Anti Lock Warning Light 64 Apple CarPlay 245 285 Apps 255 Maps 254 Messages 254 Musi...

Page 295: ...Inspection 210 Selection Of Coolant Antifreeze 234 Cruise Control Speed Control 69 150 Cruise Light 68 69 Customer Assistance 288 Cybersecurity 238 D Daytime Running Lights 29 Dealer Service 206 Defr...

Page 296: ...id Brake 236 Fluids And Lubricants 234 Fog Lights 175 Fog Lights Service 175 Fold Flat Seats 22 Folding Rear Seats 24 Forward Collision Warning 83 Four Wheel Drive 139 Operation 139 Shifting 139 Syste...

Page 297: ...1 99 127 Automatic Headlights 29 Brake Assist Warning 76 Brake Warning 61 Bulb Replacement 173 174 Center Mounted Stop 176 Cruise 68 69 Daytime Running 29 Dimmer Switch Headlight 29 Electronic Stabili...

Page 298: ...verter 51 Windows 38 Power Steering Fluid 236 Pregnant Women And Seat Belts 97 Preparation For Jacking 186 Pretensioners Seat Belts 97 R Radial Ply Tires 220 Radio Presets 240 243 248 Radio Operation...

Page 299: ...tment 22 Rear Folding 22 Tilting 22 Security Alarm 15 64 Arm The System 15 Disarm The System 15 Selection Of Coolant Antifreeze 234 Sentry Key Replacement 11 Service Assistance 288 Service Contract 28...

Page 300: ...ing Life Of Tires 221 Air Pressure 218 Chains 225 Changing 183 211 Compact Spare 223 General Information 218 223 High Speed 219 Inflation Pressure 218 Jacking 211 Life Of Tires 221 Load Capacity 215 2...

Page 301: ...Entry Programming 16 Uniform Tire Quality Grades 227 Universal Consumer Interface UCI Connector 263 Untwisting Procedure Seat Belt 95 V Vehicle Identification Number VIN 233 Vehicle Loading 216 Vehicl...

Page 302: ...r drink and then drive This guide has been prepared to help you get quickly acquainted with your new Jeep brand vehicle and to provide a convenient reference for common questions However it is not a s...

Page 303: ...rovides special offers tailored to your needs customized vehicle galleries personalized service records and more To get this information just create an account and check back often Get warranty and ot...

Reviews: