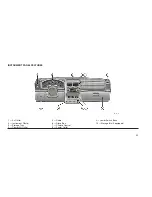
12. Charging System Warning Light
This light shows the status of the electri-
cal charging system. The light should
turn on when the ignition switch is first
turned ON and remain on briefly as a bulb check.
If the light stays on or turns on while driving, turn
off some of the vehicle’s electrical devices, such
as the fog lights or rear defroster. If the light
remains on, it means that the charging system is
experiencing a problem. See your local autho-
rized dealer to obtain SERVICE IMMEDIATELY.
13. Oil Pressure Warning Light
This light shows low engine oil pressure.
The light will turn on and remain on when
the ignition switch is turned from the
LOCK or ACC position to the ON position. The
light will turn off after the engine is started. If the
light does not turn on during starting, have the
system checked by an authorized dealer.
If the light turns on and remains on while driving,
safely bring the vehicle to a stop and shut off the
engine. DO NOT OPERATE THE VEHICLE UNTIL
THE CAUSE IS CORRECTED.
This light does not show the quantity of oil in the
engine. The engine oil level must be checked
using the proper procedure.
14. Anti-Lock Brake Warning Light
This light monitors the Anti-Lock
Brake System (ABS). This light will
turn on when the ignition switch is
turned to the ON position and it may
stay on for approximately three sec-
onds.
If the light remains on or turns on during driving, it
indicates that the Anti-Lock portion of the brake
system is not functioning and that service is
required. However, the conventional brake system
will continue to operate normally, provided the
BRAKE warning light is not on.
If the ABS light is on, the brake system should be
serviced as soon as possible to restore the benefit
of Anti-Lock Brakes.
The ABS Warning light should be checked fre-
quently to assure that it is operating properly. Turn
the ignition switch to the ON position, but do not
start the vehicle. The light should turn on. If the
light does not turn on, have the system checked
by an authorized dealer.
15. Tachometer
This gauge measures engine revolutions-per-
minute (RPM x 1000). Before the pointer reaches
the red area, ease up on the accelerator to
prevent engine damage.
16. 4 LOW Mode Indicator Light — If
Equipped
This light alerts the driver that the
vehicle is in the 4WD LOW mode. In
this mode, the front driveshaft and
rear driveshaft are mechanically
locked together forcing the front and
rear wheels to rotate at the same
speed.
17. Hill Descent Control Indicator Light — If
Equipped
The symbol indicates the status of the
Hill Decent Control (HDC) feature.
The lamp will be on solid when HDC
is armed. HDC can only be armed
when the transfer case is in the “4WD
Low” position and the vehicle speed
is less then 30 mph. If these conditions are not
met while attempting to use the HDC feature, the
HDC indicator lamp will flash on/off.
18. TOW / HAUL Indicator Light — If
Equipped
This light will illuminate when select-
ing TOW/HAUL. The TOW/HAUL but-
ton is located on the shift lever bezel.
97
Summary of Contents for Cherokee 2009
Page 1: ......
Page 2: ......
Page 3: ......
Page 5: ...2...
Page 9: ...6...
Page 11: ...8...
Page 15: ......
Page 45: ...42...
Page 50: ...Rear Window Defroster If Equipped 89 ROOF LUGGAGE RACK IF EQUIPPED 90 47...
Page 51: ......
Page 63: ...60...
Page 64: ...61...
Page 65: ...62...
Page 97: ...INSTRUMENT CLUSTER 94...
Page 106: ...Compass Variance Map 103...
Page 111: ...Compass Variance Map 108...
Page 116: ......
Page 120: ...117...
Page 123: ...Control Setting Suggestions for Various Weather Conditions 120...
Page 147: ......
Page 159: ......
Page 162: ......
Page 175: ...172...
Page 179: ......
Page 210: ...9 IF YOU NEED CONSUMER ASSISTANCE IF YOU NEED ASSISTANCE 208 207...
Page 212: ...209...
Page 213: ...210...
Page 214: ...10 INDEX 211...


