


JDM
®
CD/USB/FM-RDS Receiver Module
4
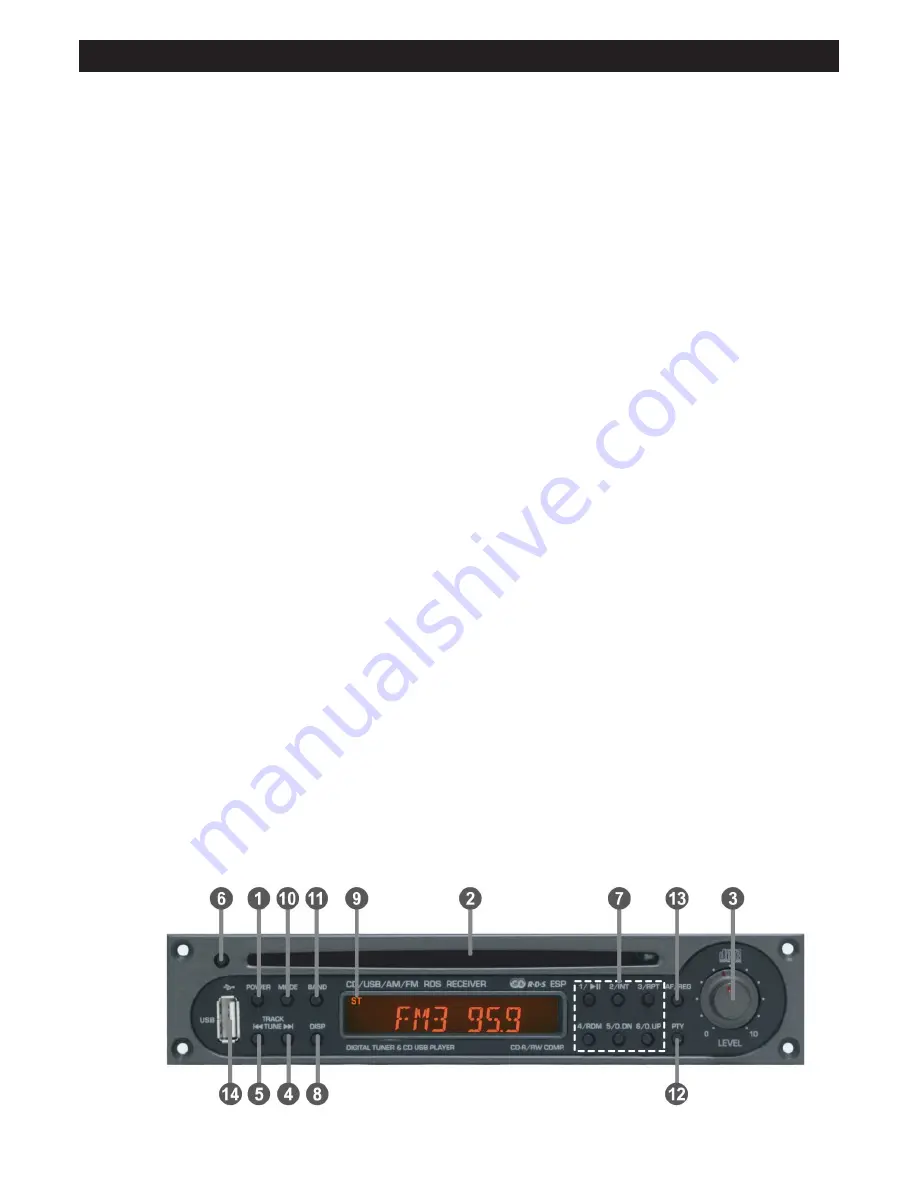
FRONT PANEL: (Figure 2.)
1. POWER:
Press this to turn the power on to the unit. Press again to switch
it off.
2. DISC SLOT:
When a CD is inserted into the slot, it is loaded automatically,
and will show
ʻ
LOAD
ʼ
then
ʻ
PLAY
ʼ
then disc information (
ʻ
Total
Tracks
ʼ
,
ʻ
Total Time
ʼ
) on the LCD, and then start playback.
3.VOLUME LEVEL:
Turn this knob clockwise to increase the volume, anti-clockwise
to decrease.
4 & 5. TUNE / TRACK |<< >>|:
Radio Mode:
Press these buttons to adjust the frequency,
moving through the available frequencies. Press and hold for
manual tuning. The unit will display
ʻ
Manual
ʼ
. Release button
and use
|<<
or
>>|
to tune manually. After a few seconds of no
activity the tuning will revert back to auto (Search)
tuning. Press
briefly to activate SEEK tuning mode, and the tuner will stop on
the next frequency with a signal.
CD Mode:
Press these buttons to skip to the next or previous
track on the disc or USB. Press and hold to rewind / review or
cue / fast forward through the track that is playing.
6. EJECT:
Press this button to eject the inserted CD from the unit and
return to radio mode operation. If the disc is not removed from
the unit within 10 seconds, it will again be reinserted into the CD
slot and commence playing.
7.BUTTONS NUMBERED 1 TO 6:
Radio Mode:
These buttons provide preset memories for radio
station frequencies (Station Presets). A total of 24 frequencies
can be stored in the preset memory buttons – 18 for FM band
(FM1, FM2, FM3 x 6 each) and 6 for AM band frequencies.
Simply chose the band (FM or AM – button 11), tune the
frequency (see above) and press and hold a memory button to
store that favourite frequency in that memory number.
CD / USB Mode:
Each button has a different function relating to
playback, as indicated on the button labels, which are described
below.
(1) PLAY/PAUSE
– start or pause playback of track.
(2) INT (Intro Scan)
– when pressed, the Intro Scan function
will play the first 10 seconds of a track and then skip to do the
same on the next track. A convenient method to find a track
you like on a CD or USB stick. Just press the button again to
turn the function off.
(3) RPT (Repeat)
– Press this button to repeat the single track
currently playing [
ʻ
S-RPT
ʼ
appears on the LCD] Press again to
switch repeat off. Press and hold for a few seconds to
activate DIRECTORY REPEAT [
ʻ
D-RPT
ʼ
appears on the LCD]
which will repeat all tracks in a selected USB / CD directory.
Press button again to turn off.
(4) RDM (Random)
– Press this button to RANDOMISE
(Shuffle) the playback order of tracks on the CD or USB. LCD
will show
ʻ
RDM
ʼ
when the function is active.
(5) D-DN (Directory Down)
– press to return to previous
directory.
(6) D-UP (Directory Up)
– press to advance to the next
directory.
8. DISP (Display):
Radio Mode
– Press this button to display either clock time or
RDS information on the LCD. Clock time is obtained from the
RDS code transmissions when available.
CD Mode
– Press this button to display the track name or album
name and/or file list on the CD / USB.
9. ST:
Indicates
ʻ
ST
ʼ
on the LCD if an FM stereo signal is being
received. Default status is to receive in stereo. If the FM signal
is too weak then the unit automatically reverts to mono.
Note:
Some low-power FM stations operating in Australia on
88 MHz and below may be transmitting in mono. AM analogue
radio in Australia is currently broadcasting only in mono.
10. MODE:
Press this button to select the playback mode - Radio, CD or
USB. For CD / USB modes to function, the CD / USB Stick must
be inserted into their respective slots.
11. BAND (also provides loudness function):
Press this button to switch between FM and AM band
frequencies for the tuner. The tuner will display FM1, FM2, FM3
for the FM frequencies and MW for AM frequencies.
Press and hold the band button to turn loudness on or off.
12. PTY (Program Type)
This button is used to scan for stations of a selected program
type. When active, the top of the display will show
ʻ
PTY
ʼ
. For
normal tuning of the complete band, this button MUST be turned
off.
Pressing this button once starts the tuner scanning only for the
RDS program type selected (format or genre, eg Pop, Rock,
News etc). When this button is pressed the RDS program type is
temporarily displayed on screen. Note that it may take up to 20
seconds to scan for a station of the selected program type.
To select another RDS program type, press PTY button once
and then any of the buttons numbered 1 to 6 once. Each button
Figure 2:
Front Panel