


Android basics
27
AUG-2.3-103
Android User’s Guide
Monitoring your phone’s status
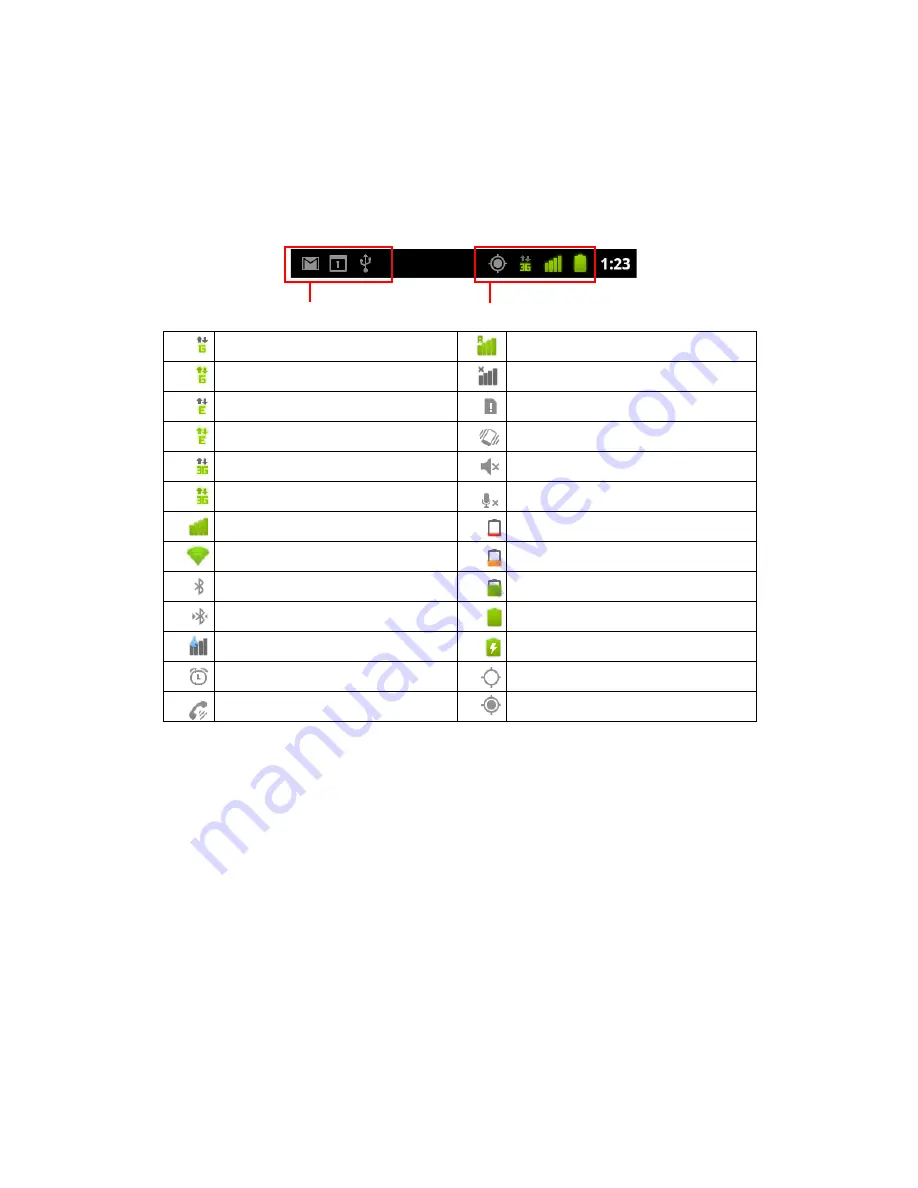
The Status bar appears at the top of every screen. It displays icons indicating that
you’ve received notifications (on the left) and icons indicating the phone’s status (on
the right), along with the current time.
If you have more notifications than can fit in the status bar, a plus icon
prompts
you to open the Notifications panel to view them all. See “Managing notifications” on
page 29.
Status icons
The following icons indicate the status of your phone. To learn more about the
different kinds of mobile networks, see “Connecting to networks and devices” on
page 57.
Network status icons turn green if you have a Google Account added to your phone
and the phone is connected to Google services, for syncing your Gmail, Calendar
events, contacts, for backing up your settings, and so on. If you don’t have a Google
Account or if, for example, you’re connected to a Wi-Fi network that is not connected
to the Internet, the network icons are white.
Connected to GPRS mobile network
Roaming
GPRS in use
No signal
Connected to EDGE mobile network
No SIM card installed
EDGE in use
Vibrate mode
Connected to 3G mobile network
Ringer is silenced
3G in use
Phone microphone is mute
Mobile network signal strength
Battery is very low
Connected to a Wi-Fi network
Battery is low
Bluetooth is on
Battery is partially drained
Connected to a Bluetooth device
Battery is full
Notification icons
Status icons
Android basics
27
AUG-2.3-103
Android User’s Guide
Monitoring your phone’s status
The Status bar appears at the top of every screen. It displays icons indicating that
you’ve received notifications (on the left) and icons indicating the phone’s status (on
the right), along with the current time.
If you have more notifications than can fit in the status bar, a plus icon
prompts
you to open the Notifications panel to view them all. See “Managing notifications” on
page 29.
Status icons
The following icons indicate the status of your phone. To learn more about the
different kinds of mobile networks, see “Connecting to networks and devices” on
page 57.
Network status icons turn green if you have a Google Account added to your phone
and the phone is connected to Google services, for syncing your Gmail, Calendar
events, contacts, for backing up your settings, and so on. If you don’t have a Google
Account or if, for example, you’re connected to a Wi-Fi network that is not connected
to the Internet, the network icons are white.
Connected to GPRS mobile network
Roaming
GPRS in use
No signal
Connected to EDGE mobile network
No SIM card installed
EDGE in use
Vibrate mode
Connected to 3G mobile network
Ringer is silenced
3G in use
Phone microphone is mute
Mobile network signal strength
Battery is very low
Connected to a Wi-Fi network
Battery is low
Bluetooth is on
Battery is partially drained
Connected to a Bluetooth device
Battery is full
Notification icons
Status icons
Android basics
28
AUG-2.3-103
Android User’s Guide
Notification icons
The following icons indicate that you’ve received a notification. See “Managing
notifications” on page 29 for information about responding to these notifications. In
addition these icons, applications you install on your phone may use their own
notification icons.
Airplane mode
Battery is charging
Alarm is set
GPS is on
Speakerphone is on
Receiving location data from GPS
New Gmail message
More notifications
New text or multimedia message
Call in progress
Problem with text or multimedia
message delivery
Call in progress using a Bluetooth
headset
New Google Talk message
Missed call
New voicemail
Call on hold
Upcoming event
Call forwarding is on
Data is syncing
Song is playing
Problem with sign-in or sync
Uploading data
SD card or USB storage is full
Downloading data
An open Wi-Fi network is available
Download finished
Phone is connected via USB cable
Connected to or disconnected from
virtual private network (VPN)
Phone is sharing its data connection
via USB (USB tethering)
Carrier data use threshold approach-
ing or exceeded
Phone is sharing its data connection
as a Wi-Fi hotspot (Wi-Fi tethering)
Application update available
Phone is tethered in multiple ways
System update available
Display
Display layout
Notifications and Status Information
The Status bar appears at the top of every screen. It displays notifications icons,
such as missed call or received messages (on the left) and phone status icons, such as
battery status (on the right), along with the current time.
Status Icons


