background image

11

JCB-RO125
Instruction & User Manual

OPERATING INSTRUCTIONS

Intended Use

This orbital sander is intended for dry sanding 
of wood, plastic, metal and filler material as 
well as painted surfaces.

The tool must not be modified or used for 
any other purposes than the ones described in 
these instructions.

Before using the tool on metal surfaces, 
always remove the dust bag from the outlet. 
Sparks may ignite the dust or the bag.

WARNING!

Power Switch


m

On: Shift the ON/OFF switch slider to “I” 
position.


m

Off: Shift the ON/OFF switch slider to “O” 
position.

Changing A Sanding Sheet

The sanding sheet and sanding pad are 
provided with a hook and loop attachment 
system to allow quick and easy changing of 
sanding and polishing sheets.

Ensure the hook and loop surfaces of the 
tool plate, and chosen sheet are as clean as 
possible, and free from any large debris prior 
to mounting the sheet.

NOTE

To attach a new sheet:


m

Align the edge of the disc with the edge of 
the pad, and ensure the sheet is centered in 
the plate.


m

Apply pressure to the disc, ensuring it is 
securely fixed across the entire sanding pad.

To remove a disc:


m

Lift one corner of the sanding disc and pull 
off from the sanding pad.

Adjusting Speed


m

Disc speed can be varied by rotating the 
speed adjustment wheel.


m

The wheel allows fine control between 
minimum (7000rpm) and maximum 
(14000rpm) speeds.

The correct speed for your application will 
depend on grade, material and pressure 
applied. Always test new settings on a scrap 
piece of material if possible.

NOTE

The tool may become hot at low speeds. To 
aid in cooling the motor, periodically set the 
speed to a higher value and run the tool with 
no load.

NOTE

Dust Suction


m

Efficiency and durability of sandpaper are 
much improved by dust suction through the 
apertures in the disc and sandpaper. 


m

Dust collector bag must be emptied 
regularly.

Vacuum Adaptor


m

The adaptor ensures coupling to a vacuum 
cleaner in case of increased dust generation.


m

Dismount the collector bag and fasten the 
tool to a vacuum cleaner.

Summary of Contents for JCB-RO125

Page 1: ...POWER TOOL INSTRUCTION USER MANUAL EN IM RO125 EN JCB RO125 Original Instructions...

Page 2: ...pean Directive 2012 19 EU It will then be recycled or dismantled in order to reduce the impact on the environment Electric and electronic equipment can be hazardous for the environment and for human h...

Page 3: ...ls 6 COMPONENT LIST 8 TECHNICAL DATA 9 NOISE INFORMATION 9 VIBRATION INFORMATION 10 OPERATING INSTRUCTIONS 11 Intended Use 11 Power Switch 11 Changing a Sanding Sheet 11 Adjusting Speed 11 Dust Suctio...

Page 4: ...et conditions Water entering a power tool will increase the risk of electric shock m m Do not abuse the cord Never use the cord for carrying pulling or unplugging the power tool Keep the cord away fro...

Page 5: ...and or remove the battery pack if detachable from the power tool before making any adjustments changing accessories or storing power tools Such preventive safety measures reduce the risk of starting t...

Page 6: ...Use the tool for dry sanding only m m Use clamps or a vice to secure your work whenever possible m m Use perforated hook and loop sandpaper with the prescribed dimensions m m A sanding sheet that has...

Page 7: ...7 JCB RO125 Instruction User Manual...

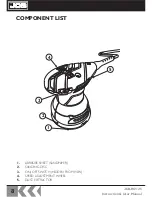
Page 8: ...8 JCB RO125 Instruction User Manual COMPONENT LIST 1 2 3 4 5 1 ABRASIVE SHEET SANDPAPER 2 SANDING DISC 3 ON OFF SWITCH HIDDEN FROM VIEW 4 SPEED ADJUSTMENT WHEEL 5 DUST EXTRACTOR...

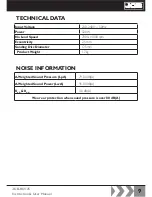
Page 9: ...tage 230 240V 50Hz Power 320W No Load Speed 7000 14000 rpm Eccentricity 2 5mm Sanding Disc Diameter 125mm Product Weight 1 7kg A Weighted Sound Pressure LpA 79 00 dB A A Weighted Sound Power LwA 90 00...

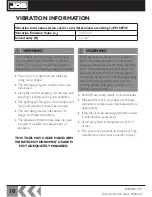
Page 10: ...IS NOT ADEQUATELY MANAGED To be accurate an estimation of exposure level in the actual conditions of use should also take account of all parts of the operating cycle These include times when the tool...

Page 11: ...he edge of the disc with the edge of the pad and ensure the sheet is centered in the plate m m Apply pressure to the disc ensuring it is securely fixed across the entire sanding pad To remove a disc m...

Page 12: ...ly in lengthwise and crosswise directions over the workpiece Do not tilt the machine during operation This will apply uneven pressure and may cause damage to the work piece e g when sanding veneer NOT...

Page 13: ...loose screws immediately or serious injury could occur m m If the power cord becomes damaged and replacement is necessary this must be carried out by an authorised warranty agent Never open the tool T...

Page 14: ...save as a PDF document The relevant warranty certificate together with the original sales receipt will be required in the event of any claim within the warranty period Should you choose not to registe...

Page 15: ...m Accessories and consumable items m m Cases and tool storage products If your product develops a fault within 30 days of purchase return it to the retailer where it was purchased together with your s...

Page 16: ...mpatibility Directive 2014 30 EU RoHS Directive 2011 65 EU Standards conform to EN 55014 1 2017 EN 55014 2 2015 EN 61000 3 2 2014 EN 61000 3 3 2013 EN 62841 1 2015 AC 2015 EN 62841 2 4 2014 The person...

Page 17: ...17 JCB RO125 Instruction User Manual...

Reviews: