Quick Setup Guide to Using the
DVD600 (with the DCR600)
The DVD600 can play discs in the following
formats:
• Both 5-inch (12cm) and 3-inch (8cm) discs
• CD audio discs • DTS audio discs
• CD-RW audio discs • DVD movie discs
• VCD video compact discs
However, it cannot play:
• DVD discs with a Region Code other than "1"
or "All"
• DVD discs using PAL format video
• DVD-ROM data discs
• DVD-RAM discs • CD-R discs
• CD-I discs • CD-G discs
• SVCD discs • Photo CD discs
• MP3 audio discs
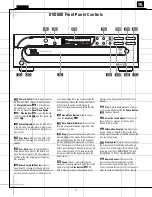
Press the DVD600’s
Power Switch
so
that it latches and the
Status Indicator
turns amber, indicating that the unit is in the
Standby mode. Turn the unit on by pressing
either the
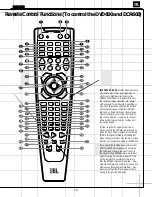
Power On Button
b
on the
remote or the
Open/Close Button
or
Play Button
on the front panel. The
Status Indicator
will turn green.
Open the DVD600’s drawer, and insert up to
5 discs in the tray locations, using the
Disc
Skip Button
to rotate the carousel
to access all locations. Make sure each disc is
loaded with the label side up, and that it is
seated correctly in its location.
When you close the drawer, the DVD600 will
automatically start playing the first disc it rec-
ognizes, whether it is a CD or DVD disc.
However, whichever type of disc is playing,
make sure that you have selected DVD as the
input source on the DCR600 by pressing
d
on
the remote, or
!
on the front panel of the
receiver until DVD is indicated.
For most discs, the DVD600 and DCR600 will
automatically select the correct surround mode.
To make sure that audio in the DTS audio format
is correctly processed, you must choose that for-
mat as the default in the DVD600’s setup menu.
Simply stop play of the disc, and enter the setup
menu by pressing
z
on the remote. Use the
⁄
/
¤
Buttons
y
to scroll down to
Digital Audio Output.
Press the
Set Button
to select this option, and a screen will pop
up, allowing you to choose from PCM, Dolby
Digital or DTS outputs. Use the
⁄
/
¤
Buttons
y
to highlight DTS, then press
the
Set Button
to select this choice. You
do not need to reset the audio output for other
formats. The DCR600 and DVD600 will automat-
ically process PCM, Dolby Digital and DTS sig-
nals correctly. Press the
Menu Button
z
to
exit the menu screen. If you press the
Menu
Button
z
while the disc is playing, you can
access the disc’s menu to choose the DTS for-
mat there as well.
You may wish to experiment with surround
modes other than Dolby Digital and DTS using
the DCR600’s functions. Press the
Surround
Mode Selector
t7
to scroll through such
choices as Dolby Pro Logic, Dolby 3 Stereo,
5-Channel Stereo, Hall, Theater, VMAx, Logic 7
or Surround Off (Stereo). See page 52 for
descriptions of these modes.
Press the
Stop Button
once to enter
Resume mode, in which play will resume from
the point where it was stopped. Pressing the
Stop Button
twice will cause play to
resume from the beginning of the disc, or the
disc’s main menu.
You may wish to listen to the tracks of a CD, or
view the chapters of a DVD, in a different order
than they appear on the disc.
The Random function will play all of the tracks
on one CD, or all of the chapters on one DVD, in
a random order selected by the DVD600. The
DVD600 does not randomly play selections from
all five discs inserted in its tray, since this might
result in the odd experience of alternating among
audio tracks and disjointed video selections.
Simply press the
Random Button
once to
start random play, and press it again to return to
standard play, using the disc’s main menu.
The DVD600 offers several variations of Repeat
Play:
Repeat All
discs in the unit once;
Repeat
1 Disc
until play is manually stopped;
Repeat
Title
on a DVD disc until play is manually
stopped;
Repeat Track/Chapter
on either a CD
or DVD disc until play is manually stopped; and
Repeat A–B,
which repeats a programmed
selection until play is manually stopped.
Press the
Repeat Button
to scroll through
the repeat choices. Repeat play can be stopped
by pressing the
Repeat Button
until
Repeat Off is selected, or by pressing the
Stop
Button
twice.
Program the Repeat A–B function while a disc is
playing. Press the
Repeat A–B Button
at
the start of the passage to be repeated, and
press it again at the end of the passage. The
passage will continue to play until the
Stop
Button
is pressed.
You can also program play lists of selected
tracks or chapters.
1.
Select the DVD600 by pressing the
DVD
Button
d
, and press the
Program Button
to bring up the Program Edit Screen.
2.
Use the
⁄
/
¤
y
keys to select a disc
number, and press either
Set
or
›
to enter the selection and move to the next
option.
3.
Use the
⁄
/
¤
y
keys to select a track
(for a CD) or title (for a DVD), and press either
Set
or
›
to enter the selection and
move to the next option. If “99” appears, it
means the DVD600 has not read the disc yet
to determine whether it is a CD or DVD.
4.
For DVDs only, use the same procedure to
enter a chapter.
5.
The next choice is to add the selection to the
play list by pressing the
Set Button
.
6.
Repeat Steps 2–5 to enter up to 25 selections
into the play list.
7.
Play the list by using the arrow keys to high-
light the Play selection, and the
Set Button
to begin play. Press the
Stop Button
twice to stop playback of the list. To
cancel the list, press the
Clear Button
.
8.
To delete a selection, highlight the item to be
deleted, press the
Set Button
, and then
use the
⁄
/
¤
y
keys to choose the
Delete Button
. Press the
Set Button
again to delete it. Alternatively, highlight the
item and press the
Clear Button
to
delete it.
9.
Insert an entry by highlighting the item in the
play list at the point of insertion, pressing the
Set Button
, and using the
¤
key
once to select the Insert option. Follow Steps
2 through 5 above to enter the new selection.
You may also edit an entry by pressing the
Check Button
twice to step through
the items in a play list. Use the
‹
/
›
`
keys to choose a disc, track or chapter to be
edited, and the
⁄
/
¤
y
keys to make
a change.
This completes the quick setup and operation of
your JBL Cinema ProPack 600 system. Additional
information is provided in the following sections
for those users with additional components, or who
wish to make other, more advanced adjustments
to their system.
53
47
47
61
46
8D
61
56
8D
61
55
55
50
61
8D
61
8D
4D
51
2D
10D
6D
2D
1D
6
DVD600
Summary of Contents for DVD600
Page 23: ...23 ...
Page 26: ...DVD600 26 ...
Page 28: ...DVD600 28 ...
Page 29: ...DVD600 29 ...
Page 30: ...DVD600 30 ...
Page 31: ...DVD600 31 ...
Page 32: ...DVD600 32 ...
Page 33: ...BLK_FIVE_JBL KLH sch 1 Mon Feb 18 14 04 14 2002 DVD600 33 ...
Page 34: ...34 ...
Page 35: ...DVD600 35 ...
Page 48: ...DVD600 48 ...
Page 49: ...DVD600 49 ...
Page 50: ...DVD600 50 ...
Page 51: ...DVD600 51 ...
Page 52: ...DVD600 52 ...
Page 53: ...DVD600 53 ...
Page 54: ...DVD600 54 ...
Page 55: ...OUT_JBL_MP 00 sch 1 Mon Feb 18 14 09 26 2002 DVD600 55 ...
Page 56: ...VOUT_JBL_MP 00 sch 1 Mon Feb 18 14 09 26 2002 DVD600 56 ...
Page 57: ...DVD600 57 ...
Page 58: ...st1_videout_JBL_MP 01 sch 1 Mon Feb 18 14 08 23 2002 DVD600 58 ...
Page 59: ...st1_videout_JBL_MP 01 sch 1 Mon Feb 18 14 08 23 2002 DVD600 59 ...
Page 60: ...DVD600 60 ...
Page 61: ...miscs_JBL_MP 00 sch 1 Mon Feb 18 14 07 22 2002 DVD600 61 ...
Page 62: ...miscs_JBL_MP 00 sch 1 Mon Feb 18 14 07 22 2002 DVD600 62 ...
Page 63: ...DVD600 63 ...
Page 64: ...memory_JBL MP 00 sch 1 Mon Feb 18 14 06 32 2002 DVD600 64 ...
Page 65: ...memory_JBL MP 00 sch 1 Mon Feb 18 14 06 32 2002 DVD600 65 ...
Page 66: ...DVD600 66 ...
Page 67: ...main_JBL_MP 00 sch 1 Mon Feb 18 14 05 34 2002 DVD600 67 ...
Page 68: ...main_JBL_MP 00 sch 1 Mon Feb 18 14 05 34 2002 68 ...
Page 69: ...DVD600 69 ...
Page 70: ...front JBL MP 01 sch 1 Mon Feb 18 14 04 55 2002 DVD600 70 ...
Page 71: ...front JBL MP 01 sch 1 Mon Feb 18 14 04 55 2002 DVD600 71 ...
Page 72: ...DVD600 72 ...
Page 73: ...c 5920p_mecha_ftms_01 sch 1 Fri Feb 22 15 19 13 2002 DVD600 73 ...


