


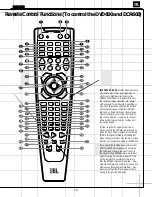


This button is also used during the “Auto
Search” procedure when programming the
remote.
u
All Off:
Simultaneously sends Power Off
commands to all programmed devices con-
trolled by the remote.
v
All On:
Simultaneously sends Power
On commands to all programmed devices
controlled by the remote.
w
Volume Down:
Use to lower the system
volume.
x
Channel/Title/Guide:
Starts the process
of setting the DCR600’s speaker output levels
using an input source rather than the test tone.
Press this button, then use the
⁄
/
¤
Buttons
y
to select the channel being adjusted,
followed by the
Set Button
. You may
then use the
⁄
/
¤
Buttons
y
again to
change the level for that channel. Press the
Set Button
to lock in the setting.
When using the DVD600 to play a DVD disc,
this button functions as a Title button, and dis-
plays the disc’s Title Select Menu, or a symbol
(
X
) if the disc either does not offer this func-
tion or has only one title.
When the Video 3 input has been programmed
for a cable or satellite service, this button will
access the service’s programming guide, if the
service is active.
y
⁄
:
Used to change or scroll through items
in the on-screen menus, or to change configu-
ration settings, such as output levels. When
changing an item such as the surround mode
or digital input directly, first press the function
or mode to be changed, such as Surround
Mode or Digital Input, and then press this button
to scroll through the list of available choices.
z
Menu:
Used only with video sources.
When DVD is selected, pressing this button
while a DVD disc is playing stops playback and
displays the disc’s menu. When the unit is
stopped, pressing this button displays the
DVD600’s Setup Menu.
`
‹
:
Used to change the menu selection
or setting during some of the setup or other
procedures.
Set:
Used to enter settings into the mem-
ory of the DCR600, DVD600 or video device
selected. Also used in the setup procedures for
delay time, speaker configuration and channel
output level adjustment. When the DVD600
has been selected, pressing this button will
select the item that is highlighted in the Status
Banner, or in the on-screen menu displayed by
a DVD disc.
›
:
Used to change the menu selection
or setting during some of the setup or other
procedures.
Digital/Subtitle/Exit:
When the DCR600
is selected, press this button to assign one of
the digital inputs to a source. When the
DVD600 is selected, this button is used to
change the subtitle choice. For other video
devices, it exits the menu.
¤
:
Used to change or scroll through
items in the on-screen menus, or to change
configuration settings, such as output levels.
When changing an item such as the surround
mode or digital input directly, first press the
function or mode to be changed, such as
Surround Mode or Digital Input, and then press
this button to scroll through the list of
available choices.
Delay/Return/Prev Ch.:
Begins the
process for setting the delay times used by the
DCR600 when processing surround sound.
After pressing this button, the delay times are
entered by pressing the
Set Button
and
then using the
⁄
/
¤
Buttons
y
to
change the setting. Press the
Set Button
again to complete the process.
This button is also used when viewing a menu
display from a DVD disc. Press it to return to
the previous menu screen.
–
,
Numeric Keys:
These
buttons serve as a ten-button numeric keypad
to enter tuner preset positions. They are also
used with the DVD600 to enter data for
sequential programming, to enter or change
the access password for parental control, to
enter a language code, or to respond to menu
options presented by a disc. When the TV or
another video device is selected, they are used
to select channel numbers. They may also be
used to select track numbers when playing a
CD, DVD or LD.
Tuner Mode/Angle:
Press this button
when the tuner is in use to select between
automatic tuning and manual tuning. When
the button is pressed so that the
AUTO
indica-
tor
V
goes out, pressing the
Tuning Buttons
8
will move the frequency up or
down in single-step increments. When the
FM band is in use, pressing this button when
a station’s signal is weak will change to
monaural reception.
When a DVD encoded with multiple-angle
information is playing, press to change the
angle in use. Note that this function is only
available on discs that are specially prepared
to take advantage of the multiple-angle func-
tion, and only for those parts of the disc that
are recorded with multiple-angle content.
The DVD600 will display a camera icon on the
screen to indicate when this feature is
available.
Memory:
Enters a radio station into the
DCR600’s preset memory. Once the
MEMORY
Indicator
S
flashes, you have five seconds
to enter a preset memory location using the
Numeric Keys
–
,
. Repeat
the process to enter additional stations.
Tuning Up/Down/Step (Frame
Advance) Buttons:
When the tuner is in use,
these buttons will tune up or down through the
selected frequency band. If the
Tuner Mode
Button
@
has been pressed so that the
AUTO Indicator
V
is illuminated, pressing
and holding either of the buttons for three sec-
onds will cause the tuner to seek the next sta-
tion with acceptable signal strength for quality
reception. When the
AUTO Indicator
V
is
NOT illuminated, pressing these buttons will
tune stations in single-step increments.
When a DVD disc is playing, press these
buttons to move forward or backward one
frame at a time. Press the
Play Button
to resume normal play. These buttons do
not function when a CD is playing.
Direct/Program Button:
Pressing this
button in tuner mode starts the sequence for
direct entry of a station’s frequency or CD track.
After pressing the button, simply press the
proper
Numeric Keys
–
,
to
select a station or track.
When the DVD600 is stopped, press this but-
ton to display the program menu and enter a
programmed play sequence. When a disc is
playing, press to switch between normal play
and programmed playback.
Clear Button:
Erases incorrect entries
when using the remote to directly enter a radio
station’s frequency.
When the DVD600 has been selected, press
this button to remove the Status Banner or
other displays from your video screen. This
button is also used to clear items from
Programmed Play lists.
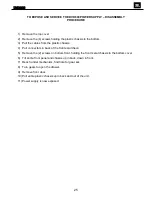
47
46
10D
58
49
49
12
DVD600
Summary of Contents for DVD600
Page 23: ...23 ...
Page 26: ...DVD600 26 ...
Page 28: ...DVD600 28 ...
Page 29: ...DVD600 29 ...
Page 30: ...DVD600 30 ...
Page 31: ...DVD600 31 ...
Page 32: ...DVD600 32 ...
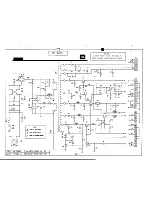
Page 33: ...BLK_FIVE_JBL KLH sch 1 Mon Feb 18 14 04 14 2002 DVD600 33 ...
Page 34: ...34 ...
Page 35: ...DVD600 35 ...
Page 48: ...DVD600 48 ...
Page 49: ...DVD600 49 ...
Page 50: ...DVD600 50 ...
Page 51: ...DVD600 51 ...
Page 52: ...DVD600 52 ...
Page 53: ...DVD600 53 ...
Page 54: ...DVD600 54 ...
Page 55: ...OUT_JBL_MP 00 sch 1 Mon Feb 18 14 09 26 2002 DVD600 55 ...
Page 56: ...VOUT_JBL_MP 00 sch 1 Mon Feb 18 14 09 26 2002 DVD600 56 ...
Page 57: ...DVD600 57 ...
Page 58: ...st1_videout_JBL_MP 01 sch 1 Mon Feb 18 14 08 23 2002 DVD600 58 ...
Page 59: ...st1_videout_JBL_MP 01 sch 1 Mon Feb 18 14 08 23 2002 DVD600 59 ...
Page 60: ...DVD600 60 ...
Page 61: ...miscs_JBL_MP 00 sch 1 Mon Feb 18 14 07 22 2002 DVD600 61 ...
Page 62: ...miscs_JBL_MP 00 sch 1 Mon Feb 18 14 07 22 2002 DVD600 62 ...
Page 63: ...DVD600 63 ...
Page 64: ...memory_JBL MP 00 sch 1 Mon Feb 18 14 06 32 2002 DVD600 64 ...
Page 65: ...memory_JBL MP 00 sch 1 Mon Feb 18 14 06 32 2002 DVD600 65 ...
Page 66: ...DVD600 66 ...
Page 67: ...main_JBL_MP 00 sch 1 Mon Feb 18 14 05 34 2002 DVD600 67 ...
Page 68: ...main_JBL_MP 00 sch 1 Mon Feb 18 14 05 34 2002 68 ...
Page 69: ...DVD600 69 ...
Page 70: ...front JBL MP 01 sch 1 Mon Feb 18 14 04 55 2002 DVD600 70 ...
Page 71: ...front JBL MP 01 sch 1 Mon Feb 18 14 04 55 2002 DVD600 71 ...
Page 72: ...DVD600 72 ...
Page 73: ...c 5920p_mecha_ftms_01 sch 1 Fri Feb 22 15 19 13 2002 DVD600 73 ...


