18
Operating the DVD600
II
DVD Changer
2.
Press the
‹
/
›
Buttons
`
until the
camera icon with the letters “Ang” below it (fifth
from the left) is highlighted in white between
yellow brackets.
3.
Press the
Enter Button
.
4.
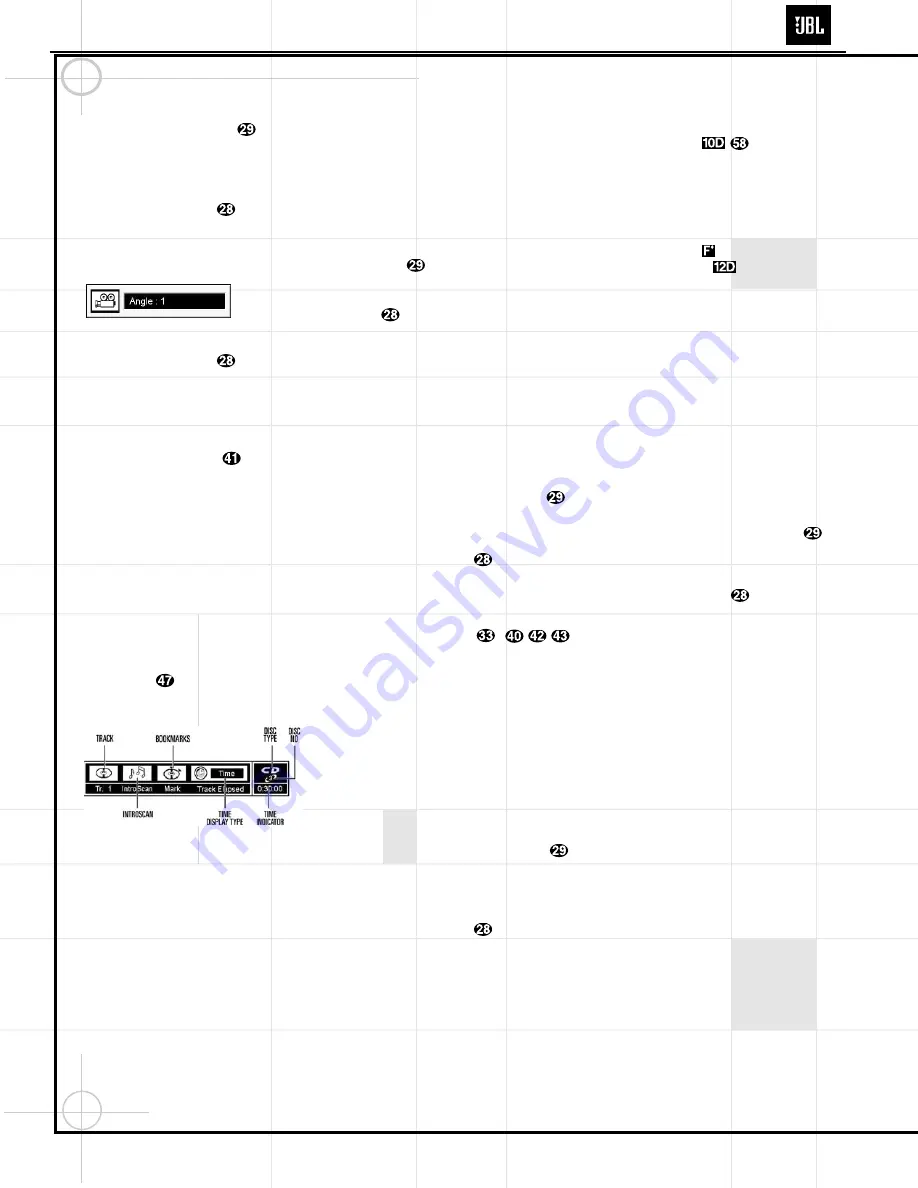
Note that the main Menu Bar will be replaced
with a single display of the angle number
(Figure 21).
Figure 21
5.
Press the
Enter Button
until the desired
angle is shown. Note that the number of angles
available is set by the disc’s producer, not the
DVD600
II
, and it may vary from disc to disc.
You may also change the angle directly by
pressing the
Angle Button
when multiple
angles are present, until the desired angle
appears on the screen.
Playing CDs
The DVD600
II
allows you to take advantage of
the on-screen Menu Bar even when playing
CDs. The use of this graphical display makes it
easy to select CD Functions.
When a CD is playing, the Menu Bar will auto-
matically appear in your video display, even
though there is no video on the CD itself. To
remove the Menu Bar at any time, press the
Clear Button
. If the Menu Bar is not pres-
ent, press the
Status Button
e
to have it
appear on the screen (Figure 22).
Figure 22
Track:
The number shown indicates the number
of the track that is currently playing.
IntroScan:
When the IntroScan feature is
active, the musical notes in this icon will
change.
Bookmarks:
Highlight this area and press enter
to enter or go to bookmarked locations on a disc.
Time Display Type:
This shows the type of
time indication being shown: Time Remaining
for the Current Track, Total Elapsed for the Disc,
or Total Remaining for the Disc.
Disc Type:
Shows the type of disc being played.
Disc Number:
The slot number of the disc being
played is shown.
Time Indicator:
The time indication selected
is shown.
Once the Menu Bar appears, press the
‹
/
›
Buttons
`
to move across the display
to select the desired option. When the option to
be changed is highlighted, press the
Enter
Button
to change the setting for that
option.
Selecting a Track
To select any track on a CD, follow these steps:
Enter the track number while the disc is playing
or in Pause mode by entering its number, or:
1.
During disc playback, press the
Status Button
e
if the Menu Bar is not already on the screen.
2.
If needed, press the
‹
/
›
Buttons
`
until the disc icon with the letter “T” underneath
it is highlighted in white between yellow brackets.
3.
Press the
Enter Button
.
4.
Note that the number to the right of the “T”
will be replaced with two dashes (– –).
5.
Using the
Numeric Keys
–
,
enter the number of the track to be accessed.
6.
The desired title will automatically be started.
Using IntroScan
The IntroScan feature allows you to sample the
tracks on a CD by playing the first ten seconds
of each track and then moving to the next track.
To use IntroScan, follow these steps:
1.
During disc playback, press the
Status Button
e
if the Menu Bar is not already on the screen.
2.
If needed, press the
‹
/
›
Buttons
`
until the musical score icon with the phrase
“IntroScan” underneath it (second from the left)
is highlighted.
3.
Press the
Enter Button
.
4.
Note that the disc will immediately begin to
play the first track on the disc and the musical
notes in the icon will change and flash.
5.
The unit will play the first ten seconds of
each track on the disc, moving from one track to
the next.
6.
To play a track during IntroScan, press the
Play/Pause Button
.
7.
If no track is selected, the disc will stop play-
ing when it has played the first ten seconds of
each track in order.
Note that while the IntroScan feature is in use,
the
Intro Indicator
will appear in the
Information Display
.
Time Display Selection
When playing CDs, the DVD600
II
is capable of
displaying the time displays that you are famil-
iar with from traditional CD-only players. The
choice of a time display is made through the use
of the on-screen Menu Bar, but any changes to
the display will also change the Time Display
mode for the Information Display.
To change the time display during CD playback,
follow these steps:
1.
During disc playback, press the
Status Button
e
if the Menu Bar is not already on the screen.
2.
If needed, press the
‹
/
›
Buttons
`
until the clock icon with the word “Time” next to it
is highlighted.
3.
Press the
Enter Button
to select one of
these four choices. Each press of the button will
select the next option:
•
Track Elapsed:
This shows the time that has
elapsed for the current track. At the start of
each track this display will reset to zero and
begin to count up again.
•
Track Remain:
This shows the time
remaining for the current track. At the start of
each track the time will begin to count down
again, starting with the total time of the
track.
•
Disc Elapsed:
This shows the total time that
the current disc has played for all tracks.
•
Disc Remain:
This shows the total time
remaining for all tracks on the disc that have
not yet been played.
Playing MP3 and Video CD Discs
The DVD600
II
is rare among DVD players in that
it is able to play discs containing MP3 audio
files. This means that you may enjoy the latest
music, using discs created in your computer,
through the high quality audio components in
your home theater system. As the way that MP3
files are recorded on discs differs from the way
conventional CD audio discs are structured, MP3
playback is somewhat different from standard CDs.
DVD600II
Summary of Contents for DVD600 II
Page 24: ...24 DVD600II...
Page 31: ...D600II_block_MP_1102 sch 1 Fri Jan 25 13 39 15 2002 31 DVD600II...
Page 32: ...32 DVD600II...
Page 33: ...33 DVD600II...
Page 34: ...34 DVD600II...
Page 35: ...35 DVD600II...
Page 36: ...36 DVD600II...
Page 37: ...37 DVD600II...
Page 45: ...DVD600II 45...
Page 46: ...DVD600II 46...
Page 47: ...DVD600II 47...
Page 48: ...DVD600II 48...
Page 49: ...DVD600II 49...
Page 50: ...DVD600II 50...
Page 51: ...DVD600II 51...
Page 52: ...DVD600II 52...
Page 53: ...DVD600II 53...
Page 54: ...DVD600II 54...
Page 55: ...VD600II_mecha_CDM5F_MP_1102 sch 1 Sat Nov 03 09 12 48 2001 DVD600II 55...
Page 56: ...DVD600II FRONT_MP_1102 sch 1 Sat Nov 03 09 17 30 2001 DVD600II 56...
Page 57: ...DVD600II FRONT_MP_1102 sch 1 Sat Nov 03 09 17 30 2001...
Page 58: ...DVD600II...
Page 59: ...DVD600II 59...
Page 60: ...60...
Page 61: ...DVD600II 61...
Page 62: ...VD600II REAR_MP_1102 sch 1 Sat Nov 03 09 19 20 2001 DVD600II 62...
Page 63: ...DVD600II_WIRING_MP_1102 sch 1 Sat Nov 03 09 16 03 2001 DVD600II 63...


