background image

14

connecTing The Ac poWer

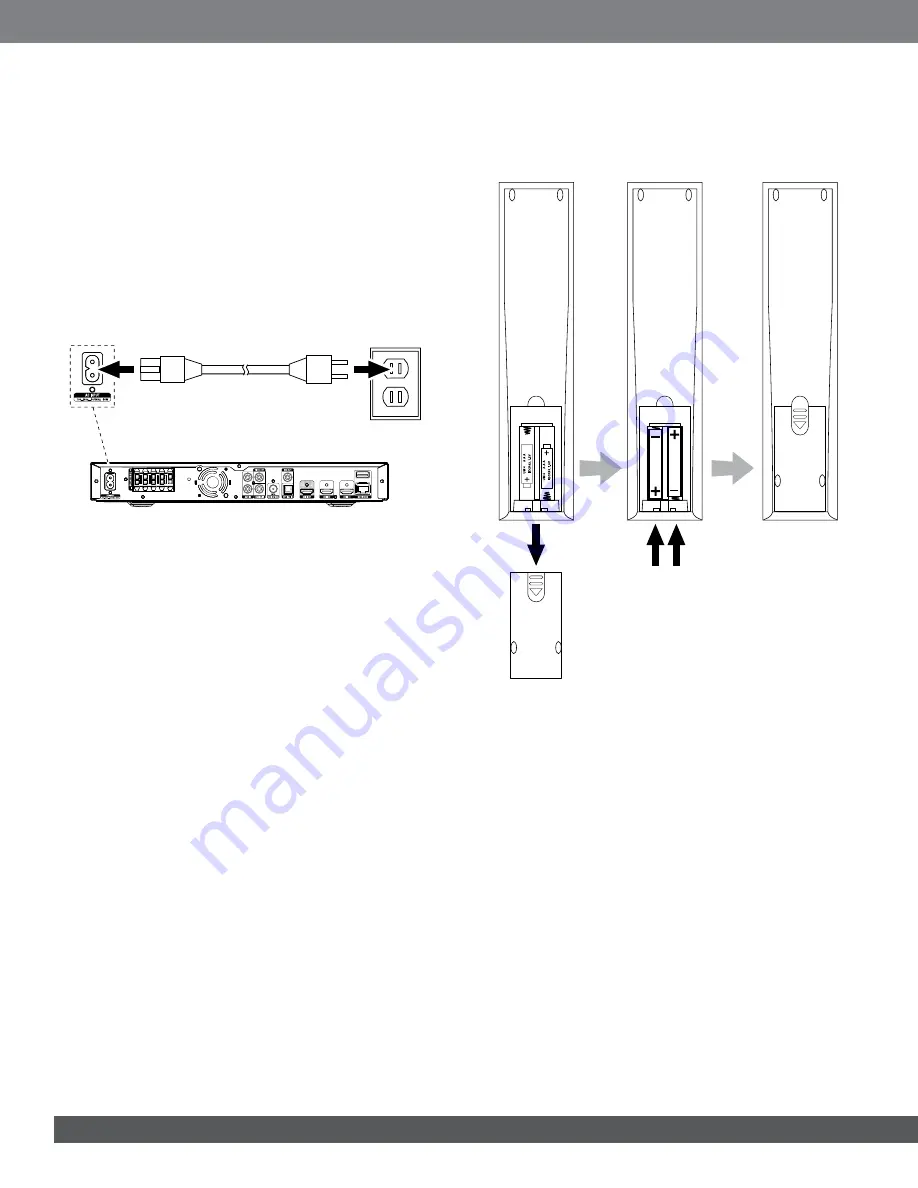
The receiver comes with a detachable AC power cord. This type of cord 

makes it easier for you to install and connect all other system wiring to the 

receiver’s rear panel.

NOTES:

• The power requirement for the BD100 and BD300 receivers is 100V – 

240V AC, 50/60Hz, 50W. Connecting to a power source other than the 

one listed may damage the receiver or cause abnormal operation.

• Before connecting the AC power cord to a wall outlet, confirm that you 

have correctly made all of the speaker connections, video connections 

and audio-component connections.

Connect the female end of the receiver’s detachable power cord to 

the receiver’s AC Power connector. Plug the other end into a working, 

unswitched 

AC outlet. 

Power Cord 

(supplied)

100v – 240v 

50/60Hz

Bd300 only: 

Plug the subwoofer’s power cord into an active, unswitched 

AC wall outlet.

• If you set the subwoofer’s Auto/On switch in the “Auto” position, the 

subwoofer will automatically turn on when it senses an audio signal at 

its input connection. The subwoofer will automatically enter the Standby 

mode approximately 20 minutes after the input signal ceases.

• If you set the Auto/On switch in the “On” position, the subwoofer will 

turn on when the Power switch is in the “On” position and will turn off 

when the Power switch is in the “Off” position.

• If you will not be using the subwoofer for an extended period of time, such 

as a vacation, we recommend setting the Power switch to “Off.”

Press the receiver’s front-panel Power button or the Power button on the 

remote control. The front-panel information display will display the legend 

“JBL.” The receiver is now ready for use.

pRepaRing The ReMoTe ConTRol

inSTAlling The BATTerieS

Your receiver’s remote control uses AAA batteries (supplied). Insert the 

batteries as shown in the illustration, making sure to observe the correct 

polarity.

uSing The reMoTe

When using the remote, remember to aim it toward the receiver’s front 

panel. Make sure that no objects, such as furniture, block the remote’s view 

of the receiver. Bright lights, fluorescent lights and plasma-video displays 

may interfere with the function of the remote.

• The remote has a range of about 20 feet (6.1m), depending on the 

lighting conditions. 

• You can use the remote at an angle of up to 30° to either side of the BD 

receiver.

If the remote seems to operate intermittently, make sure that the batteries 

are inserted correctly. If the remote still operates intermittently, replace both 

batteries with new ones.

Summary of Contents for Cinema BD100

Page 1: ...Home theater system Owner s Manual Cinema BD300 120V version system shown Cinema BD100 Cinema BD300 ...

Page 2: ...ntain region coding for the area where your receiver was shipped and intended for sale Area Where Sold Blu ray Disc Region Code DVD Region Code USA Canada Europe Middle East Korea S E Asia Mexico Latin America Australia New Zeland Russia India China For example BD receivers shipped to and sold in the USA will play only Blu ray discs that contain region code A and DVD discs that contain region code...

Page 3: ... Web site at www jbl com Verify Line Voltage Before Using Your BD receiver has been designed for use with 100 240 volt 50Hz 60Hz AC current and includes a detachable power cable intended for use in the region where the system is sold Connection to a line voltage other than that for which the unit is intended can create a safety and fire hazard and may damage the unit If you have any questions abou...

Page 4: ...aterials used normal heat and vibration caused by the use of the receiver or other factors Your warranty will not cover this type of damage to furniture so exercise caution in choosing an installation location for the receiver and in performing normal maintenance practices Your new JBL Blu ray Disc receiver requires a broadband Internet connection for streaming capability and BD Live interactivity...

Page 5: ...sert or remove the device at any time there is no installation or ejection procedure You can also use the USB port to perform firmware upgrades If an upgrade for the receiver s operating system is released in the future you will be able to download it to the receiver using this port Complete instructions will be provided at that time IMPORTANT Do not connect a PC or other USB host controller to th...

Page 6: ...tput Connector USB Network Port FM Antenna Connector Coaxial Digital Input Connector Power Cord Connector Analog Audio Input Connectors BD300 Receiver Composite Video Output Connector Network Connector HDMI Monitor Out Connector Optical Digital Input Connectors Fan Vents Speaker Connectors FM Antenna Connector Coaxial Digital Input Connector Power Cord Connector Analog Audio Input Connectors BD100...

Page 7: ...BD300 receiver only If your home network is a Wi Fi network insert the supplied Wireless LAN USB adapter into this port See Connecting to Your Home Network on page 13 for more information Do not insert a USB memory stick or similar device into the rear panel USB Network port The port will work only with a USB network adapter like the one supplied with the receiver HDMI Monitor Out connector Connec...

Page 8: ...SOURCE Eject Button Source Buttons Cursor Buttons Options Button Thumbnail Yellow Button Zoom Blue Button Repeat Button Volume Buttons Surround Button Disc Transport Control Buttons Power Button Mute Button Top Menu Button Home Button Number Buttons Display Button Setup Button Audio Button Enter Button Clear Exit Button Subtitle Button Program Red Button Bookmark Green Button Channel Buttons Pop U...

Page 9: ...his button while playing a Blu ray Disc recording or DVD displays its disc menu NOTE This feature is disc dependent Not all discs have pop up menus If a disc has no pop up menu pressing the Pop Up button may display the disc menu depending on how the disc s menu system was authored Enter button Press this button to select the highlighted item on the on screen menu Cursor buttons Use these buttons ...

Page 10: ...NT Make sure the and bare wires do not touch each other or any metal object on the receiver s rear panel Touching wires can cause a short circuit that can damage the BD100 receiver Connect the Speakers BD300 CAUTION Before making any connections to the BD300 receiver ensure that the receiver s AC cord is unplugged from the receiver and the AC outlet Making speaker connections with the receiver plu...

Page 11: ...ght center and surround speakers on the wall using picture hanger hardware Placing the subwoofer with its speaker 4 6 100mm 160mm from a wall maximizes bass performance and helps protect the exposed speaker unit from accidental damage PLACING THE SPEAKERS Cinema BD300 System Place center speaker above or below center of TV Place left right speakers on either side of TV Place subwoofer in a corner ...

Page 12: ...ector NOTE The HDMI connection will deliver both video and audio to your TV or video display We suggest disabling your TV or video display s audio system to take full advantage of your Cinema BD system s superior audio reproduction Connecting Your HDMI Source Devices BD300 only If you have any source devices with HDMI connectors using them will provide the best possible video and audio performance...

Page 13: ...connect the BD receiver s Network connector directly to your home network router network switch network modem or Ethernet network wall jack that has Internet access See Network on page 17 for information about joining the BD receiver with your home network To Internet To Internet Network Modem Network Modem Wireless Router Ethernet Cat 5 5E Cable not supplied Wireless LAN USB Adapter supplied Inse...

Page 14: ... the Auto On switch in the On position the subwoofer will turn on when the Power switch is in the On position and will turn off when the Power switch is in the Off position If you will not be using the subwoofer for an extended period of time such as a vacation we recommend setting the Power switch to Off Press the receiver s front panel Power button or the Power button on the remote control The f...

Page 15: ...will change to the chosen resolution You will be presented with the option to continue with the new resolution or Cancel to return to the previous resolution If the screen remains blank please wait 15 seconds without pressing anything and the system will automatically return to the previous resolution Auto 1080p 1080i 720p 480p 576p 480i 576i Setup Wizard Next 3 5 ENTER Previous If you are unsure ...

Page 16: ...il you pair it with a Bluetooth device which can then stream audio content to the BDS receiver Select Force Pairing to drop a currently paired Bluetooth device and force the receiver to enter the pairing mode so you can pair it with a new device Bluetooth Break in Allow An audio signal streaming fron a paired Bluetooth device will interrupt the audio currently playing through the BD receiver and t...

Page 17: ...n This option lets you select your TV s highest resolution Auto automatically selects the best resolution for your TV or flat screen display Color Space This option lets you match the receiver s video output to the color space of the connected TV or video display Check the documentation for your TV or video display to determine which color space RGB YUV VCbCr422 or Full RBG it uses Film Mode If yo...

Page 18: ... dialogue Auto This setting applies compression based on information encoded within the Dolby Digital bitstream The receiver will selectively apply compression only during the most dynamic parts of the soundtrack Speaker Settings This option lets you set the following items Test Tone This setting outputs test noise through each of the loudspeaker channels in the following order Left L Center C Rig...

Page 19: ...Bluetooth Input Home Menu The available sources are listed on the left If a disc has been inserted into the receiver s built in disc slot it will appear on the list as either CDDA CD DVD Video DVD or Blu ray Disc If you have inserted a USB device into the receiver s USB port it will appear on the list as USB Digital and analog audio sources connected to the receiver s rear panel digital and line i...

Page 20: ...ur personal taste here are some ideas you may find helpful For films and video music programs your overall goal should be to create an enveloping realistic sound field that draws you into the film or music program without drawing your attention away from the action on the screen For multichannel music recordings some music producers will create a sound field that places the musicians all around yo...

Page 21: ... there is glue or a similar substance on the disc remove the substance completely before using the disc Do not expose the disc to direct sunlight or heat sources such as hot air ducts or leave it in a car parked in direct sunlight as there can be a considerable rise in temperature inside the car After playing store the disc in its case Do not write on the label side with a ball point pen or other ...

Page 22: ...ressing this button while playing a Blu ray Disc recording displays the pop up menu DVDs will display the disc menu Note If the Blu ray Disc recording does not support a pop up menu the disc menu will be displayed Bookmark function The bookmark function lets you mark up to 12 locations on the disc currently playing Press the Bookmark button to mark the current location on the disc To clear a bookm...

Page 23: ...e computer operating system or media player To determine which of your network devices allow DLNA media sharing simply scroll through the BD receiver s Home Menu screen and select DLNA the various network devices will be listed below the main title Simply click on a device and if it allows file sharing its file structure will be displayed allowing you to find the available media NOTE Your receiver...

Page 24: ...o inputs in the following order Optical Aux Coaxial HDMI ARC Audio Return Channel HDMI 1 BD300 only and HDMI 2 BD300 only The Audio Input Now Playing screen will appear on the TV Coaxial Playing Files from USB Devices and Data Discs Your Cinema BD system can play MP3 up to 320kbps bitrate audio files display JPEG photos and show MPEG 2 and DivX home theater profile audio video files stored on a US...

Page 25: ...hile the directory list is displayed highlights the next item in the directory Cursor Left button Pressing this button while a photo is displayed rotates the photo 90 counterclockwise Pressing this button while the directory list is displayed jumps to the next higher directory level Cursor Right button Pressing this button while a photo is displayed rotates the photo 90 clockwise Options button Pr...

Page 26: ...track s time remaining Play Mode Plays songs in their normal order in random order until you press the Stop button or in shuffle order plays each song in the folder one time in random order then returns to the directory Bitrate Shows the bitrate of the song currently playing Advance Performs a rapid audible search forward through the song Replay Each press of the Enter button jumps back ten second...

Page 27: ...structure when you see a file you want to include in the playlist for that file type highlight it and press the Options button The playlist options box will appear 5 To add the item to the playlist select Add to playlist 6 Repeat Steps 4 5 for all items you want to add to the playlist To create a playlist for a different file type repeat Steps 1 6 but in Step 3 select a different file type To Play...

Page 28: ...t the receiver is joined in your home network See General Settings Network on page 17 for information about performing a connection test Cannot stream media from other networked devices via DLNA Make sure the networked devices have given permission to share media See Digital Living Network Alliance DLNA on page 23 for more information The disc does not play Check that the disc is inserted correctl...

Page 29: ...D R RW DVD R RW CDDA CD digital audio CD R RW discs Region code BD DVD See table on page 2 Audio formats Dolby Digital Dolby Digital Plus Dolby TrueHD DTS Digital Surround DTS HD Master Audio PCM MP3 32kbps 320kbps bitrates WMA 64kbps 192kbps Video Section Television format NTSC or PAL selectable HDMI version with 3D and 30 36 bit Deep Color Bluetooth Frequency range 2402MHz 2480MHz Transmitter po...

Page 30: ...ansducer N A 1 2 13mm titanium laminate dome video shielded Midrange transducer N A 3 75mm paper cone video shielded Full range transducer 2 1 2 64mm cone N A Dimensions W x H x D N A 7 5 8 x 3 1 4 x 3 3 4 194mm x 83mm x 95mm Weight N A 1 87 lb 0 85kg Subwoofer CINEMA BD100 CINEMA BD300 Low frequency transducer 5 1 4 133mm cone 8 200mm long throw paper cone Amplifier power N A 100 watts RMS Enclos...

Page 31: ... are trademarks of Rovi Corporation or its subsidiaries and are used under license DLNA the DLNA Logo and DLNA CERTIFIED are trademarks service marks or certification marks of the Digital Living Network Alliance DOLBY DIGITAL PLUS TRUE HD Manufactured under license from Dolby Laboratories Dolby and the double D symbol are registered trademarks of Dolby Laboratories DTS DIGITAL SURROUND Manufacture...

Reviews: