background image

page 3

www.jayline.co.nz

NOVEMBER 2016

Congratulations on the purchase of your Jayline wood fi re.

Please read this installation and operation manual carefully.
The installation of this fi re must comply with the Installation Standard 
AS/NZS 2918:2001 as well as any additional local requirements.
Please ensure you have all relevant permits prior to installation.

Keep this booklet as a reference guide.

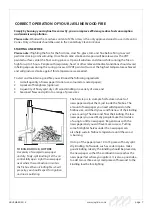
INSTALLATION OF YOUR JAYLINE WOOD FIRE

Jayline recommends you use a suitably qualifi ed installation technician to install your fi re.  Your dealer 
or heating specialist will be able to help with recommendations as well as advise on permits/consents 
required for the installation in your area.

Please follow carefully all dimensions and recommendations provided on the individual specifi cation 
sheet for your model of heater as these dimensions comply with the required New Zealand standard 
(AS/NZS 2918:2001).
As safety and emissions performance can be aff ected by altering the appliance, no modifi cations are 
allowed without the written permission from the manufacturer.
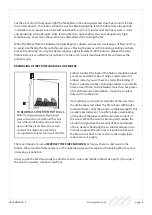
PRE-INSTALLATION 

Prior to installing your Jayline Insert into a fi replace cavity, it is important that certain clearances and 
other requirements are complied with as detailed below:

FIREPLACE CAVITY

*   The chimney must be swept.
*   Check for cracks and overall condition.  If repairs are necessary, they must be carried out by a  
 

suitably qualifi ed technician.

*   Check the cavity dimensions to ensure the insert will fi t.  It is usually necessary to remove the bricks
  

from the lower fi replace cavity.

*   The base of the fi replace on which the Jayline Insert will rest must be level.  If not, it should be
  

leveled using mortar.

*   If a timber or combustible mantle shelf exists above the fi replace opening, it should be a minimum 
 

distance above the top of the fl oor protector.  The minimum distance is 1175mm.  If less than the 


minimum specifi ed, a defl ector or heat shield will be required to be under the mantle shelf.

Summary of Contents for IS550

Page 1: ...JAYLINE IS550 INSERT WOOD FIRE INSTALLATION OPERATION INSTRUCTIONS Please leave this information with the appliance NOVEMBER 2016...

Page 2: ...___________ ______________________________________________________________________________ EMAIL ________________________________________ PHONE ________________________ MODEL _________________________...

Page 3: ...nd standard AS NZS 2918 2001 As safety and emissions performance can be affected by altering the appliance no modifications are allowed without the written permission from the manufacturer PRE INSTALL...

Page 4: ...top The space between the flue pipe and the chimney must be vented at the top The area of this vent must not be less than 10 000mm The vent must be fitted with means to prevent significant water and d...

Page 5: ...ontinue to the minimum length of 4 6m from the top of the floor protector to the cowl Flue exiting more than 3 metres from the ridgeline must terminate no less than 1 metre above the roof penetration...

Page 6: ...O BE IN BREACH OF THE APPROVAL GRANTED FOR COMPLIANCE WITH AN NZS 4013 1999 3 PLEASE ENSURE THAT ONLY COMPONENTS APPROVED BY JAYLINE ARE USED FOR THE INSTALLATION as substitutes may adversely affect p...

Page 7: ...quantity of finely split dry soft wood kindling in a variety of sizes and 4 Seasoned firewood split into a range of piece sizes The first step is to crumple half a dozen sheets of newspaper and put t...

Page 8: ...than five pieces of small firewood on the embers Open the air inlets fully and close the door If everything is just right fast ignition of the new load should be expected Allow the fire to burn with...

Page 9: ...spring and autumn To build a small hot fire rake the embers evenly in the firebox and place several small pieces of firewood on it The bottom layer should be placed to ensure that combustion air can f...

Page 10: ...oon after refuelling or not raking the charcoal to the combustion air inlet or turning the combustion air down too low to support efficient combustion or all of the above REMEMBER THE HOTTER THE FIRE...

Page 11: ...e negative pressure in the house when they are operating Because new houses are tightly sealed there are few holes to allow replacement air to enter and the house pressure becomes negative This negati...

Page 12: ...he stacks of firewood should be in an open area so that air can circulate through them During the summer as warm breezes flow through the stacks carrying away the evaporating water the moisture conten...

Page 13: ...s will eventually need replacing DOORS Check all gaskets used for wear and replace if necessary Adjust door fitting if required LUBRICATION All moving parts should be lubricated with graphite grease e...

Page 14: ...nt cleaning advice should be sought to investigate the installation and the operation of the fire Flue pipes can deteriorate very quickly with incorrect firing CONSUMABLES Some parts of your Jayline f...

Page 15: ...IQUIDS OR AEROSOLS IN THE VICINITY OF THIS APPLIANCE WHEN IT IS OPERATING WARNING DO NOT STORE FUEL WITHIN APPLIANCE INSTALLATION CLEARANCES WARNING OPEN AIR CONTROL BEFORE OPENING FIRE DOOR CAUTION T...

Page 16: ...essary At the same time any other minor potential problems can be detected and corrected before they turn into major ones We think this is a small price to pay to ensure your heater is kept in peak co...

Page 17: ...irst instance should be directed to the store of purchase Any repairs undertaken without the manufacturer s authority will render the guarantee void Water boosters must be a Jayline model specified wi...

Reviews: