Javad TRIUMPH-LS Update To User Manual Download Page 2

Figure 5

Collect by GNSS

Collect by GNSS performs RTK and other tasks as ex-

plained in other documents. 

The RTK Status has the following format in the first row: 

number of engines fixed

/

Minimum number of engines to ac-

cept epochs

Minimum number of engines for Verify 

The second row of RTK Status: Number of RTK corrections 

per second/Number of fixes per second.

Communication Status box shows the signal strength with 

four bars, Line quality %, and Base ID number or seconds 

of delay when communication is lost. 

U

: UHF, 

W

: Wi-Fi, 

F

Frequency Hopping, 

C

: Cellular, 

L

: LAN 

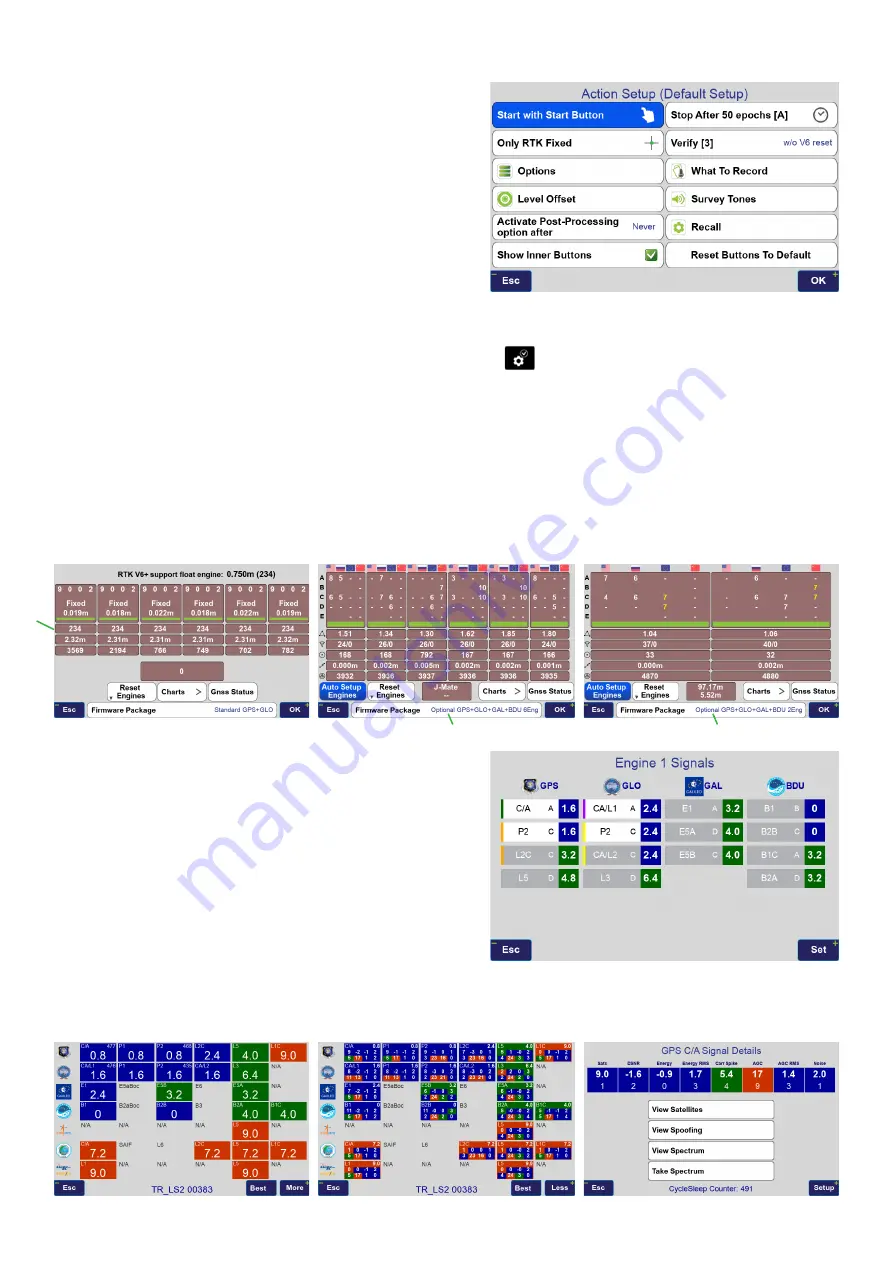
You can show/hide the inner white buttons by 

holding

 the “Level” button of Figure 4 or click it and check/un-

check the “Show Inner Buttons” of 

Figure 5

. In J-Mate screens 


button works similar to this “Level” button.

Hold the “Back” button of Figure 4 to customize the highlighted buttons (with red borders). By cus

-

tomizing the side buttons, you may have less need to use the white buttons and have wider screen 

for viewing points. Hold the “Back” button again to release the customization mode. “Rest Buttons 

to Default” re-established the factory button assignments.

White buttons are explained at the end of this section.
There are three 

types

 or RTK engines: 1) 6 engine GPS + GLONASS; 2) 6-engine multi constellation, and 

3) 2-engine multi constellation. “Engine Type” selection button is on the bottom of the “engine view” screens. 

Changing the engine type takes about one minute for the TRIUMPH-LS to reboot.

“Auto Setup Engines” button selects signals for each en-

gine automatically. You can click on each engine to reset 

it, and long click to assign signals manually. The number 

assigned to each signal in Figure 7 is the “Figure of Mer-

it” of that signal according to the number and strength of 

that signal. “0” is perfect. “10” is very bad. “GDOP” of used 

satellites are shown below each engine. Below that is the 

number of signals used and number of signals rejected. 

High number of rejected signals indicates of bad environ-

ment and large multipath. Below that is number of seconds 

since last engine reset. Below that is the engine differences 

in mm. Below that is the continuous running time. 
“GNSS Status” button shows the Figure of Merit number for each signal. Click on any signal number to get 

details. The lower the number, the better the signal.

GDOP

Engine Type Selection 

Engine Type Selection 

Figure 6

Figure 7

Figure 8

Summary of Contents for TRIUMPH-LS

Page 1: ...RIUMPH LS with the J Mate we also provide software im provement updates regularly and free of charge Download the J Mate up date in your TRIUMPH LS and then inject it to the J Mate TRIUMPH LS communic...

Page 2: ...ished the factory button assignments White buttons are explained at the end of this section There are three types or RTK engines 1 6 engine GPS GLONASS 2 6 engine multi constellation and 3 2 engine mu...

Page 3: ...about 5 degrees The viewing area of the J Mate camera is represented on the TRIUMPH LS by a small red rectangle Figure 11 While TRIUMPH LS is sitting on top of the J Mate you can view your target on...

Page 4: ...the ten readings are shown Optionally you can specify four points around the target point to be measured too to ensure that you have aimed at the desired target To specify the radius of four points ar...

Page 5: ...re points that are not possibly your target and reduces the chance of identifying a wrong object Target Features and its offset from the top of the pole are shown in the Target Features screen You can...

Page 6: ...given diameter and height If Measure to Bottom is not checked it will go to the top of the tube and then come down half of the specified height irrespective of the actual height of the tube Measure Tu...

Page 7: ...to be followed by the J Mate A single shot Backsighting Setup J Mate and TRIUMPH 3 at Occupation Point Do Base Rover setup TRIUMPH 3 with TRI UMPH LS and do Auto position Aim J Mate roughly towards t...

Page 8: ...rget and screen of Figure 23 appears Follow the laser with a large white paper and observe the Distance to Target When you reach your target stake it and then survey it The Next and Prev buttons prepa...

Page 9: ...TRIUMPH LS units In the Main screen click TLS2TLS and then in the Compose screen click and enter names and serial numbers of the TRIUMPH LS units that you want to communicate with You can attach Proj...

Page 10: ...orted first as AutoCAD Blocks Icons or PNG images Shape Tag Click to change the shape tag 3 Audio Video Recording Sounds Audio Record Click it to set the amount of time that microphone opens automatic...

Page 11: ...stake point as staked Adds survey coordinate to design point Accept as Accept as new point Creates new survey point Original design point is not changed Ahead Back Shows direction to target by moving...

Page 12: ...ed J Mate as the 7th RTK Engine Robotics and Scanning too GPS GLONASS Galileo BeiDou TRIUMPH LS RTK Rover TRIUMPH 3 RTK Base Station J Mate Rover Target Stripes J Mate Base Station engine 1 engine 3 e...

Page 13: ...ay communication service providers The communica tions are done via integrated and included Bluetooth UHF and Wi Fi embedded in the system Another major advantage is that because your own RTK base sta...

Page 14: ...conds of RTK at the Backsight point and click Backsight button There is no need to locate Occupation Point and the Backsight point because Occupation point is the RTK Base station and one point is eno...

Page 15: ...Backsight with Auto SunSeek Click a button and after a few seconds Backsight will be calibrated with the Sun AUTOMATICALLY Don t forget the Sun filter...

Page 16: ...than conventional total stations and RTK systems Light Weight Low Cost Complete RTK Base Rover Complete optical system Complete controller and software Free updates Robotic Scanner all under 40K And i...

Reviews: