Jason International, Inc. •
501.771.4477
Page 11 of 20
Customer Service : 800.255.5766
Copyright © 2018 Jason International, Inc.
INSTALLATION INSTRUCTIONS
INSTALLATION
Remove the product from its packaging.
Read the entire
instructions prior to installing this product.
See the USER MAINTENANCE INSTRUCTIONS section
of this owner’s manual prior to installation for
humidity and mold prevention suggestions.
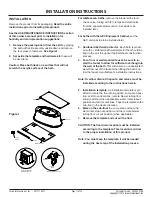
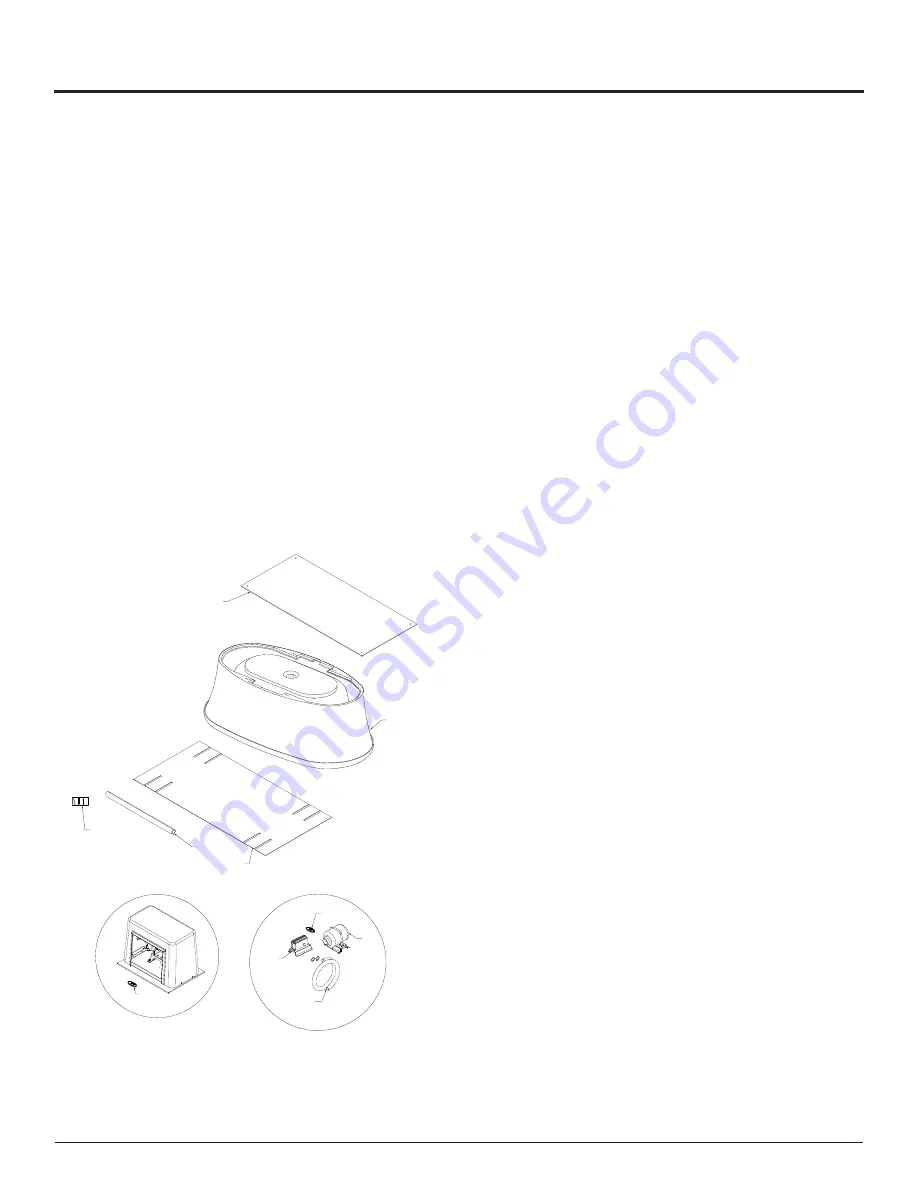
1. Remove the packing board from the skirt
by placing
the bath with skirt assembly upside down and remove
the four press-in fasteners.
See Figure1.
2. Set aside the template and hardware kit,
these will
be used later.
Caution: Place bath deck on a surface that will not
scratch the acrylic surface of the bath.
For AirMasseur
®
baths,
remove the blower with stand,
check valve, tubing with (2) clamps and electronics
from the separate blower carton. Set aside to be
installed later.
For baths with the AEC Equipment Cabinet,
set the
AEC carton aside to be installed later.
3. Cardboard bath-well protector
. Each bath is provid-
ed with a cardboard bath-well protector that should be
kept in the unit throughout the bathroom construction
process.
4. For a floor or wall mounted faucet, be sure to in-
stall the faucet to allow for sufficient overhang into
the well of the bath.
This will ensure an unobstructed
water flow out of the faucet when filling the bath. Fol-
low the faucet manufacturer’s installation instructions.
Note: Overflow drains, fill spouts, and valves must be
installed according to the instructions herein.
5. Installation
template.
An installation template is pro-
vided to locate the floor drain position, sump area posi-
tion, skirt mount locations, remote blower tubing floor
cutout position (when applicable), water inlet stubout
position and skirt center lines. Tape the template to the
sub-floor in the desired location.
6. Mark on the sub-floor
the sump area position, the
water inlet stub-out position, and the remote blower
tubing floor cut out position (when applicable).
7. Remove the template and cut out the floor.
CAUTION: The floor drain location must be installed
according to the template. This location is critical
to the proper installation of this product.
Note: You must keep the template; it will be needed
during the next step of the installation process.
AEC Equipment Cabinet
(Standard on MicroSilk)
(Optional on AirMasseur)
Bath-Well Protector
Template
Packing Board
Bath with Skirt
Locating
Studs Kit
Blower
Tubing with
Clamps
Control Box
Keypad
Standard AirMasseur Equipment
Keypad
Figure 1


