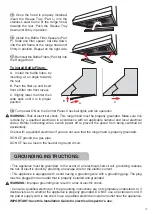
5. Align Exhaust Duct Base Gasket (Part D) with the
exhaust opening on top of the Range Hood, place
Exhaust Duct Base (Part C) on top of it, and fasten
using Exhaust Duct Base Screws (Part K).
NOTE:
Additional step for 48in models:
Fix two Duct Cover Hooks with screws provided
(Part O) to the top of the hood towards the wall
side.
You will use these two Hooks to fasten the
Exhaust Duct Cover Top for additional stability.
6. Calculate the height of the duct and extend
approximately 6” (15 cm) longer than required. Con-
nect the duct to the Exhaust Duct Base on the Hood
Body and seal the connection with HVAC foil tape or
duct tape to make sure joints are secure and
air-tight.
7. Raise the Hood Body and hang it onto the screws
on the wall. Tighten screws to secure hood to the
wall.
8.
CAUTION
- Make certain the range hood is
secure before releasing!
9. For safety purposes, pre-drilled mounting holes
are provided through the back of the hood. For a
more secure installation, use as many mounting
holes as needed to secure the unit from the inside of
hood.
10. Connect the upper end of the duct to the vent
system in the wall or ceiling.
11. Carefully slide the top half of the Exhaust Duct
Cover into the Lower Exhaust Duct Cover (Parts B).
12. Fasten the Lower Exhaust Duct Cover to the
Hood Body using Exhaust Duct Cover Screws (part
J).
13. Carefully extend the Upper Exhaust Duct Cover
until it reaches the Duct Cover Mounting Bracket.
14. Fix the Upper Exhaust Duct Cover to the Duct
Cover Mounting Bracket using Exhaust Duct Cover
Screws (Part J) on each side, left and right sides of
the Exhaust Duct Cover.
11

