background image

AAASewing.com

4

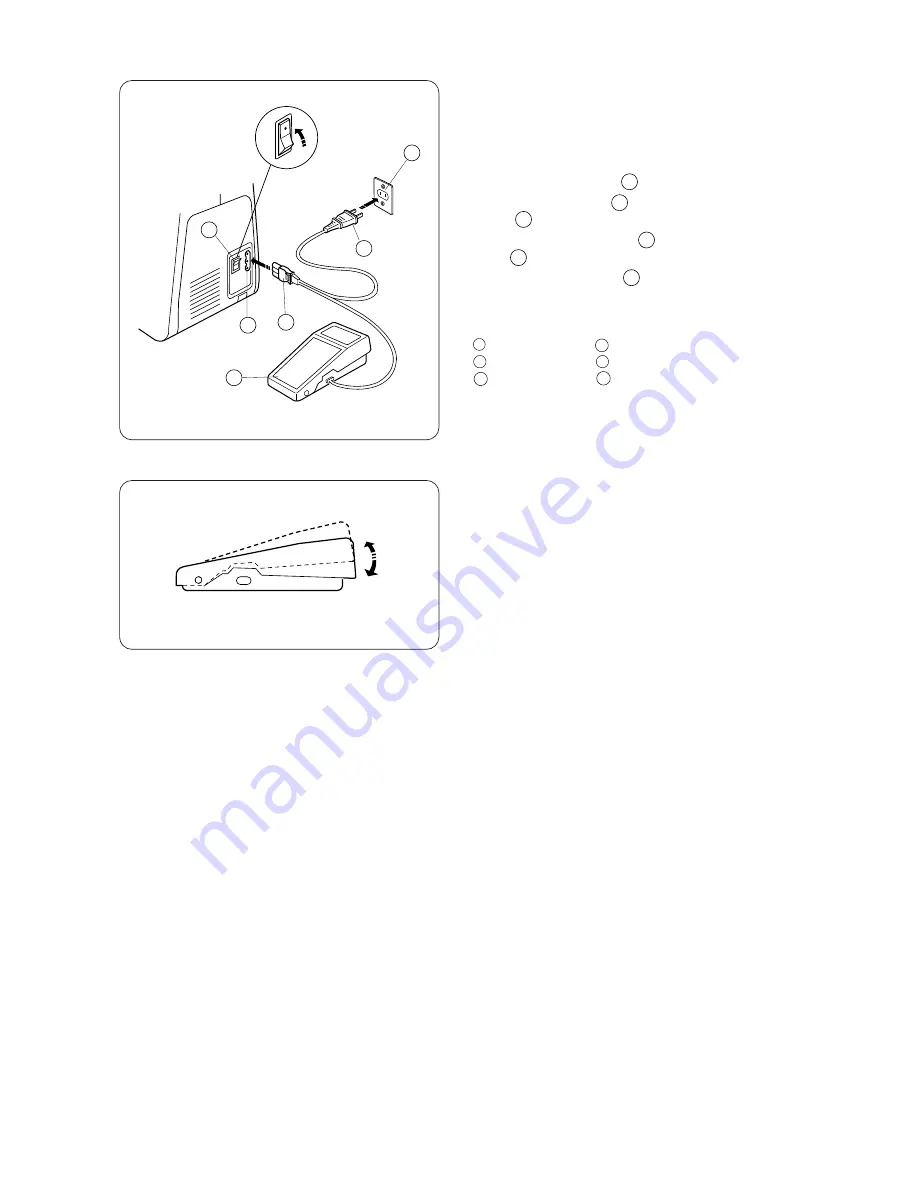
Connecting the Machine to the Power Supply

Before connecting the power cord, mark sure the voltage

and frequency shown on the machine conform to your

electrical power.

1. Turn off the power switch       .

2. Insert the machine plug       into the machine

socket       .

3. Insert the power supply plug       into the

outlet       .

4. Turn on the power switch        to turn on the

power and sewing light.

Foot control

Sewing speed can be varied by the foot control.

The harder you press on the control, the faster the

machine runs.

1

2

3

4

5

2

1

2

3

4

5

6

1

Power supply plug

Power switch

Outlet

Machine socket

Machine plug

Foot control

2

3

4

5

6

Janome US2014 Instruction Manual 

www.aaasewing.com 

US2014 Owners Manual/ User Guide

Summary of Contents for US2014

Page 1: ...A A A S e w i n g c o m Janome US2014 Instruction Manual MODEL US 2014 Janome US2014 Instruction Manual www aaasewing com US2014 Owners Manual User Guide...

Page 2: ...the machine or the electrical set must be disconnected from the supply by removing the plug from the socket outlet 4 Do not place anything on the foot control otherwise the machine will start inadvert...

Page 3: ...e to the nearest authorized dealer or service center for examination repair electrical or mechanical adjustment 4 Never operate the appliance with any air opening blocked Keep ventilation openings of...

Page 4: ...h Dial 13 Reverse Stitch Button 14 Dropping the Feed Dog 14 SECTION 3 BASIC SEWING Straight Stitch Sewing 15 To Change Sewing Direction 15 Using the Seam Guides on the Needle Plate 16 Turning Square C...

Page 5: ...guide 8 Thread guide 9 Thread take up lever 10 Thread tension dial 11 Face plate 12 Thread cutter 13 Presser foot holder 14 Needle plate 15 Extension table 16 Carrying handle 17 Handwheel 18 Power swi...

Page 6: ...when bartacking to reinforce pockets plackets and waistlines For stitching sleeves waistbands pants legs or any circular garment area For darning socks or mending knees elbows or areas of wear in chi...

Page 7: ...he machine socket 3 Insert the power supply plug into the outlet 4 Turn on the power switch to turn on the power and sewing light Foot control Sewing speed can be varied by the foot control The harder...

Page 8: ...to the left To replace Push and twist to the right To Attach and Remove the Presser Foot To remove Turn the handwheel toward you to raise the needle to its highest position Raise the presser foot Pres...

Page 9: ...etic 11 Tricot Fine Cotton Covered Polyester Linens Cotton Pique 50 silk 11 Serge Double Knits 50 to 80 Cotton or Percale 50 to 60 14 Synthetic Cotton Covered Polyester Denim Tweed 50 silk 14 Gabardin...

Page 10: ...over Latch Horn 1 2 3 3 2 1 Setting Spool Pins The spool pins are used for holding the spool of thread in order to feed thread to the machine To use pull up the spool pin Push down for storage 1 2 3 U...

Page 11: ...ld in your hand depress the foot control Stop the machine when it has made a few turns and cut the thread close to the hole in the bobbin 6 Depress the foot control again When the bobbin is fully woun...

Page 12: ...ke sure the thread unwinds in the direction of arrow 2 Pull the thread into the bobbin case slot 3 Draw the thread under the tension spring and into the delivery eye Leave about 10 cm 4 of free thread...

Page 13: ...w thread down into the tension area and then around the check spring holder 3 Firmly draw thread up and through take up lever from right to left 4 Then draw thread down and slip it into the lower thre...

Page 14: ...rds you with your right hand until the needle goes down and continue turning the handwheel until the take up lever is at its highest position Lightly draw up the needle thread forming a loop of the bo...

Page 15: ...sen the needle thread tension by moving the dial to a lower number 2 Tighten the needle thread tension by moving the dial to a higher number 3 Thread Tension for Zigzag Sewing To obtain better zigzag...

Page 16: ...Length Dial Place the setting mark at the desired number by turning the stitch length dial The higher the number the longer the stitch length is the correct setting for buttonhole stitching Adjust th...

Page 17: ...ok cover 1 2 2 To drop the feed dogs pull down the lever and move it in the direction of the arrow as illustrated 3 To raise the feed dog pull down the lever and move it in the direction of the arrow...

Page 18: ...y itself For fastening the ends of seams press the reverse stitch button and sew several reverse stitches Raise the presser foot and remove the fabric drawing the threads to the back The threads are c...

Page 19: ...e plate Needle plate hole Seam width from the center needle position Turning square corners To turn a square corner 1 6 cm 5 8 from the fabric edge When the fabric edge facing you lines up with the co...

Page 20: ...length 4 1 2 3 4 4 1 2 3 SECTION 4 UTILITY STITCHING Overcasting This type of stitch is used on the seam allowance to prevent fabric from fraying at raw edges Stitch selector C Presser foot Zigzag foo...

Page 21: ...s used to finish the seam allowance on synthetics and other fabrics that tend to pucker It is also handy for darning and mending tears Place your fabric to allow a 1 5 cm 5 8 seam Trim the seam allowa...

Page 22: ...oot Thread tension 2 6 Stitch length S S 4 1 2 3 The stitch is sewn with two stitches forward and one stitch backward forming a seam that does not rip easily Garment should be basted for fitting befor...

Page 23: ...s just above the right hole of the button Sew about five stitches and raise the needle To strengthen the shank cut the threads leaving a 20 cm 8 tail Bring the needle thread down through the hole in t...

Page 24: ...e Stop sewing at a right stitch 6 Set the stitch selector at Sew four 4 to six 6 stitches Stop sewing at a left stitch 7 Remove the fabric and open a hole with a seam ripper buttonhole opener 1 2 3 4...

Page 25: ...e foot control gently and sew the buttonhole Each side of the buttonhole and the bartacks will be sewn over the cord 6 Remove the fabric from the machine and cut the sewing threads See page 21 7 Pull...

Page 26: ...e edge of the zipper along the zipper teeth and stitch through the garment and zipper tape Turn the fabric and sew the other side of the zipper in the same way as you did the left side 1 2 3 4 0 1 2 3...

Page 27: ...4 0 7 cm 5 32 1 4 1 2 4 1 1 2 2 4 3 Stitch selector E or F Presser foot Zigzag foot Hem guide Thread tension 2 4 Stitch length 0 5 1 4 1 2 3 Raise the presser foot and place the fabric under the foot...

Page 28: ...lift the hemmer foot Insert the folded portion of the fabric into the curl of the hemmer foot 4 Lower the hemmer foot then sew by lifting up the edge of the fabric to keep it feeding smoothly and even...

Page 29: ...lace the folded edge along the slot of foot The needle should fall off the edge of the fabric on the right forming a tuck If forward and reverse feeds become unbalanced due to the type of fabric resto...

Page 30: ...the other end Sew the decorative stitch between the gathering stitches Pull out the gathering stitches Note Loosen the top thread tension to make gathering easier 4 1 2 3 Box Stitching Stitch selecto...

Page 31: ...race with a brush and a soft dry cloth Bobbin case Hook race ring holder Hook race ring Hook Hook race 1 2 3 4 5 To assemble hook race Hold the hook by the center pin and fit it carefully back into t...

Page 32: ...hown at least once a year Use good quality sewing machine oil One or two drops of oil is sufficient Remove excess oil otherwise it may stain fabric If machine has not been used for an extended time oi...

Page 33: ...ttern selector dial had been turned while the needle was in the material 1 The needle is incorrectly inserted 2 The needle is bent or blunt 3 The needle and or threads are not suitable for the work be...

Reviews: