background image

Getting Started

 XT1 

User Manual


Janam Technologies LLC


Version 1, March 2015


2

1


Getting Started 

Unpack Your XT1 Rugged Mini-Tablet 

Make sure you have the following: 


Janam XT1 Rugged Mini-Tablet 


Documentation (Quick Start Guide, License Agreement and Regulatory Guide) 


Charging accessory (one or more of the following power/connection kits 
ordered/packaged separately): 


Janam mini-USB cable with AC wall mount adapter 


Janam Single-Slot Ethernet/USB cradle kit  


Janam Six-Slot Ethernet/USB cradle kit 

Recommended Host Computer Requirements 


Microsoft

®

 Windows

®

-compatible host computer  


Microsoft Windows 8, Windows 7, Windows XP or Windows 2000 operating system 


100 MB of available hard disk space and 1GB if installing the Android™ SDK 


One available USB port 

Janam XT1 SDK 

The Janam XT1 Software Development Kit enables programmers to develop applications for Janam 
XT1 rugged mini-tablets running the Android™ operating system. It contains details and instructions 
for developing applications that access the XT1 embedded scanner. 

The development kit, which can be downloaded from Janam’s Product Zone (login required), is 
designed for use with the publicly available Android SDK. 


Products or services mentioned may be trademarks or registered trademarks of their respective companies. 

Microsoft and Windows are either registered trademarks or trademarks of Microsoft Corporation in the United States 
and/or other countries. 

Summary of Contents for XT1

Page 1: ...XT1 User Manual Version 1 March 2015 2015 Janam Technologies LLC All rights reserved Technology at Work...

Page 2: ...third parties which may arise through the use of this product Janam Technologies LLC assumes no responsibility for any damage or loss caused by deletion of data as a result of malfunction dead batter...

Page 3: ...3 5 Security Preferences 3 7 Screen Lock Options 3 7 Forgotten Unlock Credentials 3 11 Key User Options and Preferences 3 12 Display 3 12 Sound 3 15 Disabling Connectivity 3 17 Airplane Mode 3 17 Own...

Page 4: ...r Applications CH PG Installing User Applications 10 1 Updating User Installed Applications 10 4 Uninstalling User Applications 10 5 11 GPS CH PG GPS Overview 11 1 GPS Location Access 11 1 GPS Applica...

Page 5: ...associated with camera scanning applications Available with optional 3G WWAN technology mobile workforces can be armed with high quality dependable wireless communication with exceptional versatility...

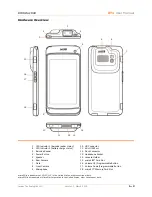
Page 6: ...ther countries or both 1 LED Indicator 1 barcode reader status 10 HD Connector 2 LED Indicator 2 battery charge status 11 Mini USB Port 3 Barcode Reader 12 Dock Connector 4 Power Button 13 Headphone S...

Page 7: ...s 7 Windows XP or Windows 2000 operating system 100 MB of available hard disk space and 1GB if installing the Android SDK One available USB port Janam XT1 SDK The Janam XT1 Software Development Kit en...

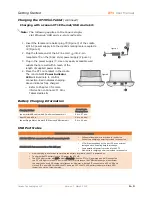
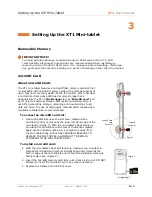
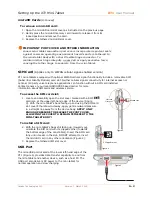
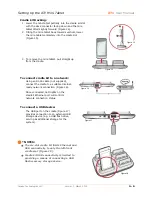
Page 8: ...RED TO THE MINI TABLET BODY 2 Slide the AC plug prong adapter onto the AC power supply housing Figure 1 until it clicks 3 Insert the mini USB plug of the AC power supply into the mini USB port on the...

Page 9: ...ble with AC wall mount adapter kit 2 hrs 27 min Host PC s USB Port 5 hrs 42 min Janam Single Slot or Six Slot XT1 Ethernet USB cradle kit 2 hrs 41 min USB Port Notes USB Port Notes refer to Figure 2 o...

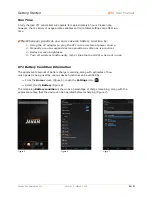
Page 10: ...suspend device operation as often as is practical 3 Reduce screen brightness 4 Turn off wireless functionality Wi Fi Bluetooth or GPS when not in use XT1 Battery Condition Information The approximate...

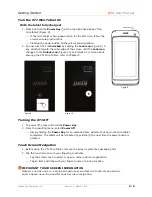
Page 11: ...let refer to Chapter 3 Turning the XT1 Off 1 To power off press and hold the Power Key 2 From the resulting menu select Power Off Simply holding the Power Key for an extended time will also shut down...

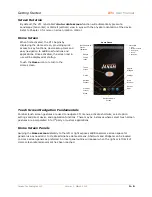
Page 12: ...amentals Familiar touch screen gestures are used to navigate XT1 menus activate shortcuts select option settings and direct device and application functions There may be instances where select touch s...

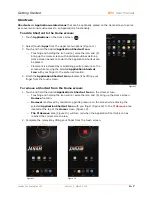
Page 13: ...ing gentle pressure on the screen while moving the selected Application Shortcut Icon with your finger to the preferred location 4 Finish the Application Shortcut Icon placement by lifting your finger...

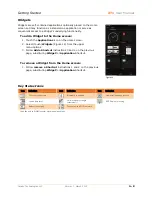
Page 14: ...upper menu options 3 Follow Add a Shortcut instructions 3 and 4 on the previous page substituting Widget for Application Shortcut To remove a Widget from the Home screen 1 Follow remove a Shortcut in...

Page 15: ...ploading and downloading of user data and more The use of high quality microSD cards supplied by a reputable manufacturer is recommended To access the microSD card slot 1 Locate and carefully open the...

Page 16: ...ut a SIM card installed Contact Janam or your local GSM GPRS based carrier for more information about SIM cards and wireless service To access the SIM card slot 1 Locate and carefully open the slot co...

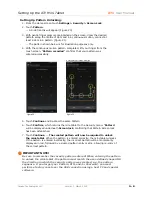
Page 17: ...ction each cloned XT1 will be configured identically to the host device whose settings were backed up on its microSD card Thus it is easy to configure multiple matching devices for deployment IMPORTAN...

Page 18: ...nfirmed visually To Clone the XT1 1 Configure the master XT1 mini tablet as preferred It is this master XT1 whose settings preferences and data will be replicated onto one or more target cloned XT1 s...

Page 19: ...e Cradle Kit Hardware Overview 1 Device slots One or Six depending on cradle configuration Figure 11 2 Kensington lock Figure 12 3 Power jack Figure 12 4 Ethernet port RJ 45 type Figure 12 5 USB port...

Page 20: ...etwork Using an RJ 45 cable not supplied connect the cradle to a suitable Internet ready network connection Figure 16 Once connected LED lights on the cradle s Ethernet port will confirm network conne...

Page 21: ...the Lock icon to an outer edge of the screen This level of security is largely a means of preventing the mini tablet from entering an operational state unintentionally Refer to Chapter 2 Page 5 for m...

Page 22: ...tablet to the Security menu Pattern will be displayed underneath Screen lock confirming that Pattern Screen lock has been established 7 Touch Continue The created pattern will now be required to unlo...

Page 23: ...the touch screen keypad enter a numeric PIN consisting of at least 4 digits and no more than 18 Figure 22 4 Touch Next 5 Re enter confirm the identical numeric PIN Figure 23 6 Touch Next to complete...

Page 24: ...here is no way to recover it If you forget your PIN you must perform a factory reset over the USB connection using a host PC and special software Setting up Password unlocking 1 From the Home screen t...

Page 25: ...onnection using a host PC and special software Removing Password unlocking 1 From the Home screen touch Settings Security Screen Lock 2 Touch Password 3 Unlock the mini tablet with the correct unlock...

Page 26: ...3 Touch OK when adjustment is complete Tip Reducing screen brightness can improve battery run time To set Wallpaper 1 From the Home screen touch Settings Display Wallpaper 2 Select from Figure 28 Set...

Page 27: ...ng off Auto rotate Screen 1 From the Home Screen Figure 29 touch Settings Display Figure 30 2 On the Display menu touching Auto rotate screen toggles between Auto rotate Off and On A checkmark at the...

Page 28: ...ample will result in a condition requiring security input very frequently To set Daydream 1 From the Home screen touch Settings Display Daydream 2 Select from the following actions during Daydream men...

Page 29: ...body as Volume Up and Volume Down keys Volume and Alert Adjustments To adjust volume with exterior mini tablet keys 1 Press either the Volume Up or Volume Down button to open the Volume control screen...

Page 30: ...K 5 Touch Default notification sound to select from a variety of sounds 6 Make adjustments as preferred 7 Touch OK 8 Touch Touch sounds to toggle between Touch sounds ON and Touch sounds Off Figure 37...

Page 31: ...h the Settings icon 2 Touch the ON or Off buttons of Wi Fi and or Bluetooth to enable or disable either or both functions Figure 38 3 Touch the Home icon when preferred settings have been made Airplan...

Page 32: ...touch Nickname to assign a name to the mini tablet itself 5 Touch Owner info 6 Touch Show owner info on lock screen to toggle between enabling and disabling the owner info being displayed on the mini...

Page 33: ...ea networks WLANs sometimes referred to as Wi Fi hot spots which the XT1 can see as it scans for available networks Typically wireless local area networks are configured with a security scheme Wireles...

Page 34: ...at Wi Fi is ON If Wi Fi is Off Figure 1 Touch the gray Wi Fi OFF button to the right of the Wi Fi heading which will change the Wi Fi ON button to blue Figure 2 indicating that Wi Fi is on 3 Touch the...

Page 35: ...e and saved the wireless network connection chosen will be made automatically If the network is 1 secured and 2 new to the XT1 a security screen will be presented and the network s password can be ent...

Page 36: ...computer using Bluetooth you can locate and use any of the services available on that device There are several ways to set up your computer for wireless access and the following section details the ge...

Page 37: ...ich will change the Bluetooth ON button to blue Figure 2 indicating that Bluetooth is now on Bluetooth Partnership Setup Creating a Bluetooth partnership 1 Ensure that the Bluetooth device to be partn...

Page 38: ...been made visible multiple devices will be shown 2 Touch the device to be paired with the XT1 to begin the pairing sequence Figure 5 which will be confirmed Figure 6 3 When the Bluetooth pairing requ...

Page 39: ...arefully note this number Successfully Paired Devices will be shown on the Bluetooth status screen Figure 8 To rename a Bluetooth partnership 1 From the Home screen touch Settings icon Bluetooth 2 Tou...

Page 40: ...d 4 Touch Image Tools Figure 11 5 Touch Share Figure 12 6 From the two first use options Bluetooth and Email touch Bluetooth Once the Share function has been used for the first time the default method...

Page 41: ...the sending device has sent the file an XT1 alert will prompt you to authorize receipt of a Bluetooth file 3 Swipe down the Notifications bar to access the authorization message Figure 15 4 To accept...

Page 42: ...e In addition the XT1 incorporates a 1 2 megapixel front facing still picture camera Note Only the rear facing camera records video Camera Function To activate the Camera 1 From the Home screen touch...

Page 43: ...witch from Still Picture Camera to Video Camera mode 3 Touch to switch from Video Camera to Still Picture Camera mode 4 Return to previous tablet operation 5 Shooting viewfinder 6 Shutter Release and...

Page 44: ...A variety of still picture and video recording options are available To make key camera adjustments and set options From an active camera screen touch Options Control icon The default camera start mo...

Page 45: ...Figure 5 on the following page providing access to Scene mode s refer to Figure 5 page 6 6 Auto default Best for everyday picture taking Night Compensates for low light and scenes with large dark are...

Page 46: ...enu item and touch the preferred setting Refer to Figure 7 on page 6 6 5 Activates the White Balance settings sub menu By default the camera is set to automatic white balance wherein the XT1 camera re...

Page 47: ...ferred area of the picture 2 Touch and hold the viewfinder to illuminate the basic picture options control circle Figure 3 on page 6 3 While maintaining finger pressure on the screen slide your finger...

Page 48: ...ing has begun and will display the length of the video clip 3 Touch the Video Start Stop button again to stop video recording The white square within the Video Start Stop button will disappear confirm...

Page 49: ...Apply filter effects Apply picture edge border effects Enhance overall exposure Adjust brightness Adjust contrast Enhance sharpness Convert to black White Alter color hue Alter color saturation To edi...

Page 50: ...March 2015 6 9 Key Camera Specifications Still pictures default setting Resolution still mode 320x240 640x480 1280x960 1MP 1600x1200 2MP 2048x1536 3MP 2592x1944 5MP Modes Video recording QVGA 320x280...

Page 51: ...etting up an XT1 email account be sure that a core email address is active with an email service provider or within a private enterprise corporate network to which the XT1 user has access and authoriz...

Page 52: ...mail address assign an optional name to the account Figure 4 6 Apply your name to be displayed on outgoing messages Figure 5 This field cannot be left blank 7 Wait for new email account synchronizatio...

Page 53: ...f an XT1 email account in no way affects the core email address account with an email service provider or a private enterprise corporate network To remove an XT1 email account 1 From the Home screen t...

Page 54: ...ancel to abandon the email account removal process Or 8 From the Home screen touch Apps Email 9 Follow instructions 4 thru 7 above SMS Text Messaging SMS text messaging functionality requires a XT1 mi...

Page 55: ...rder The Sound Recorder provides an audio recording function to capture voice notes record meetings and more Recording To record audio 1 From the XT1 Home screen touch Applications Figure 1 2 Touch So...

Page 56: ...d To stop recording 1 Touch the square Stop icon to stop recording Figure 4 2 Optional Touch the triangular Play icon to review the last recording Figure 4 3 Select touch Done or Discard Done will sav...

Page 57: ...creen touch Applications Figure 6 2 Touch File Manger Figure 7 3 Select a recording file to be played back Figure 8 Touching the blank screen during playback briefly calls up the playback screen provi...

Page 58: ...and Deleting Recordings To delete a recording 1 Touch and HOLD a recording file to be deleted Figure 8 to call up the File Management Menu Figure 9 2 Touch Delete 3 From the resulting Confirm Delete...

Page 59: ...ting file name Filename Schematic for file recording 383114016 3gpp Filename aka Prefix Suffix Filename Part 1 Filename Separator Filename Part 2 File Type Separator File Type Suffix recording 3831140...

Page 60: ...n window is located on the top edge of the tablet Figure 1 When triggered the barcode scanner emits a soft edged red light that serves as a confirmation of scan triggering and as a general targeting g...

Page 61: ...stration Application 1 From the Home screen touch the BCR Bar Code Reader icon Figure 2 2 Locate the red scan trigger button Figure 3 3 Aim the barcode imager beam at the target barcode 4 Touch the re...

Page 62: ...pear where ever the cursor is placed within the application BCR Scanwedge Configuration To configure BCR Scanwedge 1 From the Home screen touch the Apps icon Figure 5 Settings icon Figure 6 2 Touch sc...

Page 63: ...rch 2015 9 4 BCR Scanwedge Configuration Symbology The Symbology menu provides the ability to select the types of barcodes available for scanning To select Symbology From the Home screen touch Setting...

Page 64: ...h the XT1 provides the user with feedback indicating the success or failure of a scan Feedback indicator options include Duration of the LED for good and bad scan An audible beep Vibration To select a...

Page 65: ...format exampled at http unicode table com en To apply ScanWedge Prefix or Suffix 1 From the Home screen touch Settings icon BCR Setting Figure 14 General Figure 15 2 Touch Prefix or Suffix and enter...

Page 66: ...ns which may include an online purchase procedure 3 Launch the application and verify that it and the XT1 are operating properly To install user applications from other sources Using a host PC compute...

Page 67: ...rg zwanoo android speedtest_3 2 6_2180 8 Review the resulting Installation Approval screen Figure 3 If you agree with the proposed actions and device access requirements touch Install Otherwise touch...

Page 68: ...be installed Figure 6 In this example the application file name is Speedtest_org zwanoo android speedtest_3 2 6_2180 7 Review the resulting Installation Approval screen Figure 7 If you agree with the...

Page 69: ...y only apply incremental updates to the existing installation 2 From the XT1 Home screen touch Applications 3 Touch the File Manager icon Figure 9 4 From the File Manager screen touch Internal Storage...

Page 70: ...cations Method A 1 From the XT1 Home screen Figure 13 touch Settings Apps Figure 14 2 Touch the user application to be uninstalled Figure 15 3 Touch Uninstall Figure 16 4 Touch OK to confirm the unins...

Page 71: ...3 Maintaining fingertip pressure on the icon drag it towards the Uninstall trash can Figure 18 Both the icon to be uninstalled and the screen s Uninstall area change from white to red when the icon re...

Page 72: ...cess Specific Settings permissions are key to GPS functionality To enable GPS location access 1 From the Home screen touch Settings 2 From the Location access menu a Touch Off to switch Access to my l...

Page 73: ...n 1 Download or transfer a suitable and trustworthy third party GPS application onto the XT1 2 From the Home screen touch Apps Figure 2 3 From the Home screen touch Downloads Figure 3 4 Touch the down...

Page 74: ...e read the End User License Agreement with this product before using the device or accompanying software program s Using the device or any part of the software indicates that you accept the terms of t...

Page 75: ...N61000 3 2 EN 61000 3 3 IEC 60950 1 A1 2009 AS NZS CISPR 22 2008 Class B AS NZS CISPR 22 2009 A1 2010 Class B AS NZS 4268 2012 A1 2013 ARPANSA Radiation Protection Standard Maximum Exposure Levels to...

Page 76: ...r is encouraged to try to correct the interference by one or more of the following measures Reorient or relocate the receiving antenna Increase the separation between the equipment and receiver Connec...

Page 77: ...ial requirements and other relevant provisions of Directive 1999 5 EC The equipment is intended for use throughout the European Community Care and Cleaning of Terminals When needed clean the screen wi...

Page 78: ...harger supplied with your device Use of another type of charger will result in malfunction and or danger WARNING To avoid the risk of electric shock this device must only be connected to supply mains...

Reviews: