background image

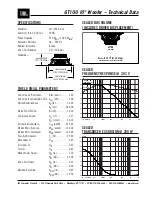
COLLOCAZIONE DEL SUBWOOFER

I subwoofer amplificati Jamo® sono stati progettati per riprodurre i bassi profondi e offrire 
una resa sonora elevatissima sia con brani musicali che con i film.  Per ottenere i migliori 
risultati, collocare il subwoofer in un angolo della stanza, presso la stessa parete accanto 
alla quale si sono disposti gli altoparlanti del canale anteriore (vedere la Figura 1).  Tenere 
presente che il punto della stanza prescelto può avere un notevole effetto sulla resa sonora 
del subwoofer.  Collocandolo in un angolo, come suggerito sopra, si aumenta il livello 
dell’uscita ai bassi, mentre se lo si colloca presso il centro di una parete o lontano dalle 

pareti si diminuisce tale livello.  Provare a collocarlo in vari punti e a regolare i comandi su 
diverse posizioni fino a trovare la configurazione adatta alla stanza e alle proprie preferenze.  
Al momento di scegliere il punto in cui collocare il subwoofer, tenere presente che sarà 
necessario collegarne l’amplificatore incorporato a una presa di corrente. 

Accertarsi che l’altoparlante sia nelle stesse condizioni di integrità in cui ha lasciato la 
fabbrica. Controllare subito se ci sono danni causati dal trasporto.  Disimballare con cautela 
l’altoparlante e verificare che tutti i componenti siano presenti consultando la distinta 
di spedizione.  In casi estremi, qualche componente potrebbe aver subito danni durante 
il trasporto; se si riscontrano danni, notificarli alla ditta di spedizione e al rivenditore.  
Presentare una richiesta di ispezione e seguire le istruzioni che saranno fornite.  Conservare 
la scatola di spedizione originale del prodotto.
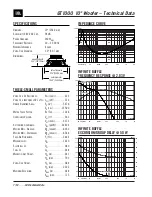
ISPEZIONE

Il Music Center kmc1 ha una durevole finitura in vinile che occorre solo spolverare o pulire 
con un panno asciutto. Evitare l’uso di detergenti abrasivi, a base di solvente o forti.
Per spolverare la cassa del subwoofer è sufficiente la spazzola di un aspirapolvere.

CURA E PULIZIA

Summary of Contents for J 110 SUB

Page 1: ...USER MANUAL J 110 SUB J 112 SUB...

Page 2: ......

Page 3: ...hen choosing your subwoofer s location keep in mind that you will need to connect the subwoofer s built in amplifier to an AC power outlet We want your new speaker system to look as good as it did lea...

Page 4: ...S S TV C L R X Y Z X Y Z S S 6 15 Sub Optional Sub Optional Sub Optional Sub Figure 1 Speaker Placement in Listening Area ENGLISH...

Page 5: ...hat receiver to set before setting the subwoofer s gain control LOWPASS Control The crossover point chosen determines where low bass frequencies are handed off from the speakers to the subwoofer If se...

Page 6: ...Connections Processor Pre Amp Receiver PRE OUT LFE OUTPUT Left and Right pre outs on Processor Pre Amp Receiver connected to Left and Right line inputs on subwoofer amplifier LFE Output on Processor P...

Page 7: ...aves n oubliez pasquevousdevrezbrancherl amplificateurint gr aucaissondegraves uneprise lectrique Nousvoulonsquevotrenouvelleenceintesoitaussibellequ sasortiedel usine Veuillezv rifiersansattendrequ e...

Page 8: ...S S TV C L R X Y Z X Y Z S S 6 15 Cassion de Graves Figure 1 Positionnement Des Encientes Dans la Zone D coute FRENCH Positionnement optionnel l arri re Optionnel...

Page 9: ...r cepteur avant de r gler le contr le de gain du caisson de graves R glage du filtre passe bas LOWPASS La fr quence de coupure choisie d termine le point auquel les basses fr quences sont transf r es...

Page 10: ...L R LINE IN R L LFE LINE IN R L LFE L R LINE IN R L LFE LINE IN R L LFE Figure 2 Branchement D un Caisson De Graves J 110 J 112 R cepteur A V surround PRE OUT LFE OU R cepteur A V surround...

Page 11: ...edarandenken dassSiedeneingebautenVerst rkerdesSubwoofersansStromnetzanschlie enm ssen Wirwollensicherstellen dassIhrneuesLautsprechersystemfabrikneuaussieht Pr fenSie bittegleich obetwaigeTransportsc...

Page 12: ...S S TV C L R X Y Z X Y Z S S 6 15 Subwoofer Abbildung 1 Lautsprecherplatzierung Im H rbereich GERMAN Optionale hintere Platzierung Optionale...

Page 13: ...angeschlossen ist muss am Receiver keine Subwooferlautst rke eingestellt werden bevor derVerst rkungsfaktor des Subwoofers eingestellt wird LOWPASS Tiefpass Der gew hlte Crossover Punkt bestimmt wann...

Page 14: ...L R LINE IN R L LFE LINE IN R L LFE L R LINE IN R L LFE LINE IN R L LFE Abbildung 2 Anschluss F r Den Subwoofer J 110 J 112 Surround A V Receiver PRE OUT LFE ODER Surround A V Receiver...

Page 15: ...cuenta que es necesario conectar el amplificador integrado del subwoofer a un enchufe de corriente alterna Deseamos que su nuevo sistema de altavoces se vea tan bien como se ve a cuando sali de la f...

Page 16: ...S S TV C L R X Y Z X Y Z S S 6 15 Subwoofer Figura 1 Ubicaci n Del Altavoz En El rea De Audici n SPANISH Ubicaci n posterior opcional Opcional...

Page 17: ...el volumen de subwoofer antes de configurar el control de volumen del subwoofer Control de pasabajas LOWPASS El punto de crossover determina el l mite superior de las frecuencias que se pasan de los...

Page 18: ...INE IN R L LFE LINE IN R L LFE L R LINE IN R L LFE LINE IN R L LFE Figura 2 Cableado De Los Subwoofers J 110 J 112 Surround A V Audio y video Surround PRE OUT LFE O BIEN Surround A V Audio y video Sur...

Page 19: ...de que ser necess rio ligar o amplificador integrado do subwoofer em uma tomada el trica Queremos que seu novo sistema de caixas ac sticas tenha sempre a apar ncia de novo Por isso inspecione o imedi...

Page 20: ...S S TV C L R X Y Z X Y Z S S 6 15 Subwoofer Figura 1 Posicionamento Das Caixas Ac sticas No Ambiente PORTUGUESE Posicionamento traseiro opcional Opcional...

Page 21: ...n oser necess rio fazerqualquerajustenovolumedosubwoofernoreceiverantesdeajustarocontroledeganhodosubwoofer Controle LOWPASS Opontodecrossoverescolhidodeterminaondeasfrequ nciaspassabaixass o transfer...

Page 22: ...L R LINE IN R L LFE LINE IN R L LFE L R LINE IN R L LFE LINE IN R L LFE Figura 2 Conex o Do Subwoofer J 110 J 112 Receiver A V Surround PRE OUT LFE OU Receiver A V Surround...

Page 23: ...ferenze Al momento di scegliere il punto in cui collocare il subwoofer tenere presente che sar necessario collegarne l amplificatore incorporato a una presa di corrente Accertarsi che l altoparlante s...

Page 24: ...S S TV C L R X Y Z X Y Z S S 6 15 Subwoofer Figura 1 Collocazione Degli Altoparlanti Nell area Di Ascolto ITALIAN Collocazione posteriore facoltativa Facoltativa...

Page 25: ...sario impostareilvolumedelsubwooferprimadiimpostarneilguadagno Comando LOWPASS Passa basso Ilpuntodicrossoverpresceltodeterminalafrequenzaallequale lebassefrequenzevengono trasferite daglialtoparlanti...

Page 26: ...L R LINE IN R L LFE LINE IN R L LFE L R LINE IN R L LFE LINE IN R L LFE Figura 2 Connessioni Di Un Subwoofer J 110 J 112 Ricevitore A V surround PRE OUT LFE OPPURE Ricevitore A V surround...

Page 27: ...1...

Page 28: ...S S TV C L R X Y Z X Y Z S S 6 15 1 CHINESE...

Page 29: ...SW Out LEFT LFE LEFT LFE WA 2 J110 J112 Jamo WA 2 WA 2 WA Port Energy Mirage Jamo WA 2 2 4 GHz 15 24 jamo com LEVEL 0 dB LOWPASS 160 50 90 90 150 PHASE 0 180 0 180 POWER AUTO ON OFF ON AUTO 15 20 OFF...

Page 30: ...L R LINE IN R L LFE LINE IN R L LFE L R LINE IN R L LFE LINE IN R L LFE 2 J 110 J 112 PRE OUT LFE...

Page 31: ...is a trademark of Klipsch Group Inc registered in the US and other countries Engineered by Klipsch Group Inc USA Product of China A Wholly Owned Subsidiary of VOXX International Corporation 1 800 554...

Reviews: