background image


GUI Features 

13


TM/TMC/RM/RMC-2030CL 

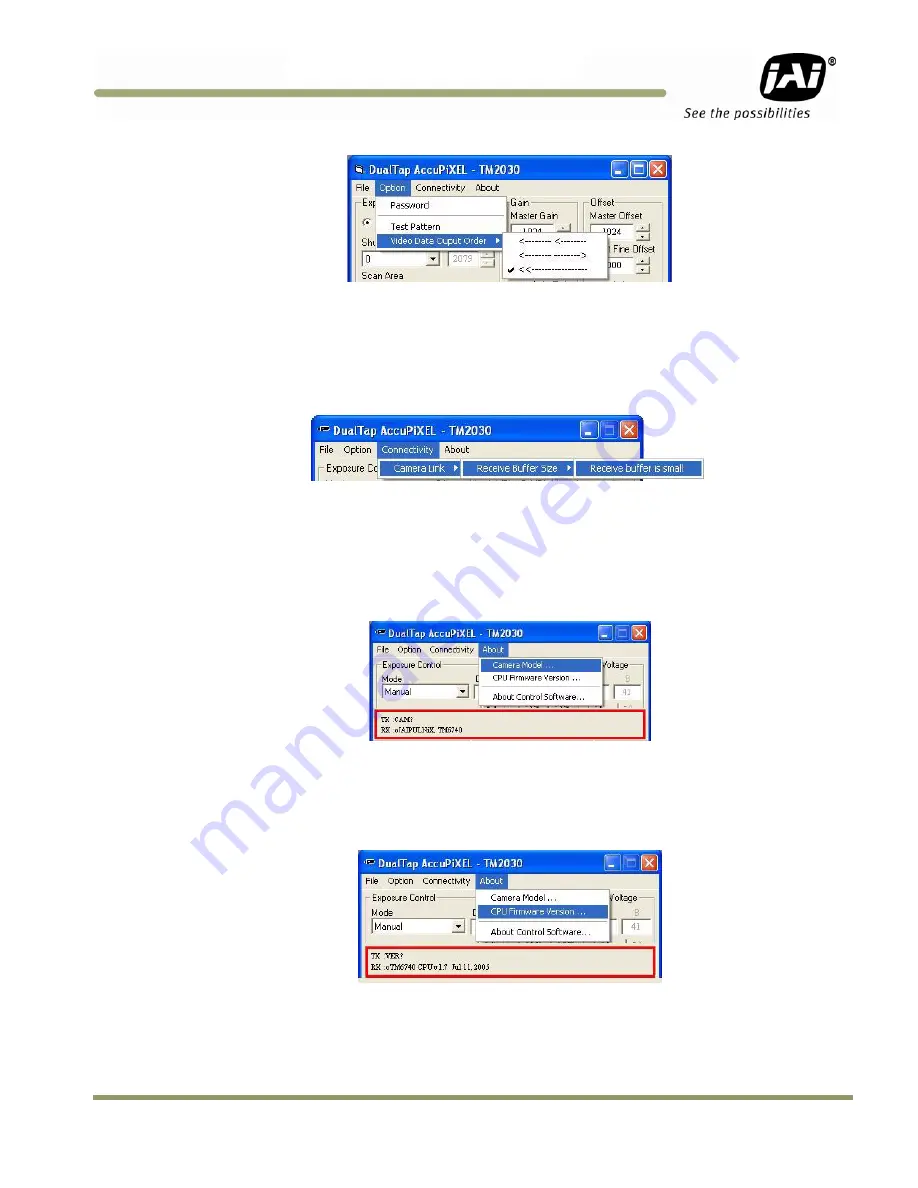
Figure 27.


Video output order 


2.3.2


Main Menu “Connectivity” 

Click on the “Connectivity” menu to view the buffer size. Some frame grabbers have a small buffer size and 
require a special communication algorithm. Use the “Receive Buffer Size” menu to set the buffer size. If you 

have trouble communicating with the camera, then select the “Receive buffer is small” option. 

Figure 28.


Buffer Size 


2.3.3


Main Menu “About” 

2.3.3 (a) Camera Model 

From the main menu, select “About” and click “Camera Model” to check the camera information. The details 
display in the information frame near the bottom of the window. 

Figure 29.


Camera Model 


2.3.3 (b) CPU Firmware Version 

From the main menu, select “About” and click “CPU Firmware Version” to check the CPU firmware 
information. 

Figure 30.


CPU Firmware Version 


Summary of Contents for RM-2030CL

Page 1: ...RM TM 2030CL RMC TMC 2030CL Digital Monochrome Color Progressive Scan Interline Transfer CL Camera Document Version E Document P N 10437 ...

Page 2: ......

Page 3: ...tives However certain factory installed options or customer requested modifications may compromise electromagnetic compatibility and affect CE compliance Please note that the use of interconnect cables that are not properly grounded and shielded may affect CE compliance Contact the JAI Inc Applications Engineering Department for further information regarding CE compliance FCC This equipment has be...

Page 4: ...TM TMC RM RMC 2030CL iv Disclaimer ...

Page 5: ...Report Frame 10 2 2 Main Menu File 11 2 2 1 Load and Save Page 11 2 3 Main Menu Option 12 2 3 1 Password 12 2 3 2 Main Menu Connectivity 13 2 3 3 Main Menu About 13 3 Hardware Introduction 15 3 1 Product Description 15 3 2 Features 15 4 Installation 17 4 1 Getting Started 17 4 1 1 Unpacking Instructions 17 4 1 2 Components 17 4 1 3 Accessories and Options 17 4 2 Camera Setup 17 4 2 1 Heat Dissipat...

Page 6: ...28 5 5 3 Asynchronous Programmable Exposure Mode 29 5 5 4 Pulse Width Control Mode 30 5 5 5 Particle Imaging Velocimetry Fixed Exposure Mode 31 5 5 6 PWC PIV Mode 32 5 6 Camera Timing Charts 33 6 Camera Serial Commands 35 7 Troubleshooting 38 7 1 Problems and Solutions 38 7 1 1 Symptom No Video 38 7 1 2 Symptom Dark Video 38 7 1 3 Symptom Non Synchronized Video 38 7 1 4 Symptom Video does not Disp...

Page 7: ... 9 Figure 19 Gamma 45 imitates human eye sensitivity when creating an image 10 Figure 20 The setting does not activate until the Send Knees button is clicked 10 Figure 21 Click Report for current software setting information 10 Figure 22 Load Page 11 Figure 23 Save Page 11 Figure 24 Password Access 12 Figure 25 Password Screen 12 Figure 26 Test Pattern requires a connected camera 12 Figure 27 Vide...

Page 8: ... RMC 2030CL viii List of Figures Figure 51 Field Video Timing Continuous Mode 34 Figure 52 Change memory settings 38 Figure 53 Physical Dimensions 41 Figure 54 Monochrome Response 42 Figure 55 Color Response 42 ...

Page 9: ...ctor 18 Table 2 Connector and Pin out Configurations 19 Table 3 12 Pin Interface Pin Outs 21 Table 4 Scan Area Start Points 24 Table 5 Asynchronous Mode Chart 32 Table 6 TM TMC 2030 Command List 35 Table 7 Command Responses 36 Table 8 TM 2030CL Camera Specifications Table 40 ...

Page 10: ...TM TMC RM RMC 2030CL x List of Tables ...

Page 11: ...es appears different from other cameras compatible with this same software and has various capabilities depending on the camera model the software is accessing The TM 2030CL series software is therefore specifically documented in this section 1 1 Software Installation Following are the instructions to install the Dual Tap AccuPiXEL series camera control software on a PC 1 1 1 Before Installing Dua...

Page 12: ...igure 2 AccuPIXel Setup screen 1 1 3 Uninstalling the Software To uninstall the Dual Tap AccuPiXEL series camera control software from the control panel follow the steps below 1 Open Add or Remove Programs in the control panel 2 Select Dual Tap AccuPiXEL from the lists of the installed software 3 Click the Change or Remove button Figure 3 The Add or Remove Programs utility can uninstall older soft...

Page 13: ...030CL 1 2 TM TMC 2030CL Camera Figure 4 Back of the TM TMC 2030CL The camera must have all cables properly connected and any required adapters installed and configured to allow the software to perform the operations on the interface ...

Page 14: ...gger Shutter Speed Expo Lines Scan Area Gain Settings Master Gain Right Fine Gain Auto Gain Balance check box Offset Master Offset Right Fine Offset Auto Offset Taps Video Depth Image Pre processing Control Signals Trigger LUT Positive Negative Table Selection X1 Y1 X2 Y2 Send Knees TX RX Report Note White Balance Color models of this camera TMC 2030CL and RMC 2030CL provide raw Bayer color output...

Page 15: ...Async No Shutter mode Async shutter speed 9 is Async no delay shutter mode pulse width control A PIV fixed exposure B PIV PWC For detailed shutter information please see Electronic Shutter on page 28 Figure 6 Continuous mode operates the shutter based on the camera settings 2 1 1 b Continuous mode Scan Area Scan Area offers a full scan or 2x2 binning when Shutter Speed is set at zero Notice the Ex...

Page 16: ...rnal trigger is used to generate one discharge signal Vsub right after the active edge of the trigger The exposure starts when time is controlled by the pulse width of the external trigger 2 1 2 b PIV Fixed Exposure In Particle Imaging Velocimetry PIV Fixed Exposure Mode when an external trigger is applied the first time exposure starts the same as PWC mode does It lasts a very short period 8μs Th...

Page 17: ...s disabled and the label for the check box changes to Balancing Please Wait Once the right channel gain has been balanced the check box clears Be careful not to send other configuration commands during this process because the camera may not receive the commands Figure 10 The Gain is being set when the Auto Gain box appears checked Verify that the channel balance process has completed by checking ...

Page 18: ... option button for the operation you prefer Single Tap operation does not allow the higher data rate permitted by the Dual Tap output Figure 13 Click on the option button to set the preferred option 2 1 6 Video Depth Figure 14 Use the option buttons to select 8 bit 10 bit or 12 bit output Figure 15 Image Pre processing Cover the lens with the lens cap before enabling the blemish calibration Activa...

Page 19: ...option causes the image to appear reversed as in a film negative Figure 17 Choose either a positive or negative image 2 1 7 b LUT Look Up Table Table Selection The LUT Table drop down box offers Linear Gamma 45 or Knee selections Figure 18 Table drop down menu The Table drop down menu offers three options The Linear option gathers light in a proportional manner In this particular selection the LUT...

Page 20: ...Control The Knee Control graphical control allows you to change two knee point values visually by clicking and dragging the knee line You may also enter X1 Y1 X2 Y2 values directly to adjust the knee curve When you have chosen the value you want and are ready to set this value to the camera click the Send Knees button Note The use of the Knee LUT may interfere with the Auto Level Control ALC 2 1 8...

Page 21: ...nge a saved set of camera parameters The zero slot is used to store factory default settings and can not be overwritten without supplying a password The 1 slot contains the power up default settings and can be changed to allow different power up defaults The remaining five pages can be used as desired to save configurations Figure 23 Save Page 2 2 1 b Read Page Click on the File menu and choose Re...

Page 22: ... JAI Inc for password access Figure 25 Password Screen 2 3 1 a Test Pattern From the main menu select Option and click Test Pattern to view or disable the test pattern This menu option is disabled if a monitor is not connected to the camera s video output Figure 26 Test Pattern requires a connected camera 2 3 1 b Video Data Output Order From the main menu select Option and Video Data Output Order ...

Page 23: ...ou have trouble communicating with the camera then select the Receive buffer is small option Figure 28 Buffer Size 2 3 3 Main Menu About 2 3 3 a Camera Model From the main menu select About and click Camera Model to check the camera information The details display in the information frame near the bottom of the window Figure 29 Camera Model 2 3 3 b CPU Firmware Version From the main menu select Ab...

Page 24: ...TM TMC RM RMC 2030CL 14 GUI Features 2 3 3 c About Control Software From the main menu select About and click About Control Software to check the software information Figure 31 Control Software Version ...

Page 25: ...er The TM 2030CL uses a dual tap progressive scan interline transfer CCD that has the following features Resolution of 1920 x 1080 active pixels for excellent image quality 7 4 x 7 4 μm square pixels for precise dimensional measurement High speed electronic shutter capability for high dynamic resolution of moving objects that eliminates the need for a mechanical shutter Progressive scan CCD elimin...

Page 26: ... speed Async no shutter The video signal and FDV are reset by external VINIT Internal shutter speed control The speed control varies from 1 32 to 1 16 000 sec The video signal and FDV starts with internal V reset timing related to shutter speed External VINIT with pulse width The duration between pulse edges controls the shutter speed externally Output The TM 2030CL has a dual tap 12 bit 10 bit 8 ...

Page 27: ...on a CD ROM 4 1 3 Accessories and Options Following is a list of additional accessories and options that may be required for your application Please check with your JAI Inc representative before you install your camera to determine what you might need PD 12U series power supply 12P 02S power cable CamLink cable 26 CL 02 26 2m or 26 CL 05 26 5m Tripod Mounting Kit TP 20 for dimensions go to www jai...

Page 28: ... pin 2 is 12V DC Table 7 shows the pin out table Table 1 12 Pin Connector Pin Description Pin Description 1 GND 7 VD in 2 12V DC 8 Strobe out 3 GND 9 HD in 4 Analog Video 10 Reserved 5 GND digital 11 Reserved 6 VINIT in 12 Reserved 4 2 2 b Digital I O Connector The TM 2030CL has a 26 pin connector on the rear panel to output Camera Link data The connector pin out is shown in Table 2 on page 19 Fig...

Page 29: ... Note SerTC Serial To Camera SerTFG Serial to Frame Grabber 4 2 2 c Analog Output Connector The TM 2030CL has a BNC connector on the rear panel to output the analog video signal Analog output is available to drive auto iris lenses and troubleshooting Note This analog signal is not an RS 170 television format signal that can be connected to a standard CCTV monitor Figure 34 BNC Connector 4 2 3 Came...

Page 30: ... connector the PD 12P PD 12UEP and PD 12UUP power supplies are available with the 12 pin mating connector already attached to the leads from the power supply The PD 12UU and PD 12UE power supplies can be connected to the JAI Inc power cable either directly or using a terminal strip When wiring the PD 12UU and PD 12UE power supplies directly please note the following The lead ends must be twisted t...

Page 31: ...rientation Follow these directions to properly attach the power cable to the camera connector 1 Rotate the connector while applying slight pressure until the keyways line up 2 Press the connector into place until firmly seated 3 Plug the power cord into the 100V AC socket This powers up the camera 4 2 5 Attaching the Camera Lens The TM 2030CL camera accepts 1 inch or larger format size C mount len...

Page 32: ... mount Be certain that the lens is properly seated 3 Next set the lens focus to infinity if the lens is a manual iris set the iris to a high f number while still retaining a well illuminated image 4 Loosen the three miniature hex set screws use a 0 9 mm hex wrench that lock the focus ring in place two screws for a CS mount Slowly turn the lens and focus ring assembly back and forth until you obtai...

Page 33: ...op to bottom at one frame rate Like a non interlace computer screen it generates a stable crisp image without alternating lines and provides full vertical TV resolution of 1000 lines a normal TV monitor display may not be able to show 1000 lines due to monitor resolution of 30Hz scanning The interline transfer architecture is also important to generate simultaneous shuttering This is different fro...

Page 34: ...erous software suppliers The digital format allows the camera to output accurate pixel data including the color information When the data is stored in the frame buffer of a frame grabber or computer the color information is easily manipulated to restore the original color images Because the color filter array contains only a single R G or B color in each pixel the restored image has to fill in col...

Page 35: ...ayer CFAs but there are slight differences between the CCDs produced by different manufacturers The first line is generally R and G The camera timing can be adjusted to start with either G or R by skipping the very first pixels at each line The majority of color interpolation software can select between a variety of pixel relations such as R G start or G R start as well as G B start and B G start ...

Page 36: ...olor characteristics the LUT Look up Table is different The LUT is a powerful tool to adjust the dynamic range as well as color dynamic range Since human color perception is non linear LUT selection can help optimize color contrast by selecting the LUT value Gamma 0 45 is logarithmic and is closed to human perception When LUT is selected black level adjustment must be more accurate than for monoch...

Page 37: ...igure 42 Color Interpolation Diagram The image quality depends on the camera s own pixel data including pixel data independency from neighboring pixels noise and color filter and interpolation of the software algorithm such as 3 x 3 interpolation 2 x 2 interpolation color matrix white balance capability and so on All AccuPiXEL color cameras are carefully designed for maximum color performance JAI ...

Page 38: ...es as the input and the LUT output is converted into either 8 bit or 10 bit to adjust the gamma correction There is no 12 bit LUT The look up table has two knee points variable gamma selection that allow the 10 bit input to be segmented into three regions The look up table selection can be made by knee curve direct input 5 4 External Sync and Pixel Locking The TM 2030CL accepts an external sync of...

Page 39: ...de when an external trigger is applied the exposure starts after one discharge signal Vsub which happens after the trigger s active edge is off Because the discharge signal Vsub synchronizes with LDV in this mode there is a maximum one video line of jitter between the trigger active edges to discharge signals Vsub off In this mode the exposure time from 1 video line to 2080 video lines can be cont...

Page 40: ...ng the trigger active off Exposure time is controlled by the pulse width of the external trigger Because the CCD requires some overhead from trigger active off to the transfer gate event the actual exposure time is equal to Exposure Time Pulse Width 12 4μs Since one discharge signal Vsub is generated right after the active edge of the trigger it is asynchronous with LDV and the discharge signal ma...

Page 41: ...time of the first image accumulated in the first exposure time The second time exposure continues until the first image transfers completely The second image is transferred after the second exposure There is a short period 500ns between the first exposure and the second exposure In order to keep two exposure periods constant the LDV is reset before the first image is transferred out The maximum tr...

Page 42: ...external trigger The maximum trigger frequency in this mode is equal to 1 transfer time of two frames exposure time of the first image The minimum active period of the external trigger is 10 pixel clocks 250ns Figure 48 PWC PIV Timing Table Table 5 Asynchronous Mode Chart Asyn No Shutter Async Preset and Prog Shutter PWC aA 1 line 1 line 6 clk aB 9 5 line n 1 lines 298 clk Pulse width 48 clk aC 48...

Page 43: ...Operation 33 TM TMC RM RMC 2030CL 5 6 Camera Timing Charts Figure 49 Camera Timing Chart Figure 50 Digital Data Output Order for Configuration ...

Page 44: ...TM TMC RM RMC 2030CL 34 Operation Figure 51 Field Video Timing Continuous Mode ...

Page 45: ... Set R channel Fine Gain XXX 000 FFF VRA XXX cr o cr Set Master Offset XXX 000 FFF VRB XXX cr o cr Set R channel Fine Offset XXX 000 FFF MGA cr oMG XXX cr Inquire Master Gain XXX 000 FFF MGB cr oSG XXX cr Inquire R channel Fine Gain XXX 000 FFF VRA cr oMF XXX cr Inquire Master Offset XXX 000 FFF VRB cr oSF XXX cr Inquire R channel Fine Offset XXX 000 FFF Lookup Table LINR cr o cr Set linear table ...

Page 46: ...X cr o cr Enable Disable Test Pattern X 1 Enable X 0 Disable CAM cr o model cr Inquire Camera Model VER cr o version cr Inquire MPU firmware version Note If a command is not accepted for any reason the camera will return a nack response e cr Not available yet Table 7 Command Responses Command Parameter End of Cmd Description Byte 1 2 Byte 3 4 Master Gain R Channel Fine Gain Master Gain H 0000 H 0F...

Page 47: ...ignal Polarity 0 Active Low 1 Active High Bit 6 Bit 7 Dual Signal Tap Positive Negative LUT 0 Dual Tap 1 Single Tap 0 Positive LUT 1 Negative LUT Byte 12 Function Flag 3 Bit 0 R Channel Auto Fine Gain 0 Disable 1 Enable Bit 1 Bit 2 R Channel Auto Fine Offset Rsvd 0 Disable 1 Enable Bit 3 Bit 4 Rsvd Blemish Compensation 0 Disable 1 Enable Bit 5 Bit 6 Rsvd Password 0 Disable 1 Enable Byte 13 14 Bit ...

Page 48: ...ode Lens Digital output cable Analog video cable 7 1 2 Symptom Dark Video Remedies Check that the following are properly connected and operational Shutter selection Iris opening on the lens 7 1 3 Symptom Non Synchronized Video Remedies Check that the following are properly connected and operational Proper mode output Frame grabber software camera selection 7 1 4 Symptom Video does not Display Prop...

Page 49: ...can Technical Support Phone 408 383 0300 E Mail camerasupport jai com European Technical Support Phone 45 4457 8916 E Mail camerasupport jai com Japan Asia Technical Support Phone 81 45 440 0154 E Mail tsh jai com Mail JAI Inc Sales Department 625 River Oaks Parkway San Jose CA 95134 ATTN Video Applications Web Site www jai com ...

Page 50: ...ps Sensitivity 30uV e Video Output Digital output 8 bit 10 bit 12 bit Gigabit Ethernet selectable at factory Gamma Programmable LUT 1 0 std Lens Mount C mount use 1 format lenses or larger Power Requirement 12V DC 10 520mA typical at 25 C Operating Temp 10 C to 50 C Vibration 7 Grams 10Hz to 2000Hz Random Shock 70G 11 ms half sine Size W x H x L 51mm x 51mm x 74mm Weight 188 grams 7 5 oz without t...

Page 51: ...ure 53 Physical Dimensions Caution When mounting the camera to any fixture do not use screws that extend more than 5 mm into the camera housing to avoid possible damage to the internal circuitry For attaching the tripod mounting plate only the supplied screws should be used ...

Page 52: ...TM TMC RM RMC 2030CL 42 Appendix 8 1 2 Spectral Response Figure 54 Monochrome Response Figure 55 Color Response ...

Page 53: ......

Page 54: ...www jai com Europe Middle East Africa Phone 45 4457 8888 Fax 45 4491 3252 Asia Pacific Phone 81 45 440 0154 Fax 81 45 440 0166 Americas Phone Toll Free 1 800 445 5444 Phone 1 408 383 0301 ...

Reviews: