background image


BM-141GE / BB-141GE


66 


Summary of Contents for BB-141GE

Page 1: ...BM 141GE BB 141GE Digital Monochrome Color Progressive Scan GigE Vision Camera Document Version Ver 2 2 BMB 141GE_Ver 2 2_Feb2016 User s Manual ...

Page 2: ...quipment has been tested and found to comply with the limits for a Class B digital device pursuant to Part 15 of the FCC Rules These limits are designed to provide reasonable protection against harmful interference in a residential installation This equipment generates uses and can radiate radio frequency energy and if not installed and used in accordance with the instructions may cause harmful in...

Page 3: ...iagram for customer 16 5 5 3 Optical Interface Specifications 16 6 3 Inputs and outputs table 17 6 4 Configuring the GPIO module 17 6 4 1 Input Output Signal Selector 17 6 4 2 GPIO Plus PWC shutter 19 6 4 3 Internal Trigger Generator 20 7 Image output 21 7 1 CCD Sensor Layout 21 7 2 Vertical Binning BM 141GE only 21 7 3 Partial Scanning Fixed rate and variable 22 7 4 Digital video output 23 7 4 1 ...

Page 4: ...ol PWC Trigger Mode 50 10 3 4 Auto detect LVAL sync a sync accumulation 52 10 3 5 Reset Continuous RCT trigger mode 52 10 3 6 Sequential Trigger Mode EPS 54 10 3 7 Delayed Readout EPS and PWC Modes EPS and PWC 55 10 3 8 Optical Black transfer Mode 57 10 3 9 Multi ROI mode Multi Region of Interest 58 10 4 Operation Mode and Functions matrix 58 11 JAI control tool 59 11 1 About GenICamTM SFNC1 3 59 ...

Page 5: ...BM 141GE BB 141GE 5 Change History 74 User s Record 75 ...

Page 6: ...ation The purpose of the GenICam standard is to provide a common program interface for various machine vision cameras By using GenICam cameras from different manufactures can seamlessly connect in one platform For details about the GigE Vision standard please visit the AIA web site www machinevisiononline org and for GenICam the EMVA web site www genicam org JAI GigE Vision cameras comply with bot...

Page 7: ...ion in the host PC The BM 141GE BB 141GE also complies with the GenICam standards as it has an internal XML file that is used to describe the functions features of the camera For further information on GenICam please go to www emva org As an application programming interface JAI provides an SDK Software Development Kit This SDK includes GigE Vision Filter Driver JAI Control tool software documenta...

Page 8: ...Pulse width trigger for more precise exposure time Sequencer trigger mode for on the fly change of gain exposure and ROI Edge Pre select Pulse width control and Reset Continuous trigger modes One push preset manual or auto Bayer white balance for BB 141GE Manual and automatic gain control Look Up Table LUT for gamma and knee settings LVAL synchronous asynchronous operation auto detect Auto iris le...

Page 9: ... thumbscrews Horizontal type left and right of RJ 45 Note 2 11 Holes for RJ 45 thumbscrews Vertical type above and below RJ 45 Note 2 12 Mounting holes M3 depth 5 mm for tripod mount plate Note 3 1 Note Rear protrusion on C mount lens must be less than 10 0mm 2 Note When an RJ 45 cable with thumbscrews is connected to the camera please do not excessively tighten screws by using a screwdriver The R...

Page 10: ...s operating in Continuous mode Flashing green Camera is receiving an external trigger LINK LED Steady green 1000 Base T has been connected Flashing green 100 Base TX has been connected ACT LED Flashing amber Network active in communication Fig 2 Rear Panel 4 3 Flange back adjustment Flange back fixed screws Flange back adjustment ring LINK ACT DCIN TRIG GPIO POWE R TR IG GigE ...

Page 11: ... Type HR10A 10R 12PB Hirose male Seen from the rear of camera Fig 3 12 pin connector 5 2 Digital Output Connector for Gigabit Ethernet Type RJ 45 HFJ11 1G02E L21RL or equivalent The digital output signals follow the Gigabit Ethernet interface using RJ 45 conforming connector The following is pin assignment for Gigabit Ethernet connector Fig 4 Gigabit Ethernet connector Pin no Signal Remarks 1 GND ...

Page 12: ... TTL IN 1 75ohm Terminator 1 4 O TTL Out 1 5 GND 6 NC 7 NC 8 O TTL Out 2 9 GND SW601 For selection of OPT IN and Iris Video OUT Factory default is UP position OPT IN To select an Iris video these two switches should be set at DOWN SW600 For selection of TTL IN 1 75 ohm ON or OFF Factory default is UP position 75 ohm OFF To set 75 ohm ON these two switches must be DOWN Left side as seen from the le...

Page 13: ...ose 12P pin 3 4 Line 7 TTL In D Sub 9P pin 3 Line 8 LVDS In D Sub 9P pin 1 2 LUT Cross Point Switch Pulse Generator 1 19 bit Counter Pulse Generator 0 19 bit Counter 12 bit Counter TRIGGER 0 TRIGGER 1 TTL OUT 1 TTL OUT 2 OPT OUT 1 OPT OUT 2 Time Stamp Reset Sequence Reset LVAL IN DVAL IN FVAL IN EEN IN OPT IN 1 OPT IN 2 TTL IN 1 LVDS IN 1 Soft Trigger 0 Soft Trigger 1 Soft Trigger 2 Soft Trigger 3...

Page 14: ...their pulse width start point and end point The pulse generator signals can be set in either triggered or periodic mode In triggered mode the pulse is triggered by the rising edge falling edge high level or low level of the input signal In periodic mode the trigger continuously generates a signal that is based on the configured pulse width starting point and end point Each pulse generator operates...

Page 15: ...puts providing galvanic separation between the camera s inputs outputs and peripheral equipment In addition to galvanic separation the opto isolated inputs and outputs can cope with a wide range of voltages the voltage range for inputs is 3 3V to 24V DC whereas outputs will handle 5V to 24V DC Fig 9 Photo coupler 5 5 1 Recommended External Input circuit diagram for customer Fig 10 External Input C...

Page 16: ...tput signal through the optical interface is as follows Conditions for Input Input Line Voltage Range 3 3V 24V Input Current 6mA 30mA Minimum Input Pulse Width to Turn ON 0 5μs Output Specifications Output Load Maximum Current 100mA Minimum Output Pulse Width 20μs Time Delay Rise TDR 0 5μs 0 7μs Rise Time RT 1 2μs 3 0μs Time Delay Fall TDF 1 5μs 3 0μs Fall Time FT 4 0μs 7 0μs Fig 12 Optical Interf...

Page 17: ...N DVAL IN FVAL IN EEN IN OPT IN 1 OPT IN 2 TTL IN LVDS IN Soft Trigger 0 Soft Trigger 1 Soft Trigger 2 Soft Trigger 3 Pulse Gen 0 Pulse Gen 1 LEGEND 0 valid combination x Not valid do not use this combination The shaded parts are for the interface to external equipment 6 4 Configuring the GPIO module 6 4 1 Input Output Signal Selector The following shows JAI SDK Camera Control Tool for setting Lin...

Page 18: ...BM 141GE BB 141GE 18 Line Source 6 5 GPIO programming examples 6 5 1 Pulse generator setting sreen ...

Page 19: ...t Switch Pulse Generator 1 19 bit Counter Pulse Generator 0 19 bit Counter 12 bit Counter TRIGGER 0 TRIGGER 1 TTL OUT 1 TTL OUT 2 OPT OUT 1 OPT OUT 2 Time Stamp Reset Sequence Reset LVAL IN DVAL IN FVAL IN EEN IN OPT IN 1 OPT IN 2 TTL IN 1 LVDS IN 1 Soft Trigger 0 Soft Trigger 1 Soft Trigger 2 Soft Trigger 3 IN OUT Pulse Generator 0 Pulse Generator 1 Pulse Generator 0 Pulse Generator 1 Digital I O...

Page 20: ...s Point Switch Pulse Generator 1 19 bit Counter Pulse Generator 0 19 bit Counter 12 bit Counter TRIGGER 0 TRIGGER 1 TTL OUT 1 TTL OUT 2 OPT OUT 1 OPT OUT 2 Time Stamp Reset Sequence Reset LVAL IN DVAL IN FVAL IN EEN IN OPT IN 1 OPT IN 2 TTL IN 1 LVDS IN 1 Soft Trigger 0 Soft Trigger 1 Soft Trigger 2 Soft Trigger 3 IN OUT Pulse Generator 0 Pulse Generator 1 Pulse Generator 0 Pulse Generator 1 Digit...

Page 21: ...his is for Horizontal only 7 2 Vertical Binning BM 141GE only The binning functions can be used to achieve higher frame rate or higher sensitivity The drawback is lower resolution Vertical binning is done by adding the charge from pixels in adjacent lines in the horizontal CCD register Fig 12 shows the vertical binning principle 1434 1052 2 40 1392 7 2 1040 OB OB OB OB 7 Effective Video Output 139...

Page 22: ...s 4 types of partial scan modes such as 2 3 1 2 1 4 an 1 8 In addition to the mentioned fixed rate partial scan modes BM BB 141GE has variable partial scan mode The start line can be set from 1st line to 1025 line and the scanned lines can be set from 8 lines to 1032 lines Please note that if the odd line is selected as the start line the Bayer color sequence is RGR and if the even line is selecte...

Page 23: ...Horizontal Pixel number 1830 Pixel clock 17 24138 ns Calculation example Read out 1 2 partial at the center 520L Stat line 261 End line 780 OB period in the upper part of the frame 3L Fast dump period for the upper part 261 7 5 2 55 6 56 Fast dump period for the lower part 1039 780 5 2 53 8 54 Total lines 3 56 520 54 633 Frame rate 1000000 1830 17 24138 633 50 06 fps 7 4 Digital video output 7 4 1...

Page 24: ...ononline org 7 4 2 1 GVSP_PIX_MONO8 8bit 1 Byte 2 Byte 3 Byte 0 1 2 3 4 5 6 7 0 1 2 3 4 5 6 7 0 1 2 3 4 5 6 7 Y0 Y1 Y2 7 4 2 2 GVSP_PIX_MONO10 10bit 1 Byte 2 Byte 3 Byte 4 Byte 0 1 2 3 4 5 6 7 8 9 X X X X X X 0 1 2 3 4 5 6 7 8 9 X X X X X X Y0 Y0 Y1 Y1 7 4 2 3 GVSP_PIX_MONO10_PACKED 10 bit 1 Byte 2 Byte 3 Byte 4 Byte 7 4 2 4 GVSP_PIX_MONO12 12 bit 1 Byte 2 Byte 3 Byte 4 Byte 7 4 2 5 GVSP_PIX_MONO1...

Page 25: ...ils of GVSP please refer to GigE Vision Specification available from AIA 7 4 3 1 GVSP_PIX_BAYRG8 BayreRG8 Odd Line 1 Byte 2 Byte 3 Byte 0 1 2 3 4 5 6 7 0 1 2 3 4 5 6 7 0 1 2 3 4 5 6 7 R0 G1 R2 Even Line 1 Byte 2 Byte 3 Byte 0 1 2 3 4 5 6 7 0 1 2 3 4 5 6 7 0 1 2 3 4 5 6 7 G0 B1 G2 7 4 3 2 GVSP_PIX_BAYRG10 Bayer RG10 Odd Line 1 Byte 2 Byte 3 Byte 4 Byte 0 1 2 3 4 5 6 7 8 9 X X X X X X 0 1 2 3 4 5 6 ...

Page 26: ... 1 Byte 2 Byte 3 Byte 4 Byte 0 1 2 3 4 5 6 7 8 9 10 11 X X X X 0 1 2 3 4 5 6 7 8 9 10 11 X X X X G0 G0 B1 B1 Even Line 1 Byte 2 Byte 3 Byte 4 Byte 0 1 2 3 4 5 6 7 8 9 10 11 X X X X 0 1 2 3 4 5 6 7 8 9 10 11 X X X X R0 R0 G1 G1 Address Internal Name Access Size Value 0xA410 Pixel Format type R W 4 0x01080009 BAYRG8 0x0108000A BAYGB8 0x0110000D BAYRG10 0x0110000E BAYGB10 0x01100011 BAYRG12 0x0110001...

Page 27: ...The first valid pixel is the same timing as DVAL The Bayer color sequence starts with RGR for odd line numbers GBG for even line numbers Figure 13 shows the timing sequence for the Bayer mosaic read out for the available partial scan modes FVAL Timing LVAL DVAL 1 55 81 94 37 8 Full 2 3 Partial 1 2 Partial 1 4 Partial 1 8 Partial 1 Line from FVAL triming G B R G R G B R G G R G B R G G R Actual V L...

Page 28: ...n for normal continuous mode Fig 19 Horizontal timing 7 6 2 Vertical timing The FVAL period for normal continuous mode full scan is shown Fig 20 Vertical timing for full scan LVAL DATA OUT Valid data OB 1392ck 40ck 1432ck DVAL 1392ck 16ck 1 LVAL 1830 clk 31 551 us 1clk 17 241 ns 398 ck ...

Page 29: ...ation for the fixed partial scan settings 1 2 1 4 1 3 and 2 3 Values for vertical timing in partial scan continuous mode Fig 21 Vertical timing for partial scanning AREA FVAL Low L A L B L C L Total line L frame rate fps Start line End line 2 3 3 38 694 37 L 772 L 41 05 173 866 1 2 3 56 520 54 L 633 L 50 06 261 780 1 4 3 82 260 80 L 425 L 74 57 391 650 1 8 3 95 130 93 L 321 L 98 73 455 584 ...

Page 30: ...and sensitivity By activating this function the frame rate is increased to 50 18 fps This function is available only for BM 141GE Important Note Vertical Binning cannot be used together with the Partial Scanning Horizontal Timing Fig 23 Horizontal Timing for Vertical Binning LVAL DATA OUT Valid data OB 1392ck 40ck 1432ck DVAL 1392ck 16ck 1 LVAL 1830 clk 31 551 us 1clk 17 241 ns 398 ck LVAL DATA OU...

Page 31: ...gh the GPIO This signal is available at pin 4 of 12 pin Hirose connector It can be used for lens iris control in Continuous mode only The signal is taken after the CCD sensor output passes through the gain circuit The video output is without sync The signal is 0 7 Vp p To get this signal the internal DIP switch SW 601 must be set Refer to chapter 5 4 Fig 25 Video output circuit Fig 26 Iris Video D...

Page 32: ...ng through a switch and or a single path or when operating in a system with limited transmission bandwidth the Delayed Readout Mode and Inter Packet Delay functions can be useful 8 2 Equipment to configure the network system 8 2 1 PC The PC used should have the following performance or better 1 Recommended CPU Core2 Duo 2 4GHz or better Better than Core2 Extreme 2 Recommended memory 2Gbyte or more...

Page 33: ...141GE series conform to Gigabit Ethernet IEEE 802 3 not all combinations of network interface cards NICs and switches routers are suitable for use with the GigE Vision compliant camera JAI will endeavor to continuously verify these combinations in order to give users the widest choice of GigE components for their system design For details of the network settings please refer to the Getting Started...

Page 34: ...or the packet size and the value will be internally adjusted to an appropriate legal value that complies with the GenICam standard The packet size can be modified in the GigE Vision Transport Layer Control section of the camera control tool Regarding data transfer rate a larger packet size produces a slightly lower data transfer rate The BM 500GE and BB 500GE series can support a maximum of 4040 b...

Page 35: ...r Pixel bits C 8 Frame Rate fps D 30 12 Packet Size Bytes E 1428 Number of Packets including Data Leader Trailer Packet packets G Transfer Data Rate Mbit s J G ROUNDUP 1392 x 1040 x 8 8 1428 36 2 1040 2 1042 J 90 62 1428 18 x 1042 2 x 8 x 30 12 1000000 362 Mbit s 8 3 5 Simplified calculation Approximate value A simple way to calculate the approximate data transfer rate is the following Transfer da...

Page 36: ...rval and so on described in this manual cannot be satisfied Pixel Type Frame rate at Full Frame scan fps MONO8 BAYRG8 BAYGB8 8 0 8 2 MONO10_PACKED MONO12_PACKED 5 4 5 6 MONO10 MONO12 BAYRG10 BAYGB10 BAYRG12 BAYGB12 4 0 4 2 8 4 GigE camera connecting examples 8 4 1 Using a switching hub for 1 port All cameras and NIC belong to the same subnet The accumulated transfer rate for all cameras should be ...

Page 37: ...istent IP In this case each camera can use the maximum 800Mbps bandwidth However the load for the internal bus CPU and the application software will be heavy so a powerful PC will most likely be required 8 4 3 The data transfer for multiple cameras 8 4 3 1 If delayed readout is not used in continuous mode The packet delay should be set larger The data traffic is controlled by the buffer of the hub...

Page 38: ...rger The data traffic is controlled by the buffer of the hub It is necessary to check the buffer value of the unit 8 4 3 3 If delayed readout is used The packet delay should be set smaller and the packet delay trigger controls the data traffic If the camera has a pulse generator it can control the data traffic ...

Page 39: ...0 000 sec See the register map included in the SDK documentation for details how to configure this register 0xA004 Programmable Shutter It is possible to set the shutter speed in the range of 2L to 1052L by 1L unit in case of Full Frame operation When1052L is set it is the equivalent of OFF 1 30 or33 19ms See the register map included in the SDK documentation for details how to configure this regi...

Page 40: ... combination with Pulse Width mode The clock generator and counter can be programmed in very fine increments As for the setting example refer to chapter 6 5 1 9 2 Full Auto Exposure function The Full Auto Exposure function combines three automatic functions Lens Auto Iris Auto Gain Control AGC and Auto Shutter When dealing with widely varying lighting conditions these automatic functions can be ma...

Page 41: ... output from the camera is selectable to 8 10 or 12 bit but video is digitized to 14 bits quantization The pre processing functions make use of the 14 bit video Featured functions are Bayer color white balance R L channel balance blemish compensation gain control and LUT Look Up Table for Gamma and Knee correction 9 3 1 Bayer White Balance BB 141GE only Normally the raw Bayer color signals are sen...

Page 42: ...ied by these LUT coefficients create the desired output signal characteristics The look up table has 256 setting points of 14 bits covering the full range of input signals On each point the gain can be set to get desired output characteristics Gr R Gb and B signals in BB 500GE have the same characteristics The Look Up Table is handled in a 14 bit Video Process circuit and a processed signal is out...

Page 43: ...tting and LUT cannot be used at the same time This is because the Gamma setting and LUT use the same data table Gamma setting Note LUT Enable is False When LUT is used the Gamma setting should be 1 0 OFF Then LUT Enable is set at True ...

Page 44: ...nd the image can be output until AcqusitionStop Trigger is input Single Frame By executing AcquisitionStart command one frame of the image can be output and then the acquisition is stopped Trigger Selector This can be selected from FrameStart or TransferStart FrameStart The trigger pulse can take one frame capture TransferStart The trigger pulse can read out the image stored in the frame memory Th...

Page 45: ...sition and Trigger Control function which is the same as used for previous models and includes 6 types of exposure modes Acquisition and Trigger Control and JAI Acquisition and Trigger Control are linked to each other and if the one is set the setting parameters are reflected in the other The following is an example when JAI Acquisition and Trigger Control is set at EPS TriggerMode is automaticall...

Page 46: ...l should be set in Acquisition and Trigger Control 10 2 GenICam SFNC Standard Trigger Setup Wizard If the feature properties has the separate window will be open The following is an example of the trigger selector This is an easy way tool to set up the trigger ...

Page 47: ...elected exposure EPS 6 Delayed Readout EPS Trigger Pre selected exposure EPS 7 Delayed Readout EPS Trigger Pulse width controlled exposure The following description uses JAI Acquisition and Trigger Control and the operation mode can be selected in JAI Exposure Mode 10 3 1 Continuous operation For applications not requiring asynchronous external triggering this mode should be used In continuous mod...

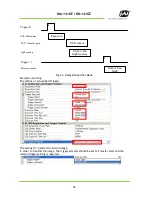
Page 48: ...l start to be read out after the selected shutter time For timing details refer to fig 19 through fig 24 and figures 29 and 30 To use this mode Important notes on using this mode Trigger pulse 2 LVAL to 1 FVAL The following table shows minimum trigger interval in synchronous accumulation mode Full scan 1054 L 2 3 Partial 774 L 1 2 Partial 635L 1 4 Partial 427 L 1 8 Partial 323 L 1 2 V Binning 529 ...

Page 49: ...BM 141GE BB 141GE 49 LVAL_sync timing Fig 28 Edge Pre select LVAL sync Timing LVAL_async timing Fig 30 Edge Pre select LVAL a sync Timing ...

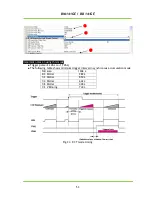
Page 50: ...video signal will start to be read out after the trigger rising edge For timing details refer to fig 21 through fig 24 and fig 31 and 32 To use this mode Important notes on using this mode Trigger pulse width 2LVAL to 2 seconds The following table shows minimum trigger interval in synchronous accumulation mode Full scan 1054 L 2 3 Partial 774 L 1 2 Partial 635 L 1 4 Partial 427 L 1 8 Partial 323 L...

Page 51: ...BM 141GE BB 141GE 51 LVAL_sync timing Fig 31 Pulse width control LVAL sync LVAL_async timing Fig 32 Pulse Width control LVAL a sync ...

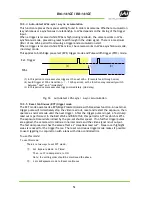
Page 52: ... restart the exposure then operate as normal mode until the next trigger After the trigger pulse is input a fast dump read out is performed In the BM 141GE and BB 141GE this period is 6 77ms which is 215L The exposure time is determined by the pre set shutter speed If no further trigger pulses are applied the camera will continue in normal mode and the video signal is not output The fast dump read...

Page 53: ... mode Trigger pulse 2 LVAL to 1 FVAL The following table shows minimum trigger interval in synchronous accumulation mode Full scan 1268 L 2 3 Partial 989 L 1 2 Partial 850 L 1 4 Partial 642 L 1 8 Partial 438 L 1 2 V Binning 744 L Fig 34 RCT mode timing ...

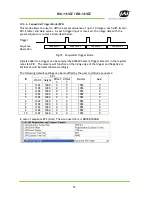
Page 54: ...in the register map via GPIO The camera will function on the rising edge of the trigger and Negative or Positive should be determined accordingly The following default settings can be modified by the user to define a sequence ID ROI Shutter Gain Width Height Offset X Offset Y 1 1392 1040 0 0 1052 0 2 1392 1040 0 0 1052 0 3 1392 1040 0 0 1052 0 4 1392 1040 0 0 1052 0 5 1392 1040 0 0 1052 0 6 1392 1...

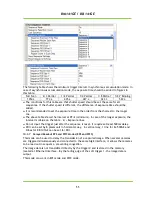
Page 55: ...PE 2 minimum In case of the longer exposure the interval is Value on the table 2 Exposure lines Do not input the trigger just after the sequence is reset It requires at least 500ms delay ROI can be set by 8 pixels unit in horizontal way In vertical way 1 line for B 500GE and 2lines for BB 141GE can be set for ROI 10 3 7 Delayed Readout EPS and PWC Modes EPS and PWC This mode can be used to delay t...

Page 56: ... setting for transfer the stored image In order to transfer the image the trigger selector should be set to Transfer start and the related trigger setting is required Exposure CCD output Store in the GigE memory Output from GigE Trigger 0 CCD Photodiode CCD Transfer gate GigE memory Ethernet output Trigger 1 ...

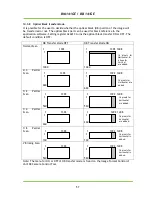
Page 57: ...040 1 1392 1408 1 16 pixels for Horizontal 4 lines for Vertical are added 1044 2 3 Partial Scan 1 1392 1 694 1 1392 1408 1 ます 16 pixels for Horizontal are added 694 1 2 Partial Scan 1 1392 1 520 1 1392 1408 1 520 1 4 Partial Scan 1 1392 1 260 1 1392 1408 1 ます 260 1 8 Partial Scan 1 1392 1 130 1 1392 1408 1 130 V Binning Scan 1 1392 1 520 1 1392 1408 1 ます 520 Note The menu for ON or OFF of OB trans...

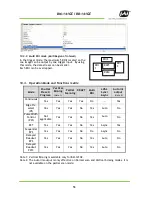
Page 58: ...ROI LVAL Sync Async Auto Iris output Note 2 Continuous Yes Yes Yes Yes No Yes Edge Pre select PS Yes Yes Yes No Yes Auto No Pulse Width Control PW Not applicable Yes Yes No Yes Auto No RCT Yes Yes Yes No Yes Async Yes Sequential EPS Yes Yes Yes No No Async No Delayed Readout EPS Yes Yes Yes No Yes Auto No Delayed Readout PWC Yes Yes Yes No Yes Auto No Note 1 Vertical Binning is available only for ...

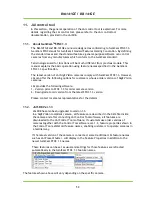
Page 59: ... of GIgE Vision cameras JAI provides the following software 1 Version prior to SFNC 1 3 for older camera version 2 Downgrade to old version from the latest SFNC 1 3 version Please contact local sales representatives for the details 11 2 JAI SDK Ver 1 3 JAI SDK has also been upgraded to version 1 3 In a GigE Vision compliant camera all features are described in the XML file inside the camera and af...

Page 60: ...blishing the connection start the control tool The model name connected to the Network is displayed with connecting icon When this icon is double clicked the camera can communicate with the camera control tool and the icon is changed 11 3 3 Camera setting level The setting level has three layers beginner expert and guru Guru level includes the most sophisticated functions 11 4 Input and Output set...

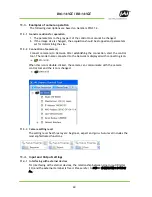
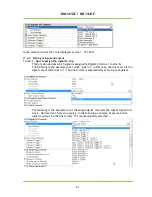
Page 61: ... O Line 1 to Line 8 The following is the example to set Line5 Opt In 1 In this case the line source is the signal connected to Opt In 1 The line format is automatically set to Opto Coupled The following is the example to set the output signal It selects the output signal from Line3 Optical Out 1 from Line source In the following example Exposure Active signal is output As the line format TTL is au...

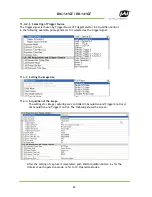
Page 62: ... is selected as the trigger signal 11 4 3 Setting the image size 11 4 4 Acquisition of the image The settings for image capturing are controlled in Acquisition and Trigger Control or JAI Acquisition and Trigger Control The following shows the screen After the setting of capture is completed push StartAcquisiton button As for the details of each operation mode refer to 10 Operation Modes ...

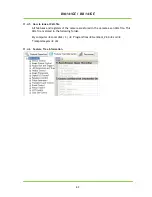
Page 63: ...XML file All features and registers of the camera are stored in the camera as an XML file This XML file is stored in the following folder My computer Local disk C Program files GenICam_V2 0 xml TransportLayers JAI 11 4 6 Feature Tree Information ...

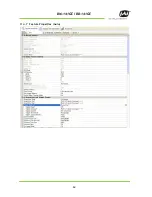
Page 64: ...BM 141GE BB 141GE 64 11 4 7 Feature Properties Guru ...

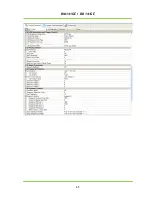
Page 65: ...BM 141GE BB 141GE 65 ...

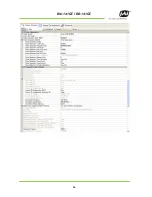
Page 66: ...BM 141GE BB 141GE 66 ...

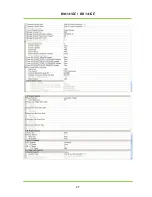
Page 67: ...BM 141GE BB 141GE 67 ...

Page 68: ...utline 40 7 45 40 45 55 40 55 LINK ACT DC IN TRIG GPIO POWER TRIG Gig E 40 C M ount 1 57 1 57 2 17 2 17 1 57 1 57 2 17 1 77 1 77 40 45 1 57 1 77 0 28 0 28 0 28 depth0 20 depth0 20 depth0 20 depth0 20 2 M 2 7 7 55 Unit mm inch 4 M3depth 4 M3 depth 4 M3 depth 4 M3 depth ...

Page 69: ...3 Specifications 13 1 Spectral response Fig 38 Spectral response for BM 141GE Fig 39 Spectral response for BB 141GE 400 450 500 550 600 650 700 1 0 0 9 0 8 0 7 0 6 0 5 0 4 0 3 0 2 0 1 0 Relative Response Wave Length nm R G B ...

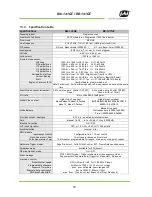
Page 70: ...er OFF 50 Green w IR cut filter S N ratio More than 58 dB 0dB gain Digital Video output GigE Vision Compliant Mono8 Mono10 Mono10_Packed Mono 12 Mono12_Packed GigE Vision Compliant BAYRG8 BAYGB8 BAYRG10 BAYGB10 BAYRG12 BAYGB12 White Balance n a Manual One push Continuous Auto 3200K to 9000K Preset 3200K 4600K 5600K Iris video output Analogue 0 7 V p p enabled by internal switch Gain Manual AGC 6 t...

Page 71: ... condensing Storage temp humidity 25 C to 60 C 20 to 90 non condensing Vibration 10G 20Hz to 200Hz XYZ Shock 70G Regulatory CE EN61000 6 2 and EN61000 6 3 FCC part 15 class B RoHS WEEE Power DC 12V 24V 10 5 1 w Lens mount C mount Rear protrusion on C mount lens must be less than 10 0mm Optical Low Pass Filter Built in Only for BB 141GE Dimensions 55 x 55 x 55 mm H x W x D Weight 230 g 230 g In ord...

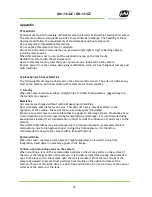
Page 72: ...e image sensor blemishes Over time some pixel defects can occur This does not have a practical effect on the operation of the camera These will show up as white spots blemishes Exposure to cosmic rays can cause blemishes to appear on the image sensor Please take care to avoid exposure to cosmic rays during transportation and storage It is recommended using sea shipment instead of air transportatio...

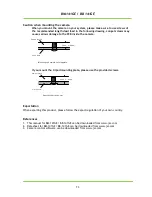
Page 73: ... plate please use the provided screws Exportation When exporting this product please follow the export regulation of your own country References 1 This manual for BM 141GE BB 141GE can be downloaded from www jai com 2 Datasheet for BM 141GE BB 141GE can be downloaded from www jai com 3 Camera control software can be downloaded from www jai com Camera chassis Fixing plate Mounting the camera to fix...

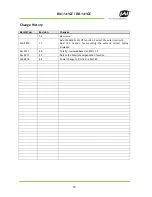
Page 74: ...b 2010 1 1 Add the details of LUT function Correct the auto iris circuit Add 12 4 Caution for mounting the camera Correct typing mistakes Oct 2011 2 0 Totally reviewed based on SFNC 1 3 Dec 2011 2 1 Delete the blemish compensation function Feb 2016 2 2 Power change to DC 12V 24V 10 ...

Page 75: ... manual are trademarks or registered trademarks of their respective owners JAI A S cannot be held responsible for any technical or typographical errors and reserves the right to make changes to products and documentation without prior notification Europe Middle East Africa Asia Pacific Americas Phone 45 4457 8888 Fax 45 4491 3252 Phone 81 45 440 0154 Fax 81 45 440 0166 Phone toll free 1 800 445 54...

Reviews: