


Soaker™ Bath Series
Installation and Operation
www.jacuzzi.com
Page 11
English
Drop-in Installation (con’t)
Figure 11 - Support
Figure 10 - Support
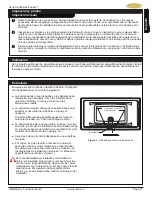
Figure 9 - Drop-In (side view)
8
Inspect all fittings, plumbing, and control
lines after inserting the bathtub to insure the
components are not damaged, disconnected, or
contacting the finish surface substrate or support
members (Figure 9).
9
Connect flex water supply lines to faucet and plug
power cords into GFCI outlet.
10
Remove scrap lumber and lower the bathtub fully
into the opening (Figures 10 and 11).
The bathtub must be fully supported from the
bottom. The bathtub must rest on the subfloor, or
be in contact with the leveling material.
11
Align the bathtub and connect the drain.
12
Turn on the power supply to the dedicated GFCI
protected circuits and check system operation.
13
Caulk around the perimeter of bathtub to seal the
space between the rim and the finished deck.
Level Subfloor
Level Subfloor
Scrap Lumber
Minimum 2˝
(50mm) Max
Thickness
Tile or
Finished
Surface
Member
Support
Substrate
Uneven
Subfloor
Floating
Floor
Compound
3-Wall Alcove Installation
1
Install the drain/overflow according to the
manufacturer’s instructions. Refer also to the
Technical Specifications Manual.
Watertight installation of the drain is the installer’s
responsibility. Drain leakage is excluded from the
Jacuzzi Luxury Bath warranty of this product.
2
Install the faucet at this time. It is recommended that
the faucet be installed by a qualified plumber.
3
Install the flange (purchased separately) according
to the instructions that are included with the kit. If the
bathtub is equipped with an integrated flange, skip this
step.
4
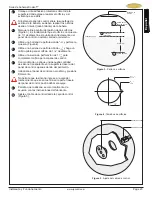
Place the bathtub into the niche. Screw the flange to
the wood stud. It may be necessary to shim the unit
to close up any gaps between the wood stud and the
flange (Figure 12).
5
Insulation may be placed within the bathtub surround.
6
Turn off the power supply to the GFCI protected
circuit.
7
Align the bathtub and connect the drain.
8
Connect flex water supply lines to faucet and plug
power cords into GFCI outlet.
9
Inspect all fittings, plumbing, and control lines after
inserting the bathtub to insure the components are
not damaged, disconnected, or contacting the finish
surface substrate or support members.
10
Turn on the power supply to the dedicated GFCI
protected circuits and check system operation.
11
Complete all finish work around the perimeter of
bathtub to seal the space between the rim and the
finished deck
(Figure 13).
Screw
Tile Flange
Tile
Cement Board
Caulking
Stud Wall
Tile Adhesive
Stud
Mounting
Screw
1˝ x 4˝
(not for
support)
Tile Flange
Figure 13 - Finishing
Silicon/Sealant
Bath Rim
Plastic Filler
Cement Board
Mortar
Stud Wall
1˝ x 4˝ (not for
support)
Finishing
Material
Figure 12 - Support


