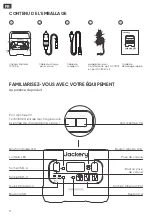
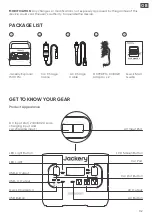
background image

04

BASIC OPERATIONS 

Power On/Off

AC Output On/Off: 

Press the AC Button, the AC Output operation indicator lights up. Then you can 

connect the equipment that needs AC charging. Press the AC Button again to turn off the AC Output.

USB Output On/Off: 

Press the USB Button, the USB Output operation indicator lights up. Then USB-A 

and USB-C Output Ports can be connected to external load devices. Press the USB Button again to 
turn off the USB Output.

Car Port On/Off:

 Press the Car Port Button, the Car Port operation indicator lights up. Then the Car 

Port can be connected to the external load devices. Press the Car Port Button again to turn off the 
output.

To Turn On, press the DISPLAY Button, any Output Power Button, or LED Light Button. Or, when there’s 
a charging input, the screen display will light up automatically.
To Turn Off, press the DISPLAY Button again and the screen display will turn off. Or,  if there is no 
operation in 30 seconds, the product will enter a sleep state and the screen display will automatically 
turn off. 
To get the screen always-on (under charging or discharging state), follow these steps: After the 
display screen lights up, double-click the DISPLAY Button and the mode of Always-On Display will be 
on.
To turn off Always-On Display, follow these steps: Press the DISPLAY Button and the screen will be 
turned off in 30 seconds.
Tip:During Always-On mode, the screen automatically turns off after 2 hours without charging or 
discharging.

There are three modes of LED Light:

 Low Light mode, Bright Light mode, and SOS mode.

The operations are as follows: 

Press the LED Light Button, the LED will be turned on. The light will 

always turn on in Low Light mode and the output power on the screen is 1W. Press again to enter the 
Bright Light mode and the output power on the screen is 3W. Press the third time to enter the SOS 
mode and the output power on the screen is 3W. Then, press again to turn off the LED Light. In any of 
these modes, the light can be turned off by a long press.

LED Light On/Off

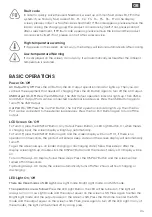
High-temperature warning

If it appears on the screen, do not worry, the battery will restore automatically after cooling.

Low-temperature Warning

If it is displayed on the screen, do not worry. It will automatically restore after the ambient 
temperature is restored.

Fault code

In order to quickly solve the user’s feedback, we set up common fault codes F0-F9 in the 
system: if you find any fault code of F0

F1

F2

F3

F4

F5

F6

F7 on the display 

screen, please contact us for after-sales treatment; If F6 code appears, please remove the 
load or unplug the charging plug, the product can restore by itself, if not, please contact 
after-sales treatment; If F9 fault code appears, please remove the load and the product 
can recover by itself, if not, please contact after-sales service.

LCD Screen On/Off

GB

Summary of Contents for Explorer 1500 Pro

Page 1: ...Version JAK UM V1 0 Model JE 1500B Contact us hello jackery com 1 888 502 2236 US USER MANUAL Jackery Explorer 1500 Pro...

Page 2: ...of Qualcomm Technologles Inc and or its subsidiaries Qualcomm and Quick Charge are trademarks or registered trademarks of Qualcomm Incorporated CERTIFICATIONS GENERAL INFO Product Name Model No Capaci...

Page 3: ...us hello jackery com 1 888 502 2236 US USER MANUAL Jackery Explorer 1500 Pro 1500 Quick Start Guide 5 AC Charge Cable 3 2 Car Charge Cable DC7909 to DC8020 Adaptor x 2 4 GET TO KNOW YOUR GEAR Product...

Page 4: ...Power Mode off by default This occurs when no device is connected or the connected device is less than or equal to a certain value Refer to the table below for more details the device will automatical...

Page 5: ...d the screen will be turned off in 30 seconds Tip During Always On mode the screen automatically turns off after 2 hours without charging or discharging There are three modes of LED Light Low Light mo...

Page 6: ...onnect the DC8020 port of the solar panel to theDC8020 port of Jackery Explorer 1500 Pro for charging If three or four solar panels are connected please refer to the method shown in the following figu...

Page 7: ...ust be the same to avoid damage or charging problems of the equipment due to inconsistent voltages of the two channels SolarSaga 3 SolarSaga 3 Explorer 1500 Pro The following way of connections are pr...

Page 8: ...put to up to 12 pieces of SolarSaga 80 solar panels When the power is connected with six solar panels in a single input port the solar panels shall be divided into two groups and each group of three s...

Page 9: ...umpy roads it is forbidden to use the car charger in case it burns due to a poor connec tion The Company will not be responsible for any loss caused by non standard operation 1 Vehicle charging is onl...

Page 10: ...ired in order to establish the start date of the warranty period 2 Years Extended Warranty To activate the Warranty Extension you must register your product online or contact our customer service team...

Page 11: ...ers Forum Qualcomm Quick Charge est un produit de Qualcomm Technologies Inc et ou de ses filiales Qualcomm et Quick Charge sont des marques commerciales ou des marques d pos es de Qualcomm Incorporate...

Page 12: ...C ble de charge pour voiture adaptateur pour transformer le port DC7909 en port DC8020 x 2 4 FAMILIARISEZ VOUS AVEC VOTRE QUIPEMENT Apparence du produit Quick Charge 3 0 Bouton USB Bouton CA Lumi re...

Page 13: ...heures Pour activer le mode faible consommation restez appuy sur le bouton CA et le bouton AFFICHAGE jusqu ce que l ic ne du mode faible consommation s allume En mode faible consommation n oubliez pa...

Page 14: ...teint automatiquement si le produit est rest 2 heures sans tre charg ou d charg Il existe trois modes d clairage LED le mode faible luminosit le mode forte luminosit et le mode SOS Les instructions s...

Page 15: ...ui de la source lectrique externe Jackery Explorer 1500 Pro pour le chargement Quand vous connectez trois ou quatre panneaux solaires veuillez effectuer le chargement par le biais d un connecteur en s...

Page 16: ...ux entr es afin d viter tout dommage ou probl me de charge de l quipement caus par des tensions incoh rentes des deux canaux SolarSaga 3 SolarSaga 3 Explorer 1500 Pro Les modes de connexion suivants s...

Page 17: ...plage en parall le entre eux puis ils doivent se relier la source lectrique externe Jackery Explorer 1500 Pro par le biais du connecteur en s rie de panneaux solaires pour le stockage des nergies et l...

Page 18: ...e directe du soleil ou dans un v hicule soumis une forte chaleur ce qui pourrait provoquer des accidents tels qu un incendie ou une explosion RECHARGE DANS LA VOITURE Ce produit peut tre recharg avec...

Page 19: ...nt la p riode de garantie applicable identifi e dans la section P riode de garantie ci dessous sous r serve des exclusions nonc es ci dessous Cette d claration de garantie nonce l obligation de garant...

Page 20: ...Hello Tech Energy Co Ltd F2 3 bldg 7 Jiaanda Science and technology industrial park factory the east side of Huafan Road Tongsheng Community Dalang Street Longhua District Shenzhen Guangdong China ht...

Reviews: