background image

Vibe 12+

The 

Settings

 tab appears.

3.

Choose the 

License

 tab.

The license information is displayed.

2.4

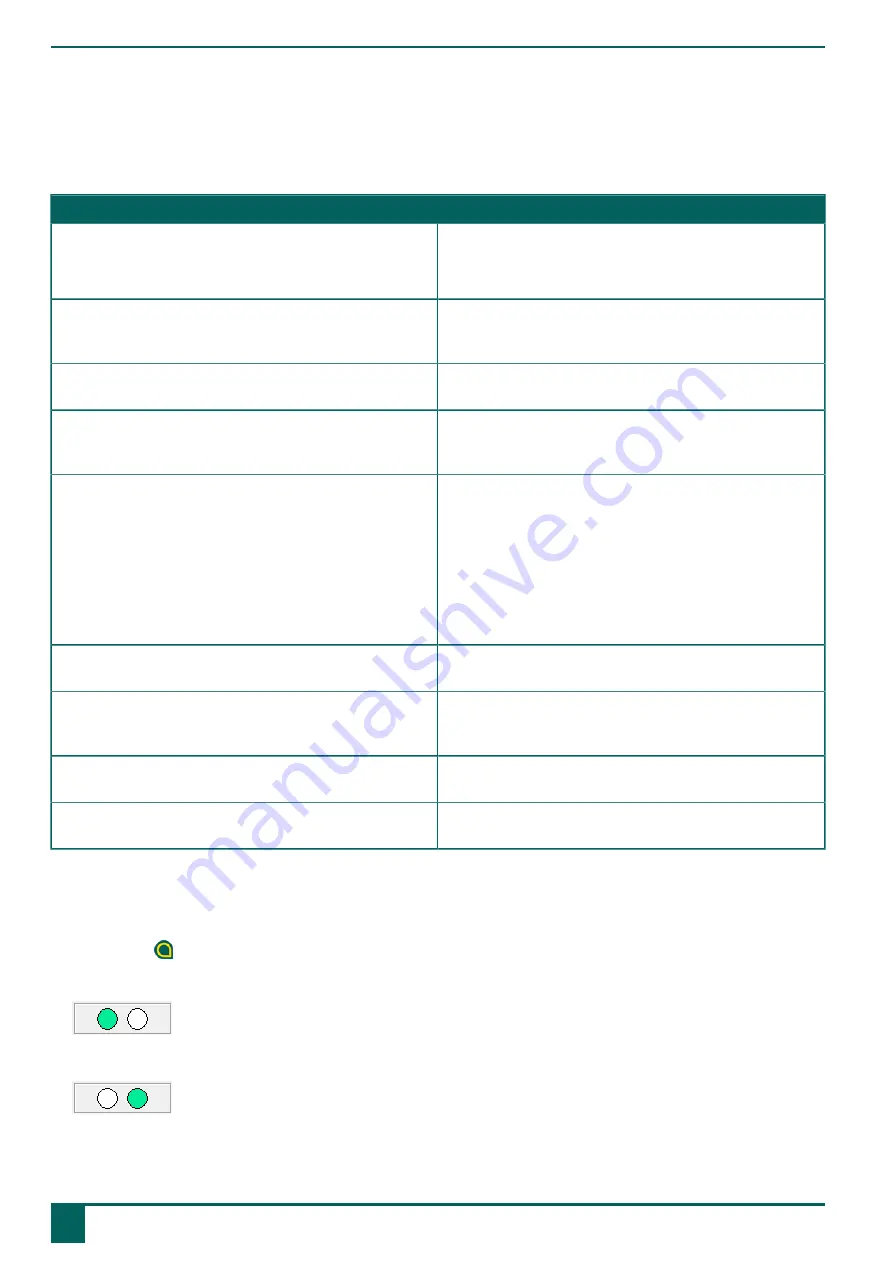
Troubleshooting

Problem

Solution

The touchscreen is slow or is not working properly.

Restart the device to correct any software errors.

Clean the touchscreen. See 

Cleaning the device

 on

page 21.

The Windows control system does not respond.

Press and hold the on/off button until the device switches

off and restart the device. See also 

Resetting the device

completely

 on page 17.

The partner display and/or the rear speakers are no longer

responding.

Reset the rear partner display and speakers. See 

Resetting

the rear partner display and speakers

 on page 16.

The device is getting hot.

The device may become hot with long and intensive use.

This is normal and has no effect on the life or performance

of the device.

No Bluetooth devices found.

Make sure that Bluetooth is enabled on the device you

want to connect to.

Make sure your device and the other appliance are

within the maximum range of 10 meters.

If necessary, remove any objects between the device

and the other appliance.

The other appliance may not be compatible with your

device.

The device cannot be switched on.

The battery has insufficient charge for starting the device.

Connect the power supply and switch the device on.

The battery is not charging properly.

If the battery can no longer be charged to 90%, please

contact the support department of the distributor where you

purchased the device.

There is no sound from the speakers.

Check that the speakers are on. See 

Switching the

loudspeakers on or off

 on page 20.

There is no sound from the headphones.

Check that the headphones are on. See 

Switching the

headphones on or off

 on page 20.

2.5

Testing the switches

You can carry out a test to check whether the switches have been connected correctly and are working properly.

1.

Double-click   in the system tray in the Windows taskbar.

2.

Press switch 1.

If operating correctly, the light in the left circle will be green.

3.

Press switch 2.

If operating correctly, the light in the right circle will be green.

4.

Click 

OK

.

G

Maintenance and troubleshooting

22

2

Troubleshooting

Summary of Contents for Vibe 12+

Page 1: ...Vibe 12 Operating instructions...

Page 2: ...automated retrieval system or translated into any language or computer language in any form or by any means either electronically mechanically optically chemically manually or in any other way without...

Page 3: ...11 3 Viewing the power status 12 4 Control options 12 4 1 Touchscreen control 12 4 2 Mouse control 12 4 3 Joystick control 13 4 4 Scanning control 13 4 5 Keyboard control 14 4 6 Using the on screen ke...

Page 4: ...n or off 20 9 Switching the headphones on or off 20 G Maintenance and troubleshooting 21 1 Maintenance 21 1 1 Repairs 21 1 2 Cleaning the device 21 2 Troubleshooting 21 2 1 Finding the device serial n...

Page 5: ...e is intended for general use in everyday life for people with a communication impairment who are not able to speak or cannot speak clearly Users must have adequate motor and cognitive abilities to us...

Page 6: ...ata Specification Explanation Processor Intel Core i5 Operating system Windows 11 Pro Hard drive 256 GB SSD Internal memory 8 GB Touchscreen 13 inch capacitive touchscreen Resolution 2 880 x 1 920 Gor...

Page 7: ...ccording to the settings usage and other factors Weight 1 600 g 3 53 lbs Dimensions Height 275 mm 10 83 inch Width 310 mm 12 20 inch Depth 20 45 mm 0 79 1 77 inch Webcam Front 5 MP Rear 10 MP Mounting...

Page 8: ...to allow photos to be taken and videos to be recorded 4 Touchscreen The device has a 13 inch capacitive touchscreen See Screen on page 8 5 Fastening holes for a strap The supplied strap can be fasten...

Page 9: ...ct a non powered voltage free switch directly to the device 13 Tray stand The device has a fold out stand The stand is designed so that the device can be ergonomically supported on a tray 14 Mounting...

Page 10: ...artner display The device is equipped with a partner display on which text can be displayed 2 Options The device can be optionally supplied with a REHADAPT mounting system or a DAESSY mounting system...

Page 11: ...life performance CAUTION The device is not watertight Always try to avoid situations that could cause moisture or dirt to get into the device through the openings Also take precautions when cleaning...

Page 12: ...vice life of the battery Figure 5 The on off button Start the device Press and hold the on off button 9 for several seconds The device is ready for use when Mind Express has started up fully 3 Storing...

Page 13: ...sleep mode your Bluetooth and Wi Fi usage If the device is used a lot it is recommended that you recharge the device every day To do this use only the supplied power adapter The device can still be us...

Page 14: ...echnology Left hand button click Tap once on the object with your finger Double click Give two short quick taps on the object with your finger Dragging To move a movable object touch the object and dr...

Page 15: ...mouse physical keyboard or on screen keyboard The device has one USB A port 16 and one USB C port 17 to which you can connect a joystick Figure 10 USB A port and USB C port CAUTION Controlling the sta...

Page 16: ...with a USB A cable The device has one USB C port 17 to which you can connect the supplied keyboard with a USB C cable Or use a USB A to USB C adapter to connect the keyboard Figure 12 USB A port and...

Page 17: ...remote control at a distance of around 5 cm from the device s infrared receiver Briefly press the remote control button of the function you want to program Consult the manual or the online help for Mi...

Page 18: ...lowing to wake the device from sleep mode Press the on off button 9 Touch the wake up sensor 2 with your thumb or finger NOTE These options are available in Windows 11 by default Advanced Windows 11 u...

Page 19: ...ly see Resetting the rear partner display and speakers on page 16 CAUTION Only completely reset the device if the device has completely frozen Figure 17 The on off button 1 Press and hold the on off b...

Page 20: ...and drag the slider to the right until you reach the desired volume Decrease the volume Press the volume control 7 until the required volume is reached Select the volume symbol in the taskbar and drag...

Page 21: ...mode see Putting the device into sleep mode on page 15 Waking the device from sleep mode see Waking the device from sleep mode on page 16 Disabling sleep mode see Disabling sleep mode on page 19 3 Dis...

Page 22: ...ress 3 Repeat step 2 to set up Switch 2 4 Click OK 7 Wake from sleep mode via touch settings You can set whether or not the device can be woken from sleep via touch You do so by activating or deactiva...

Page 23: ...leaning agents specifically designed for cleaning screens aerosol or wipes Do not press too hard on the screens when cleaning If the device has a keyboard or if a keyboard is supplied with the device...

Page 24: ...within the maximum range of 10 meters If necessary remove any objects between the device and the other appliance The other appliance may not be compatible with your device The device cannot be switch...

Page 25: ...ensor is working properly you can test it 1 Double click in the system tray in the Windows taskbar 2 Touch where the wake up sensor is located If operating correctly the light in the circle will be gr...

Page 26: ...onal If the device has been fitted with a replaceable rechargeable battery only dispose of the empty battery at an authorized collection point Used batteries are considered to be chemical waste In acc...

Page 27: ...Control 11 joystick 13 mouse 12 on screen keyboard 14 physical keyboard 14 scanning 13 switches 13 touchscreen 12 D DAESSY 4 8 mounting plate 6 Decommissioning 24 Description 6 Device 21 Device code s...

Page 28: ...on 6 complete device 17 partner display 16 rear speakers 16 Right hand button click 19 S Safety 9 Save 10 Scanning control 13 Screen cleaning 21 control 8 12 figure 6 keyboard 14 technical data 4 Send...

Page 29: ...6 USB C port 6 USB stick 10 Use device 3 prohibited 3 V Version 21 show 21 Volume button 6 decrease 6 increase 6 set inWindows 11 18 set with volume button 18 switch off 18 W Wake up sensor settings...

Page 30: ......

Reviews: