background image

J2 485 System Manual 
Version 1.0 May 19, 2012 


37 

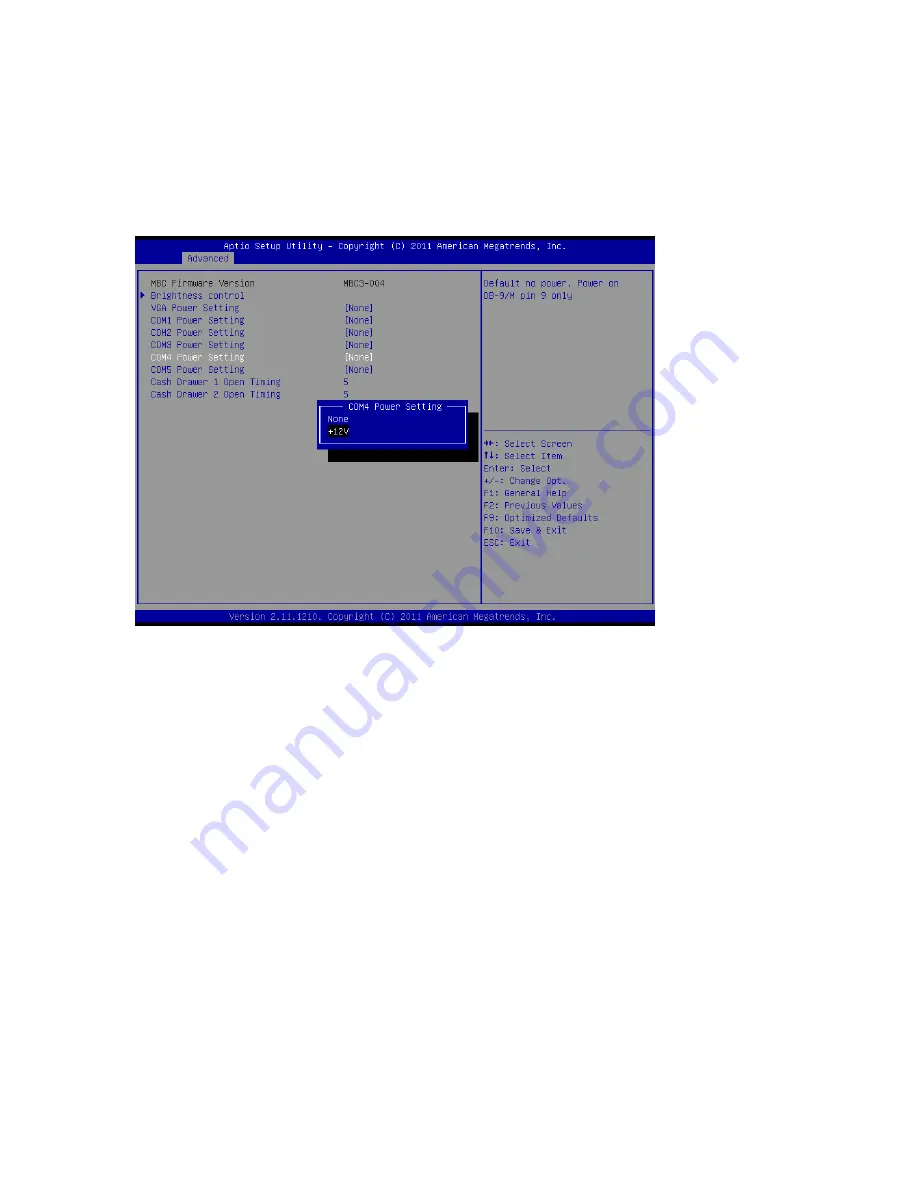
Peripheral Power and LCD Brightness Configuration 

This submenu allows for the enabling of power for the serial ports, default cash drawer, 
pulse timing, and power for a J2-supplied VGA port monitor.  

Brightness control is not used on the J2 485. 
 
Power enable for Serial Ports 


Summary of Contents for 485

Page 1: ...J2 485 Retail Point of Sale Computer System Manual May 2012...

Page 2: ...J2 485 System Manual Version 1 0 May 19 2012 2 Copyright 2012 J2 Retail Systems Ltd All rights reserved Change history Release May 19 2012...

Page 3: ...Support 12 Processors currently supported on the 485 13 I O Ports 14 Off On Buttons 14 Front Panel LEDs 15 Hard Disks 15 System Board 17 Video Ports 18 Serial ports 19 Powered USB Ports 20 Audio 21 P...
Page 4: ...lation Windows 41 Chipset Driver Installation 41 Graphics Driver Installation 41 Audio Driver Installation 42 LAN Driver Installation 43 OPOS drivers 44 J2 Health 45 Installation 45 Tray Icon 45 Loggi...

Page 5: ...J2 485 System Manual Version 1 0 May 19 2012 5 Hot Swapping RAID 1 drives 53 Contact Information 56 European Office 56 USA Office 56 Australian Office 56 Website 56...

Page 6: ...th the Q67 chipset the J2 485 uses the latest in the ultimate desktop solutions providing very high performance with a very low carbon foot print The Sandy bridge chipset is designed only to draw as m...

Page 7: ...12 total 2 0 11 external 1 internal 7 are Powered USB Serial Five DB9 RS 232 with power option Powered USB 2 12V Powered USB and 1 24V Powered USB LAN 10 100 1000 Intel 82579LM Controller PS 2 One Key...

Page 8: ...Humidity 20 80 RH non condensing Storage Humidity 20 85 RH non condensing Dimensions W x D x H 38 5 x 28 0 x 11 5cm Weight Unit 6 8 kg Weight Shipping 9 kg Shipping Box W x D x H 50 x 44 x 23cm OS Su...

Page 9: ...J2 485 System Manual Version 1 0 May 19 2012 9 Front Panel J2 485 Rear Panel J2 485 J2 Retails POS Computers the J2 485 480 425...

Page 10: ...market to offer a hot swappable RAID feature the J2 485 also supports this feature The four internal 2 5 inch SATA hard drives can be configured as a RAID array which gives true fault tolerance to the...

Page 11: ...can range from 5 watts up to as high as 95 watts and the J2 485 was designed to handle these thermal loads while still being super quiet Two smart fans are used in conjunction with an Embedded Contro...

Page 12: ...r and dual HDD with RAID can all be included The J2 485 can do it all low end to high end and at a very reasonable and cost effective price Processor Support The J2 485 supports a very wide range of I...

Page 13: ...3 2 6 GHz Na 2 4 3 MB No Yes 650 1100 No 35 W i3 2125 i3 3 3 GHz Na 2 4 3 MB No No 850 1100 No 65 W i3 2130 i3 3 4 GHz Na 2 4 3 MB No No 850 1100 No 65 W i5 2390T i5 2 7 GHz 3 5 GHz 2 2 3 MB 7 Year Ye...

Page 14: ...ons one in the front of the unit and one in the back of the unit The front panel Off On switch is slightly recessed to prevent accidental powering off The function of the button can be controlled by t...

Page 15: ...r stand by or sleep mode Hard Disks Up to four 2 5 inch SATA hard drives HDD or solid state drives SSD are supported These drives can be configured as standard hard drives or as a RAID array The SATA...

Page 16: ...Once the cover is removed from the HDD SSD the locking tab is moved to the vertical position please see below A carrying tray four of which are supplied with the J2 485 fits onto a new drive without t...

Page 17: ...ct quality and endurance is of utmost importance J2 485 electronics are built with high end components to ensure outstanding reliability and long lasting product performance The system board is design...

Page 18: ...o standard Display Port connector This connector supports a Display Port monitor or a HDMI display or DVI monitor When used with HMDI or DVI displays a passive adaptor cable is used When used with a H...

Page 19: ...upply 5 volt and COM 2 5 supply 12 volts The voltage is supplied on pin 9 RI of the DB9 connector The maximum current is 1000ma and is over current protected A BIOS setting is used to enable the volta...

Page 20: ...nternal devices All the J2 485 USB ports can supply 1000ma of power 500ma more than the norm for USB specification Powered USB Ports Of the eleven external USB 2 0 ports seven are Powered USB ports Lo...

Page 21: ...lights up when the LINK signal is present and the Amber LED lights comes on when there is LAN activity This Ethernet supports Intel AMT feature when used with the correct processor Ethernet Connector...

Page 22: ...and laser scanner but can also be used for any PS 2 Keyboard type device PS 2 Keyboard Port Location Parallel Port The J2 485 supports one parallel port This is the standard PC type 8 bit port PCI E E...

Page 23: ...nning with the optional UPS feature When the J2 485 is powered down the power to the printer is turned off This same power circuit is used by the 24 Powered USB port and normally only one 24V device i...

Page 24: ...J2 supplied Virtual Serial Cash Drawer Emulator Cash Drawer Controller Register The Cash Drawer Controller use one I O address to control the Cash Drawer Register Location 48Ch Attribute Read Write S...

Page 25: ...cleared by jumping JP3 pin 1 2 then removing the jumper Power Supply The J2 485 uses a built in power supply rated with an output of 180 watts and has an input rating of 100 240VAC at 50 60Hz 2 5Amps...

Page 26: ...sides of the rear of the unit Please see below The Kensington locks are normally used as a deterrent to prevent opportunistic theft Most retail locks will work with the J2 485 and can be located on th...

Page 27: ...tly reduces the system total carbon foot print Test conditions Voltage 220VAC 50Hz measured voltage 236 VAC OS POSReady 7 Heavy Load Program PassMark BurnInTest defaults values Maximum load PassMark B...

Page 28: ...s can all be accomplished without using any tools Removing the System Board To remove the System Board loosen the two thumbscrews located on the back of the unit as shown below Then simply use the han...

Page 29: ...the Power Supply Warning To remove the Power Supply first un plug the AC power cord Then loosen the thumbscrew located on the back of the unit as shown below and simply use the handle to slide the po...

Page 30: ...Removing Cover The case cover for the J2 485 can easily be removed by just pressing the two cover latch buttons on the side of the unit They just tilt the cover up from the rear of the unit as shown b...

Page 31: ...System Manual Version 1 0 May 19 2012 31 Lift cover from the rear and tilt up J2 485 with cover off When replacing the cover simply press in the two front sides of the case so that the locking tabs e...

Page 32: ...astic fan duct Loosen the four spring loaded screws that secure the processor heat sink by turning each screw about two turns at a time so that the pressure is removed from the socket evenly Once the...

Page 33: ...012 33 Adding Removing DVD Drive The DVD drive can easily be removed by first removing the J2 485 cover and loosening the thumbscrew that is securing the DVD drive as shown below The drive can now sli...

Page 34: ...displays a help window for the current screen or BIOS option BIOS setting should only be change by qualified personnel as changing some settings can cause the system to function improperly Main System...

Page 35: ...dvanced Setting Screen Launch PXE ROM This setting enables the built in PXE LAN remote boot rom This allows the system to run as a diskless workstation or also to be able to download a drive image to...

Page 36: ...modes SATA RAID or AHCI When set to SATA the SATA drive works the same as a normal IDE HDD This is the IDE compatible mode and default BIOS setting The other two selections are RAID and AHCI modes Pl...

Page 37: ...Power and LCD Brightness Configuration This submenu allows for the enabling of power for the serial ports default cash drawer pulse timing and power for a J2 supplied VGA port monitor Brightness contr...

Page 38: ...as lost or it will stay off if the unit was off when AC power was lost Wake on LAN Wake on LAN is enabled by default but can be disabled in this screen RTC Configuration The RTC has an alarm function...

Page 39: ...the current boot order Boot Settings Screen Display OEM Logo The BIOS can display two types of OEM logos on boot up The default is a small J2 logo in the upper left hand corner With this setting BIOS...

Page 40: ...BIOS defaults can be loaded Typing the F9 key at any time will load the Optimized Values which resets all BIOS setting to the factory defaults It should be noted that to save changes to the BIOS setup...

Page 41: ...ite http www j2retailsystems com support 485 Chipset After extracting the drivers to a temporary folder run Setup Just answer Next or Yes to all the screen prompts and the drivers will install Graphic...

Page 42: ...rs can be downloaded from the J2 web site at http www j2retailsystems com support 485 Audio After extracting the driver to a temporary folder run Setup and then follow the instructions below First Aud...

Page 43: ...em will need to be rebooted before the audio drivers take effect LAN Driver Installation The LAN drivers can be downloaded from the J2 web site http www j2retailsystems com support 485 LAN After extra...

Page 44: ...the J2 485 supports the following Cash Drawer ports optional MSR optional 2x20 character Customer Display and the optional iButton reader The OPOS driver may be downloaded from the J2 web site at http...

Page 45: ...system voltages as well as system and CPU temperatures Installation The utility can be downloaded from the J2 web site http support j2rs com Utilities Health To install just unzip anywhere and run set...

Page 46: ...information An example would be the J2 680 unit which in addition to the above information would also display the fan speed of the two J2 680 fans Logging to File The J2 Health program can log the hea...

Page 47: ...ries to access the J2 health information J2 485 Health keys are shown below J2 Remote Monitoring Software J2 now offers a full remote monitoring and asset tracking solution option that works in conjun...

Page 48: ...Retail brings this feature to POS hardware The J2 SMI BIOS Info program will run on any J2 POS hardware or for that fact on any PC hardware It can display all DMI SMI information on a formatted form I...

Page 49: ...ies To install just unzip anywhere and run as you wish to download the utility form Operation Just run the cash drawer test from whatever folder it was installed into Use the Use Direct I O Port 48c s...

Page 50: ...er send a bell character to the Com port it is assigned to The bell character is the ASCII 07 hex character Control G The open close status of the drawer may be obtained by reading the status bits of...

Page 51: ...nfigured as a RAID 0 array the two drives in the RAID array are striped With striping data is split between two drives This allows the J2 485 to read the data more than twice as fast as with a single...

Page 52: ...ing POST press the Ctrl and i keys at the same time to enter the Intel Matrix Storage Manager Option ROM user interface 2 Select Option 1 Create RAID Volume and press the Enter key 3 Use the up or dow...

Page 53: ...he J2 485 uses the ICH8R driver 5 The next screen should confirm your selected controller Press the Enter key again to continue 6 At this point you have successfully F6 d in the Intel Matrix Storage M...

Page 54: ...responds to the HDD 1 the bottom drive in the HDD bay Power to the system does not need to be turned off and the system will still operate First remove the bad drive After removing the bad drive inser...

Page 55: ...ood drive to the hot spare Rebuilding Rebuilt The RAID has now mirrored the drive and the system is now protected for a drive failure Note Please refer to J2 s Using RAID in a Point of Sale Environmen...

Page 56: ...WA3 6RP United Kingdom 44 0 1925 817003 Phone 44 0 1925 811989 Fax USA Office J2 Retail Systems Inc 9251 Irvine Boulevard Irvine CA 92618 USA 714 669 3111 Phone 714 669 3133 Fax Australian Office J2 R...

Reviews: