background image

J2 225 System Manual 
Version 1.0 May 29, 2012  


36 

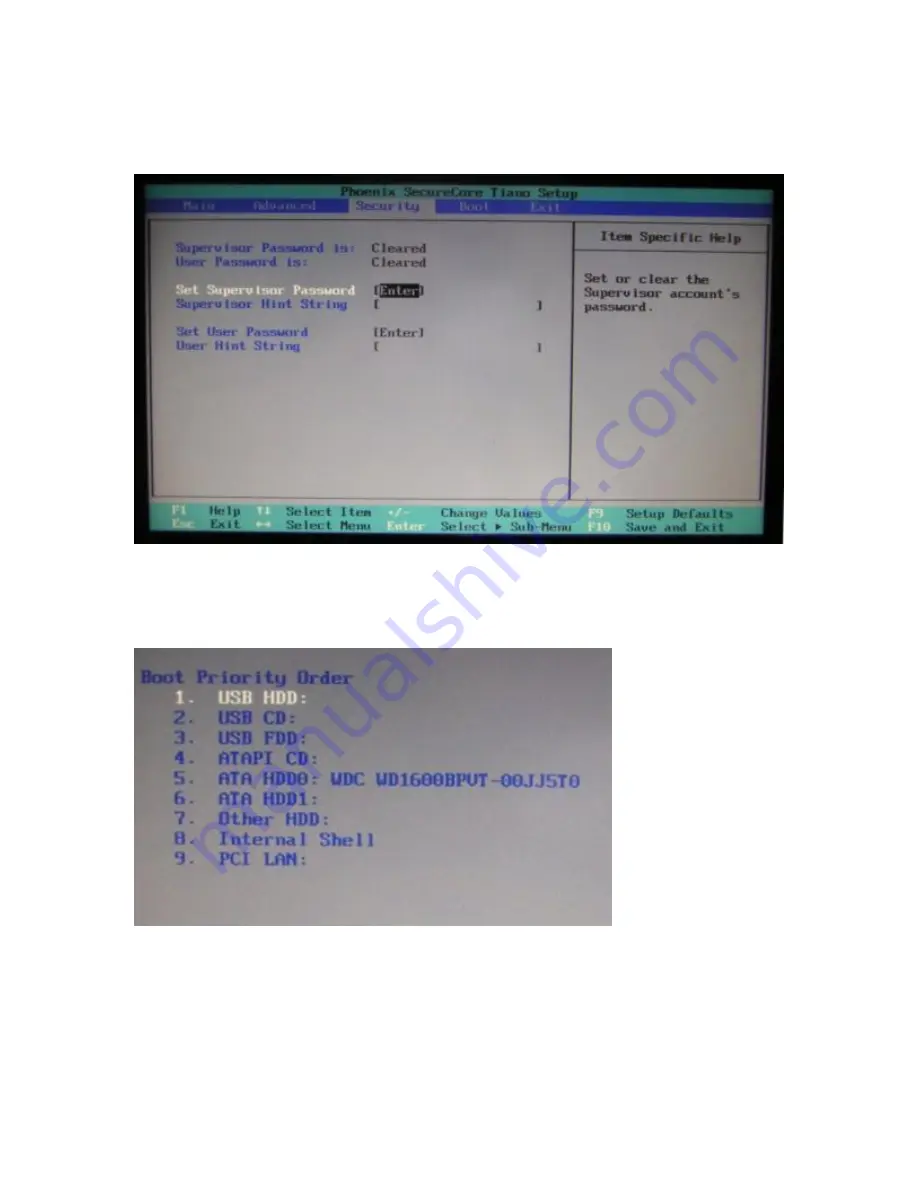
Security Screen 

The Security Screen is used to set BIOS accessed passwords. 


Boot Screen 

The boot priority order can be set with the Boot Screen.  


Keys are used to view or configure devices: 
Use up and down arrows to select a device. 
A plus and minus moves the device up or down in the list. 
A shift plus the number 1 enables or disables the device.  
A “!” will be displayed when a device is disabled in the boot list. 


Summary of Contents for 225

Page 1: ...J2 225 Integrated Touch Screen Computer System Manual April 2012...

Page 2: ...J2 225 System Manual Version 1 0 May 29 2012 2 Copyright 2012 J2 Retail Systems Ltd All rights reserved Change history Version 1 0 Release May 29 2012...

Page 3: ...16 Audio 17 Cash Drawer Ports 17 CMOS Clear 19 Mini PCI E 19 Memory SODIMM s 20 Power Supply 20 12VDV Power Out 21 Typical Power Consumption J2 225 21 Service 22 Swing Arm Base 22 Removing the Power...

Page 4: ...mware 44 MCU Option 45 DimWake 46 Installation 46 J2 Health 47 Installation 47 Tray Icon 47 Logging to File 48 Registry Entries 49 J2 Remote Monitoring Software 49 SMI BIOS Info Utility 50 Installatio...

Page 5: ...tton Reader 63 Installation 64 J2 225 Wall Mount Counter top Mount Kit 66 Packing list 66 Assembly 67 J2 225 10 1 inch 1024 x 600 LCD Customer Display 71 Installation 72 Contact Information 75 Europea...

Page 6: ...ning most POS applications with a very low carbon foot print all at a competitive and attractive low price Even with its small foot print the J2 225 is incredibly feature rich It comes standard with 2...

Page 7: ...7 The J2 225 supports the standard Microsoft operating systems Windows 7 POSReady 7 Windows 7 Embedded XP POSReady 2009 and XP embedded as well as the soon to be released Windows 8 The J2 225 is equal...

Page 8: ...This means that the touch screen J2 225 panel or systems board can quickly be replaced in less than two minutes if needed however with the solid reliability of this creative unit this should not even...

Page 9: ...ive True Flat or Projective Capacitive with Multi touch and gesturing USB 4 onboard USB ports for optional devices MSR Wi Fi PCT MSR Onboard microcontroller of MSR on PS2 Serial Serial port header for...

Page 10: ...in the cable well as shown below This button is located near the side to prevent accidental powering down by the user The function of the button can be controlled by the OS If the J2 225 hangs for som...

Page 11: ...screen is tempered glass and does not reduce the brightness of the J2 225 panel When operating in a very high use environment the PCT is the recommended touch screen technology The PCT touch screen w...

Page 12: ...68 resolution display with 16 2 Million colors and a 14 inch LED backlight with 16 9 aspect ratio screen The brightness is rated at 220cd m2 The Intel controller allows for the display to be rotated t...

Page 13: ...a passive adaptor cable must be used When using a VGA display an active adaptor is to be used With HDMI display Audio support is provided via the same HMDI cable The secondary video displays can be co...

Page 14: ...d EPSON compatible printers All serial COM ports can be BIOS enabled to provide 12Vpower to external devices This power is supplied via pin 10 of the RJ45 which corresponds to pin 9 on the DB9 adaptor...

Page 15: ...R Pin 4 Pin 2 RD Pin 3 Pin 2 RD Pin 5 Pin 7 RTS Pin 4 Pin 7 RTS Pin 6 Pin 3 SD Pin 5 Pin 3 SD Pin 7 Pin 8 CTS Pin 6 Pin 8 CTS Pin 8 Pin 4 DTR Pin 7 Pin 4 DTR Pin 9 Pin 5 GND Pin 8 Pin 5 GND Pin 10 Pin...

Page 16: ...ch as using a PCT touch screen RFID reader and or other peripherals USB Ports Ethernet Connection The J2 225 uses the Realtek RTL8111 Gigabit Ethernet controller The Ethernet connector is located in t...

Page 17: ...low which allows for the connection of a microphone and headset or audio out to other devices Audio out is also supported on the DisplayPort when used with a HDMI monitor Audio Jack Location Cash Draw...

Page 18: ...ccess to the I O ports Cash Drawer Controller Register The Cash Drawer Controller use one I O address to control the Cash Drawer Register Location 48Ch Attribute Read Write Size 8bit BIT BIT7 BIT6 BIT...

Page 19: ...J2 225 CMOS can be cleared by unplugging the system board CMOS battery for 30 seconds before plugging it back in CMOS Battery Mini PCI E The onboard Mini PCI Express connector is normally used for the...

Page 20: ...ower Supply The J2 225 uses a notebook type power supply that is mounted in the base of the unit The power supply is rated with an output of 65 watts 18 5 VDC 3 5 Amps and has an input rating of 100 2...

Page 21: ...uch lower power consumption than previous generations of POS computers When coupled with the proper system configuration this can greatly reduce the system total carbon foot print Test conditions Volt...

Page 22: ...8 This allows for great versatility in height and viewing angles The J2 225 swing arm base can be folded down flat for shipping or it can also be used with the wall mounting option Being able to fold...

Page 23: ...lder for the power supply which can be removed if the base is not needed When not using the base the VESA 75mm mounting points may be used to mount the J2 225 The power supply is mounted in the base a...

Page 24: ...outing The swing arm base is designed to allow for clean cable management There is a cable channel through the base swing arm which has a quick access cover Use a coin finger or screw driver to remove...

Page 25: ...J2 225 System Manual Version 1 0 May 29 2012 25 Route cables Replace cover...

Page 26: ...unit or through a hole in the counter top VESA Mounting The J2 225 unit also supports the industry standard 75mm VESA mounting The same mounting hard point used for the swing arm base is used for VES...

Page 27: ...oin to disassemble the J2 225 Step 1 Power down the unit and unplug all cables on the I O panel Step 2 Remove the HDD SSD from the system by removing the securing screw and slide it out HDD access pan...

Page 28: ...J2 225 System Manual Version 1 0 May 29 2012 28 Step 4 Remove the four screws shown below that secure the back cover...

Page 29: ...J2 225 System Manual Version 1 0 May 29 2012 29 Step 5 Unclip the outer bezel from the unit by pulling gently on the edge of the front of the unit...

Page 30: ...J2 225 System Manual Version 1 0 May 29 2012 30 Step 6 Using a small coin this works best at the pry point between the front bezel and back cover slip the coin in to pry the back cover off...

Page 31: ...LCD electronics assembly on a clean protected surface that will not scratch or damage the touch screen Touch Screen LCD Panel removal The touch screen or LCD panel can now be removed by detaching the...

Page 32: ...y first unplugging the 5 wire cable attached to the board then removing the five screws as shown The board will need to be moved gently from side to side to release it from the somewhat sticky thermal...

Page 33: ...ia the operating system System Information The J2 225 BIOS has a system information screen that displays useful system information including the serial number of the unit This information may also be...

Page 34: ...OS options to be accessed Please use care in changing these options as some settings can cause the system to malfunction These options are provided to offer maximum flexibility in configuring the J2 2...

Page 35: ...vior of the unit when it is powered up it also enables changing the auto power up feature COM Power and LCD Brightness Configuration This BIOS screen allows the enabling of the power for the serial po...

Page 36: ...t Screen The boot priority order can be set with the Boot Screen Keys are used to view or configure devices Use up and down arrows to select a device A plus and minus moves the device up or down in th...

Page 37: ...about this new UEFI BIOS came be found at the following web link http www phoenix com pages phoenix securecore tiano tm Device Drivers All device drivers for the J2 225 can be downloaded from the J2 w...

Page 38: ...for the configuration of options and for reading the current values of these various functions Installation The utility can be downloaded from the J2 web site http support j2rs com 225 utilities To i...

Page 39: ...e dimming the screen This same function is built into Windows 7 and Windows 8 drivers and should be used rather than the J2 225 hardware dimming But for older operating systems such as XP the J2 225 h...

Page 40: ...tive is controlled by the Dim Brightness setting This utility is used to change this value whose default value is 10 The possible range is from 5 95 in 5 increments Note Dimming is important for a few...

Page 41: ...ngs can be changed without an MSR installed It should be noted that the MSR iButton is a keyboard wedge device Most settings are self explanatory The radio buttons at the bottom of the screen are used...

Page 42: ...MSR and iButton By default for the MSR only an ENTER key needs to be sent at the end of all track data When preamble or postamble data needs to be edited a touch friendly onscreen keyboard is display...

Page 43: ...J2 225 System Manual Version 1 0 May 29 2012 43...

Page 44: ...to update the MCU firmware when necessary This may be to add a new feature or function to the MSR iButton J2 will supply a firmware file for this when required Use the Select Flash Firmware File butt...

Page 45: ...The utility will now update the MCU firmware It will first write the memory then verify it Do not turn off the J2 225 power when updating MCU Option This tab is only used for factory programming and v...

Page 46: ...DimWake program provides this function Installation The utility can be downloaded from the J2 web site http support j2rs com 225 utilities To install just unzip anywhere and run setup Like other J2 u...

Page 47: ...system voltages as well as system and CPU temperatures Installation The utility can be downloaded from the J2 web site http support j2rs com Utilities Health To install just unzip anywhere and run set...

Page 48: ...information An example would be the J2 680 unit which in addition to the above information would also display the fan speed of the two J2 680 fans Logging to File The J2 Health program can log the hea...

Page 49: ...y entries to access the J2 health information J2 225 Health keys are shown below J2 Remote Monitoring Software J2 now offers a full remote monitoring and asset tracking solution that works in conjunct...

Page 50: ...w J2 brings this feature to POS hardware The J2 SMI BIOS Info program will run on any J2 POS hardware or for that fact on any PC hardware It can display all DMI SMI information on a formatted form Ins...

Page 51: ...status lines such as when the special J2 225 Y cable is used supporting two cash drawers Installation The utility can be downloaded from the J2 web site http support j2rs com Utilities To install just...

Page 52: ...ports separate status lines The standard cable supports shared status lines When using the special cable check the Use Separate Status for Drawer2 box The test screen will now look like this The Use C...

Page 53: ...send a bell character to the Com port it is assigned to The bell character is the ASCII 07 hex character Control G The open close status of the drawer may be obtained by reading the status bits of it...

Page 54: ...n optional two line by twenty character mono color liquid crystal display module LCM This LCM display shows black characters on a white background for maximum visibility to the customer The LCM suppor...

Page 55: ...System Manual Version 1 0 May 29 2012 55 Installation The J2 225 LCM can be installed in just a minute To install first power down the system then remove the secondary display mounting cover as shown...

Page 56: ...t This 8 pin cable plugs into the CN8 LCM connector on the system board The connector is keyed so that it can only plug in one way This cable provides power and serial data to the LCM module Once the...

Page 57: ...uration utility is provided to change the LCM setting This utility allows for the setting of serial port bard rate a data format as well as emulation type and default font It also allows for the LCM f...

Page 58: ...J2 225 System Manual Version 1 0 May 29 2012 58 By default the LCM is mapped to ComPort 6 9600 baud and N 8 1 parity The emulation character set baud rate and parity can be changed under CD Settings...

Page 59: ...J2 225 System Manual Version 1 0 May 29 2012 59 The LCM firmware can be updated using the Program CD Firmware tab J2 will supply the necessary file should a firmware update be required...

Page 60: ...811 1 6 It can read both high low coercivity magnetic stripes The MSR support 3 tracks of data but defaults to having only track one and two enabled The MSR is a Keyboard Wedge device with all data be...

Page 61: ...25 System Manual Version 1 0 May 29 2012 61 Installation The J2 225 MSR can be installed in just a minute To install first power down the system Then remove the option mounting point cover as shown be...

Page 62: ...hing the MSR This completes the installation of the J2 225 optional MSR Note that the MSR can be mounted to any one of the J2 225 option mounting points By default the internal MSR cable is routed to...

Page 63: ...ader sometimes referred to as a Dallas key The iButton is a Keyboard Wedge device with all data being sent to the keyboard port For software that requires a serial port iButton reader the J2 Virtual S...

Page 64: ...n 1 0 May 29 2012 64 Installation The J2 225 iButton reader can be installed in just a minute To install first power down the system then remove the option mounting point cover as shown below Plug in...

Page 65: ...25 optional iButton reader Note that the iButton reader can be mounted to any one of the J2 225 mounting option points By default the internal iButton reader cable is routed to the upper right hand co...

Page 66: ...t works together with the J2 225 standard base to allow the viewing angle and distance from the wall to be adjusted Also the power supply is mounted in the base making for a clean install This same ki...

Page 67: ...surface using at least four of the bracket mounting holes Please note that the bracket has both a 100mm and 75mm hole pattern so that the bracket can be used with the VESA bracket as well as being dir...

Page 68: ...need to go to the unit as required A space is provided just by the power supply for the cable to exit cleanly assuming they are routed via the swing arm cable channel as in a normal install Cables can...

Page 69: ...insure the unit is not knocked of the wall by accident The 4 mm screw supplied is used for this propose First remove the rubber hole plug from the unit then screw in the safety screw The unit is now...

Page 70: ...J2 225 System Manual Version 1 0 May 29 2012 70 Some possible viewing angles using the wall mount bracket...

Page 71: ...2 225 supports an optional customer side LCD display This display attaches to an internal DisplayPort via short cable that support power and data to the display The display resolution is 1024 x 600 16...

Page 72: ...em Manual Version 1 0 May 29 2012 72 Installation The J2 225 10 1 display can be installed in just a minute To install first power down the system then remove the secondary display mounting cover as s...

Page 73: ...he unit This 20 pin cable plugs into the CN6 connector on the system board The connector is keyed so that it can only plug in one way This cable provides power and video data to the 10 1 display Once...

Page 74: ...display brightness will follow the main screen brightness unless disable by a jumper on the 10 1 display electroins J2 also supplies a virtual serial port 2 x 20 line customer driver that works with t...

Page 75: ...WA3 6RP United Kingdom 44 0 1925 817003 Phone 44 0 1925 811989 Fax USA Office J2 Retail Systems Inc 9251 Irvine Boulevard Irvine CA 92618 USA 714 669 3111 Phone 714 669 3133 Fax Australian Office J2 R...

Reviews:

Related manuals for 225