J. A. Roby FORGERON CUISINIERE Instruction Manual Download Page 18

18 

March 1

st

, 2015 

 Chimney installation, General steps 

Use only approved chimneys. The same size as the output 

collar. 6 inches in this case. The chimneys used must be tested 
according  to  CAN/ULC  S629  M87  in  Canada  and  to  UL  103 
(type HT) In USA. The Cook stove can be install with a masonry 
chimney according to ULC S635, ULC S640 and UL 1777. The 
masonry  chimney  must  be  equipped  with  a  stainless  steel 
sleeve  and  meet  the  standards  for  the  masonry  chimney  with 
inner sleeve.  

Provide a place to sweeping.  

When possible, it is preferable to avoid an outside chimney or 
built  on  an  exterior  wall,  and  this  is  even  more  important  for 
colder areas. Outside chimneys generally have a less efficient 
draught. They can even have an inverse draught because it is 
hard to heat them enough so that they can reach their operating 
temperature. A greater accumulation of creosote, a less efficient 
draught and a  lesser performance are some characteristics of 
cold  chimneys.  Draught  is  proportional  to  the  total  chimney 
height as well as its temperature. It is therefore possible to get a 
better  draught  by  increasing  the  chimney's  height  and  by 
reducing the heat loss with an insulated lining. The chimney has 
to  be  installed  with  a  stainless  steel  lining.  Make  sure  that  all 
smoke pipe joints are really airtight. A leak reduces the efficiency 
of the appliance and could even make its utilization dangerous. 
 

Note: This is a general chimneys installation method. 
Always refer to the manufacturer’s manual of the chimney 
for a more detailed method for your chimney. 

1)  Determine the total length needed for your chimney.. 
2)  Cut the holes into all floor and roof 
3)  If you need to cut a joist, be sure to strengthen the 

adjacent joists and frame hole respecting the 
minimum dimensions to be maintained between 
combustible materials and the firewall. Follow the 
manufacturer's instructions in the manual supplied 
with the firestop. Never cut a structural beam. 

4)  Frame the holes in each level and attic respecting the 

minimum distance recommended by the 
manufacturer's manual of your chimney. And install 
firestop in each level. 

5)  Frame the hole into the roof. 
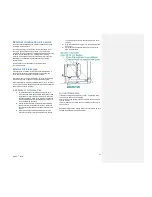
6)  Install the chimney support at the ceiling where Cook 

stove is installed. 

7)  Stack and lock the prefabricated chimney section on 

the support and above the roof. 


The chimney must be over 36 inches (91.4 
cm) over the higher point into the roof 
opening. 


The chimney must also be 24 inches over 
the highest point on the roof inside 10 ft (304 
cm) radius around chimney. 


The minimum length of chimney is 12 feet 
(365.8 cm). 


ATTENTION: Be sure the chimney section 
are lock together and lock onto the 
chimney support. 


Note: More lengthen chimney than the 
minimum can add more draft and help to 
the good working operation of the cook 
stove  Try the minimum length first then 
add section if you need more draft. 

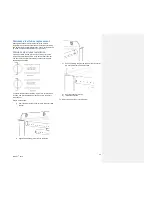
8)  Put the roof flashing over the chimney and seal it with 

roof caulking. 

9)  Nail roof flashing, and reinstall roof covering. 
10)  Slide the storm collar over the chimney and seal it 

with high temperature caulking. 

11)   Lock the chimney cap and install the spark arrestor if 

necessary  

Inside Masonry Chimney, Vertical 
Installation  

The  wood  appliance  must  be  installed  in  accordance  with  the 
applicable  local  laws  or  the  CAN/CSA-B365,  NFPA211  (USA) 
norms. Follow the chimney manufacturer’s instructions to install 
the chimney. 


Summary of Contents for FORGERON CUISINIERE

Page 1: ...March 1st 2015 CAN ULC S627 M00 UL 1482 CAN CSA STD B415 1 10 Instruction Manual 490 rue de l Argon Quebec CANADA G2N 2C9 Tel 418 849 8095 Fax 418 849 0077 FORGERON CUISINIERE FORGERON...

Page 2: ...tical Installation 19 Offset Installation 19 Vertical Installation 20 External combustion air source 21 Exterior Air Intake pipe 21 Installation of Air Intake Pipe 21 Air Inlet Obstruction 21 Stainles...

Page 3: ...death Keep these instructions This appliance must be connect to A HT type factory built chimney approved UL103 or ULC 629 with 6 inches diameter 15 24 cm A code approved masonry chimney with a flue li...

Page 4: ...4 March 1st 2015 Nameplate...

Page 5: ...5 March 1st 2015 Appliance Dimensions Figure 1...

Page 6: ...according to standard UL1618 for USA or approved to the locals codes Example cement brick ceramic tiles Floor protection plate minimum dimensions The following dimensions are the minimums values and...

Page 7: ...tection The following dimensions are the minimums values and it can be higher Canada 8 in 20 3 cm behind 8 in 20 3 cm beside 18 in 45 7 cm in front of the door opening United States 8 in 20 3 cm behin...

Page 8: ...inches to the back for a smoke simple pipe with a heat shield and a 18 inches lateral MINIMUM clearance In the case with a smoke simple pipe without heat shield you must installed the cooker stove th...

Page 9: ...hown on the illustration and center it on the other direction 5 Unscrew the nut not completely 6 Install the legs 1 like the illustration Attention Be sure the legs are in place correctly positioned a...

Page 10: ...pty for the chrome decoration 4 Insert the chrome decoration in the hole and fix it with carriage bolt and nut 2 bolts each 5 Fix the top with the back and with the front too 6 Fix the left decorative...

Page 11: ...o the cook stove Fan and Snap disc box installation 1 Screw fan putting electrical wire in the centered bottom of both Fan 2 Screw snap disc box into the holes made for that at the back side near the...

Page 12: ...h tighten the 3 bricks screw Side firebricks installation 1 Put 2 bricks A and 1 angled brick E beside the right air corridor 2 Screw the brick screw and insert split washer 3 Tighten the screws on th...

Page 13: ...rockwool must not obstruct the smoke exit way Check in the stove air exit and make sure that is in the good position Finally put the half round steel plate above the rockwool see the picture 1 Put 2 A...

Page 14: ...the chimney following the manufacturer instruction 5 Put the stove directly on the floor aligned vertically with the center of chimney and trace the side of the stove on the floor and remove it 6 Trac...

Page 15: ...t ATTENTION If heat shield is not present you must move away the cook stove to keep 18 inches 45 7 cm clearance between combustibles materials and 1 the chimney connector Any horizontal section must h...

Page 16: ...next section up to the roof chimney support and don t forget to screw the chimney connector to the roof support collar DO NOT CONNECT CONECT THIS UNIT TO A CHIMNEY FLUE SERVING ANOTHER APPLIANCE CONN...

Page 17: ...flashing The Storm collar Cap with spark arrester Firestop Chimney ceiling support Decorative collar e If the chimney exit by a wall and the bottom are less than 7 feet 213 cm over the ground level A...

Page 18: ...th needed for your chimney 2 Cut the holes into all floor and roof 3 If you need to cut a joist be sure to strengthen the adjacent joists and frame hole respecting the minimum dimensions to be maintai...

Page 19: ...ey Cathedral Vertical Installation The wood appliance must be installed in accordance with the applicable local laws or the CAN CSA B365 NFPA211 USA norms Follow the chimney manufacturer s instruction...

Page 20: ...15 Vertical Installation The wood appliance must be installed in accordance with the applicable local laws or the CAN CSA B365 NFPA211 USA norms Follow the chimney manufacturer s instructions to insta...

Page 21: ...nt Installation of Air Intake Pipe 1 To install the exterior air intake pipe find the hole under the cook stove back and fold the 3 tabs outside the Intake box Insert the pipe into the hole and screw...

Page 22: ...the screws holding the lateral support 4 Install the new back deflector Install the new lateral support 1 4 Install the new stainless steel deflector 3 Install disassembled tube rockwool and half roun...

Page 23: ...tion and are in the back of heat chamber The front heat chamber is covered by the two other and are double sided perforated To ensure proper tubes orientation a groove is cut at one end of tubes and a...

Page 24: ...ART OR FRESHEN UP A FIRE IN THIS HEATER KEEP ALL SUCH LIQUIDS WELL AWAY FROM THE HEATER WHILE IT IS USE First fire The first hours of operation you must heat it gradually In order to allow an appropri...

Page 25: ...ding disposal Into a metal container with an airtight metal lid correctly closed Outside the house on a non combustible material Far enough any combustible material Far enough any inflammable liquid a...

Page 26: ...he nut 3 Unlock the door and carry it while open 4 Tilt the door off the upper hinge 5 Lift the door off the lower hinge Installing the door 1 Insert the bottom hinge 2 Close the door align it and loc...

Page 27: ...your local authority to know what to do in case of Chimney fire And be sure to know procedure in case of chimney fire 1 Close all door and put the handle to secondary position 2 Close damper 3 Spay wa...

Page 28: ...28 March 1st 2015 Annexe 1 Door assembly...

Page 29: ...Parts that can be replaced Bricks Stove ceramic glass Spring Handle Stove Door Fans Flat fiber glass rope around glass Round fiberglass rope Ash Plug Slotted Brick Washer To ordered parts call your s...

Page 30: ...discretion decide to repair or replace any part or unit after inspection and investigation of the defect The manufacturer may at its discretion fully discharge all obligations with respect to this wa...

Reviews: