4
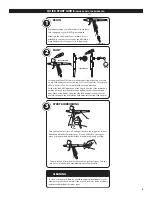
Cleaning the Airbrush (TRN2)
1. Remove the paint bottle.
2. Attach a bottle containing the appropriate cleaning solution. (Note:
Medea Airbrush Cleaner works great for water-based media.)
3. Spray until the solution sprays clear.
4. Remove the bottle of cleaning solution.
5. Spray air until the airbrush sprays dry.
6. Attach a bottle containing the next color.
7. Repeat cleaning procedure when finished.
Cleaning the Airbrush (TRN1)
1. Dump out the color cup’s excess paint.
2. Rinse the cup with the appropriate cleaning solution. (Note: Medea
Airbrush Cleaner works great for water-based media.)
3. Use a paper towel to wipe out any left-over paint.
4. Fill the bottom of the cup with cleaner.
5. Spray cleaner until the spray is clear.
6. Add the next color to the color cup.
7. Repeat cleaning procedure when finished.
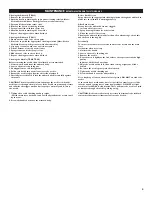
Cleaning the Needle (TRN2, TRN1)
Before removing the needle, clean the airbrush as recommended.
1. Unscrew the handle from the airbrush body.
2. Loosen the needle chucking nut.
3. Gently pull the needle straight out.
4. Fold a soft cloth damp with cleaner over the needle.
5. Rotate the needle to gently wipe the residual paint off.
6. Carefully insert the needle into the airbrush until it seats fully against
the nozzle.
CAUTION: The most probable time to damage the needle is when the
needle passes through the main lever. If the needle stops abruptly, retract
and examine the trigger mechanism for proper assembly and re-insert
the needle.
7. Tighten the needle chucking nut finger tight.
• Pull the main lever back and forth to visually confirm the needle’s abil-
ity to move.
8. Screw the handle back onto the airbrush body.
Before Each Session
Spray water or the appropriate cleaning solution through the airbrush to
make sure the airbrush is working properly.
After Each Session
Or any time the airbrush becomes clogged:
1. Increase the air pressure.
2. Spray cleaning solution for a short time.
3. Clean the needle if necessary
Cleaning the airbrush this way helps clean the paint passage, the nozzle
and the needle thoroughly.
Periodically
To ensure smooth main lever action lubricate the needle and the main
lever
mechanism when necessary.
1. Unscrew the handle.
2. Loosen the needle chucking nut.
3. Remove the needle.
4. Coat the needle lightly at the front where the taper starts with a high-
quality
lubricant, like Medea Super Lube.
5. Wipe the needle with a soft, clean cloth, leaving a light coat of lube
behind.
6. Re-insert the needle gently into the airbrush.
7. Tighten the needle chucking nut.
8. Screw the handle onto the airbrush body.
Use a tiny drop of lube on the main lever’s piston. DO NOT over-lube the
needle
or the main lever mechanism, since it is possible to transfer excess lube
into the nozzle causing severe paint flow problems. DO NOT use light
machine oil or WD-40 for lubrication. These will cause the needle to stick
as it moves through the needle packing o-ring.
CAUTION: If it becomes absolutely necessary to dismantle the airbrush
remember that in most situations tools are not needed.
MAINTENANCE
REFER TO MASTER PARTS LIST ON PAGE 5


