background image

5

A

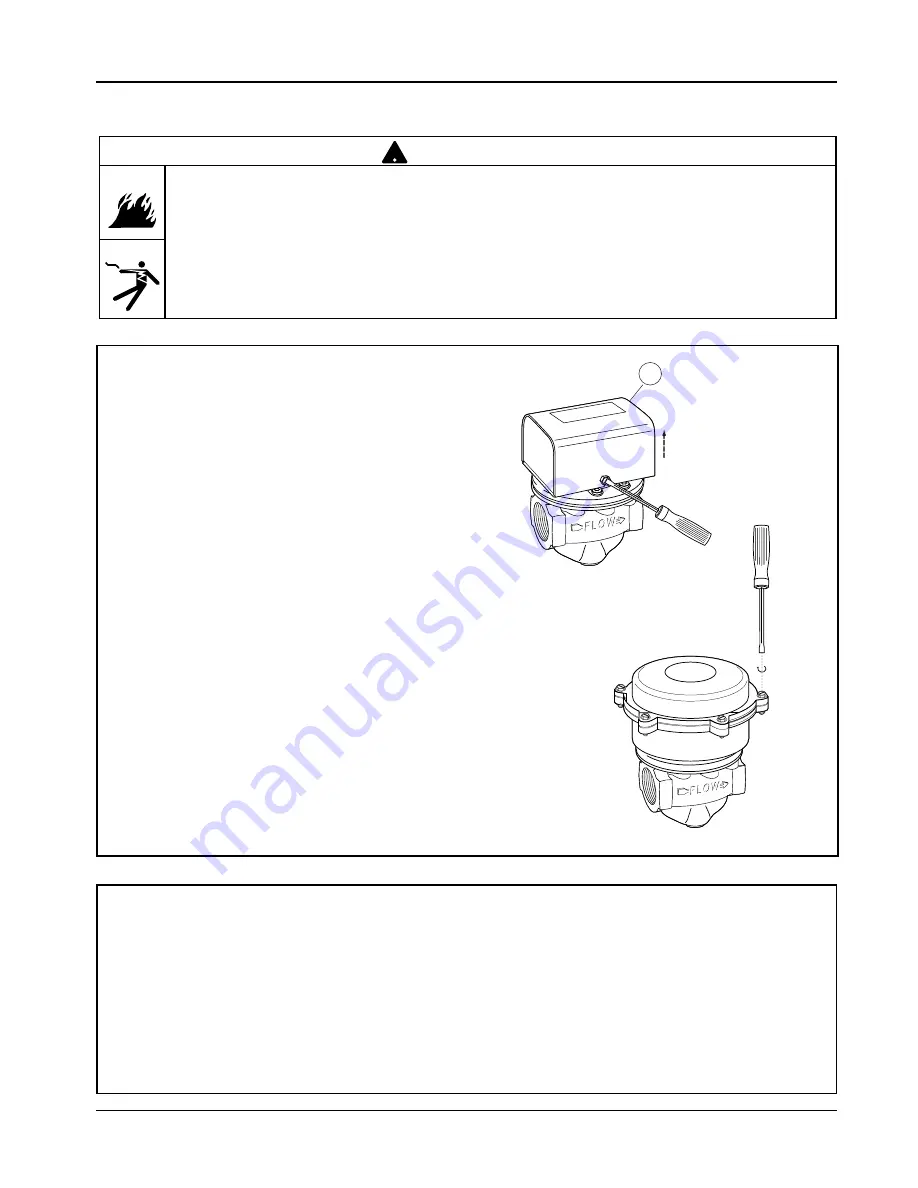
a. Cover Removal and Installation Procedure

For FS6 models with NEMA 1 Enclosure

• Using a flathead screwdriver, loosen but do not

remove the two cover screws and remove the cover
(A).

• Place the cover on the flow switch sliding the slots

behind the two loose cover screws. Push the cover
down into the flow switch and using a flat blade
screwdriver, tighten the cover screws to a torque of
10 lb•in (1.13 N•m).

For FS6-W models with NEMA 4X Enclosure

• Using flathead screwdriver, unscrew the six cover

screws and remove cover.

• Place the electrical connection cover on the flow

switch and insert the six cover screws. Tighten the
screws to a torque of 10 lb•in (1.13 N•m).

STEP 3 - Electrical Installation

• To prevent electrical shock, turn off the electrical power before making electrical connections.

• To prevent an electrical fire or equipment damage, electrical wiring insulation must have a rating of 

167˚F (75˚C) if the liquid’s temperature exceeds 180˚F (82˚C).

• To prevent electrocution, when the electrical power is connected to the flow switch, do not touch the 

terminals.

• Make sure flow switch electrical cover is secured before turning on electric power.

Failure to follow this warning could cause property damage, personal injury or death.

!

WARNING

b.

Electrical Conduit Connection

• Connect electric conduit to flow switch electrical enclosure.

• Follow accepted electrical practices when installing fittings 

and making connections.

• Refer to and follow local codes and standards when 

selecting the types of electrical fittings and conduit to 
connect to flow switch.

Summary of Contents for McDonnell & Miller FS-6 Series

Page 1: ...an electrical fire or equipment damage electrical wiring insulation must have a rating of 167 F 75 C if the liquid s temperature exceeds 180 F 82 C To prevent electrocution when the electrical power i...

Page 2: ...ectronic has Type 1C action micro interruption on operation LVD 73 23 EEC EMC 89 33 EEC For applications with loads between 38mA and 3 7 Amps power factors exceeding 0 65 an anticipated system switch...

Page 3: ...1 Determine the Location of the Flow Switch 5 x D MINIMUM 5 x D MINIMUM D PIPE DIAMETER 3 4 or 1 PIPE D The flow switch should be located in a horizontal section of pipe where there is a straight hori...

Page 4: ...low switch and one wrench on connecting piping Tighten to following torque values 47 ft lb 64 N m for 3 4 pipe 63 ft lb 85 N m for 1 pipe Repeat to connect pipe to opposite side of flow switch a Apply...

Page 5: ...trical Installation To prevent electrical shock turn off the electrical power before making electrical connections To prevent an electrical fire or equipment damage electrical wiring insulation must h...

Page 6: ...itch will be used to actuate a signal alarm or other device when no flow occurs connect the wire from that device to the N C contact Connect the Hot power supply wire to C terminal Flow Opens Circuit...

Page 7: ...FLOW Adjustment Lever Screw Flow No Flow 0 12 0 06 Flow No Flow The Flow Rates Shown Are Averages May Vary 10 2 5 1 5 MAXIMUM ADJUSTMENT MINIMUM ADJUSTMENT Adjustment is necessary only if required flo...

Page 8: ...tically Solution a Adjustment screw may have been turned below original factory setpoint Verify that flow rate is high enough for flow switch to activate Measure flow rate and match with velocities sh...

Reviews: