background image

i

Sysmart


4. Installation and Preparation 


4-1. Installation Diagram 


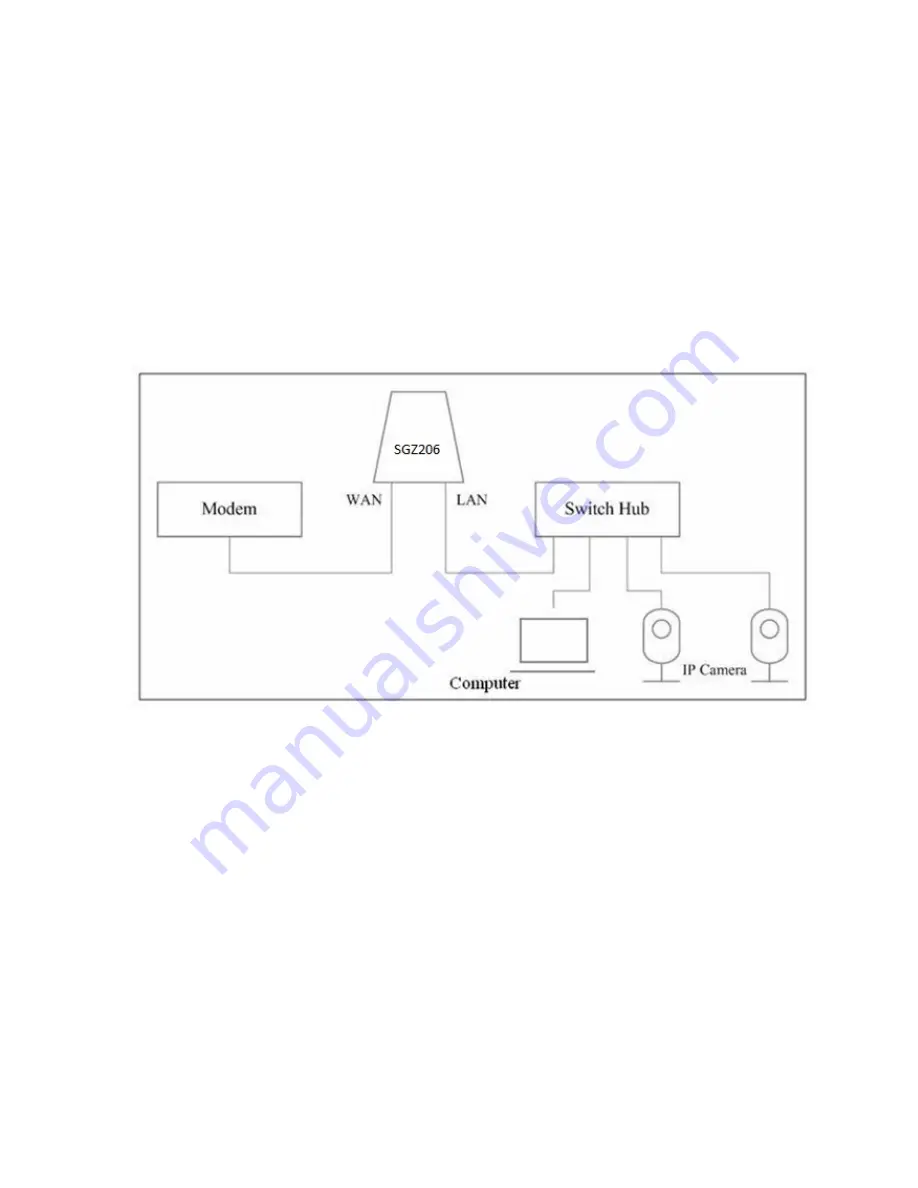
Step1. Connect the Internet connection to the WAN port. 

Step2. Connect the computer/IP Camera to the LAN port. 


(Please connect the LAN port and the computers/IP cameras to a switch when users would like to 

use more computers/IP cameras.) 

The installation diagram is as below: 


4-2. Power on SGZ206 


Power on SGZ206 using 110V~220V AC to 12V DC/1.5A power adapter. The power indicator will stay 
on. 


4-3. Reboot SGZ206 


To reboot SGZ206, press the Reset B

utton

 while SGZ206 is powered on. 


4-4. Reset SGZ206 


To reset SGZ206, press and hold the Reset B

utton

 for 5 seconds while SGZ206 is powered on. 


Summary of Contents for SGZ206

Page 1: ...iSysmart ZigBee TM Integrated Wireless Smart Home Controller User Manual Integrated Wireless Smart Home Controller Model SGZ206 ...

Page 2: ...Reset SGZ206 6 4 5 Permit Join 7 4 6 WPS 7 4 7 Indicators 7 4 8 UPS Backup Power 7 5 Setting up SGZ206 9 5 1 Enter Into the Login Page 9 5 2 View the Status of SGZ206 13 5 3 Internet Settings 16 5 4 Wi Fi Settings 21 5 5 Firewall Settings 25 5 6 Administration 27 6 Setting up ZigBee Smart Home 30 6 1 Device List 31 6 2 Device Management 32 6 3 Initiate Smart Home 33 6 4 User Management 35 1 ...

Page 3: ...iSysmart 6 5 Data Management 36 6 6 Import Data 36 6 7 Communication Setting 37 7 Important Maintenance Instructions 38 2 ...

Page 4: ... Furthermore ISysmart Smart Home Cloud service allows users to remotely manage the devices like lighting curtain or IP Camera anytime and anywhere What is ZigBee ZigBee is a short range wireless transmission technology based on IEEE802 15 4 standard and supports multiple network topologies such as point to point point to multipoint and mesh networks It is defined for a general purpose cost effecti...

Page 5: ...duct Appearance ZigBee Indicator Cloud Indicator WPS Indicator Wi Fi Indicator LAN Indicator WAN Indicator Power Indicator Backup Power DC 12V Power USB Port WAN Port LAN Port ZigBee Button WPS Button Reset Button 4 ...

Page 6: ... Wi Fi IEEE 802 11 b g n channel 1 11 2 x RJ 45 ports WAN x 1 LAN x 1 Power supply DC 12V Up to 210 meters ZigBee transmission range in non obstacle space Up to 250 meters Wi Fi transmission range in non obstacle space Bluetooth dongle supported Internet of Things Cloud services Easy installation and configuration 5 ...

Page 7: ... cameras to a switch when users would like to use more computers IP cameras The installation diagram is as below 4 2 Power on SGZ206 Power on SGZ206 using 110V 220V AC to 12V DC 1 5A power adapter The power indicator will stay on 4 3 Reboot SGZ206 To reboot SGZ206 press the Reset Button while SGZ206 is powered on 4 4 Reset SGZ206 To reset SGZ206 press and hold the Reset Button for 5 seconds while ...

Page 8: ...WPS function of the Wi Fi device such as mobile phone to establish the Wi Fi connection C The default Permit Join period of time is 3 minutes 4 7 Indicators A Power Indicator Stay On when power on Stay Off when power off B ZigBee Indicator C Cloud Indicator D WPS Indicator Start flashing when WPS is enabled Stay On when WPS connection is established Stay Off when WPS is disabled 4 8 UPS Backup Pow...

Page 9: ... SGZ206 5 1 Enter Into the Login Page Connect the computer to the LAN port of ISysmart SGZ206 using a RJ 45 cable Windows Click Start Click Network Connections Right click on the Local Area Network and then click Properties ...

Page 10: ...iSysmart Click Internet Protocol TCP IP and then click Properties Key in the IP address and subnet mask as below Open the web browser and enter http 192 168 15 1 to go into the login page 10 ...

Page 11: ...iSysmart Key in the Username Password default admin admin and login the management system For advanced settings please use operator operator 11 ...

Page 12: ...iSysmart 5 2 View the Status of SGZ206 Click Status to enter into the status page A Status To view the access point status 13 ...

Page 13: ...iSysmart B Statistic To view the statistic data C Management For basic system management 14 ...

Page 14: ...iSysmart D Setup Wizard For quick setup E Operation Mode To configure the operation mode 15 ...

Page 15: ...Click Internet Settings to enter into the Internet setting page A WAN Settings Setup the WAN connection i Static fixed IP Enter the IP address subnet mask default gateway and DNS server which ISP Internet Service Provider provided 16 ...

Page 16: ...iSysmart ii DHCP Request IP addresses and networking parameters automatically iii PPPoE ADSL Enter the PPPoE data which ISP Internet Service Provider provided when necessary 17 ...

Page 17: ...iSysmart iv L2TP Enter the L2TP data for VPN connection v PPTP Enter the PPTP data for VPN connection 18 ...

Page 18: ...iSysmart B LAN Settings Setup the LAN connection C DHCP Clients List the DHCP clients D VPN Passthrough VPN passthrough setting 19 ...

Page 19: ...iSysmart E Advanced Routing Routing rules setting F IPv6 IPv6 connection setting 20 ...

Page 20: ...less Settings to enter into the Wi Fi setting page A Basic Basic settings of Wi Fi such as Wi Fi name SSID or Wi Fi channel B Advanced Advanced settings of Wi Fi such as beacon interval Wi Fi multimedia or multicast to unicast converter 21 ...

Page 21: ...iSysmart C Security Wi Fi security settings It is recommended to choose WPA2 PSK for Security Mode and the Wi Fi password Pass Phrase should be at least 8 letters numbers D WDS WDS setting 22 ...

Page 22: ...iSysmart E WPS WPS setting F Station List List the Wi Fi users 23 ...

Page 23: ...iSysmart G Statistics Showing the statistics of Tx Rx 24 ...

Page 24: ...iSysmart 5 5 Firewall Settings Click Firewall to enter into the firewall setting page A MAC IP Port Filtering MAC IP Port filtering setting B System Security System security setting 25 ...

Page 25: ...iSysmart C Content Filtering Filtering URL or web contents D Port Forwarding Port forwarding virtual server setting E DMZ DMZ setting 26 ...

Page 26: ...iSysmart 5 6 Administration Click Administration to enter into the system management page A Management System settings such as user permission or green AP B Upload Firmware Firmware update 27 ...

Page 27: ...iSysmart C Settings Management To save load the settings or reset to factory settings D Status To view the access point status E Statistics To view the statistic data 28 ...

Page 28: ...iSysmart F System Command To send the system commands G SDK History To view the SDK history 29 ...

Page 29: ...of ISysmart SGZ206 using a RJ 45 cable Open the web browser and enter http 192 168 15 1 to go into the login page Key in the Username Password for advanced settings please use operator operator and login the management system Click Smart Home to enter into the smart home page 30 ...

Page 30: ...mart 6 1 Device List To list the device data such as IEEE address End Point Data Code or detailed information For the first time use please power one wake up all of the devices and then refresh the list 31 ...

Page 31: ... the network we need to turn the Permit Join feature on After turning on Permit Join power on the devices users would like to add into the network Note Permit Join time is 255 Permit Join feature is always on B Add Devices Users could also add the devices manually using device s IEEE number C IPCamera List To manage the IP camera 32 ...

Page 32: ...Home A ZigBee Channel The ZigBee channel SGZ206 is using B Switch ZigBee Network Channel To change the ZigBee channel please make sure the Wi Fi signal is good Please activate the End Devices before switching the ZigBee channel 33 ...

Page 33: ... Smart Home After building up or re building a ZigBee network please initialize the ZigBee network D Check the Completeness Users are able to check the completeness of the network It will list the problem of the network 34 ...

Page 34: ...ser please click Add To create a new user profile please key in the Username Password Confirm Password and Verification Code To acquire Verification Code please refer to the next section B Verification Code To get a new Verification Code please click Add 35 ...

Page 35: ...iSysmart 6 5 Data Management To backup restore or delete the settings 6 6 Import Data To import mode controlling scheme or IR data 36 ...

Page 36: ...iSysmart 6 7 Communication Setting To manage security key or Cloud link 37 ...

Page 37: ... the device in extremely hot temperatures High temperatures may damage the device or battery Do not use or store the device in extremely cold temperatures When the device warms to its normal temperature moisture can form inside the device and damage the device or battery Do not drop knock or shake the device Rough handling would break it Do not use strong chemicals or washing to clean the device D...

Reviews: