background image

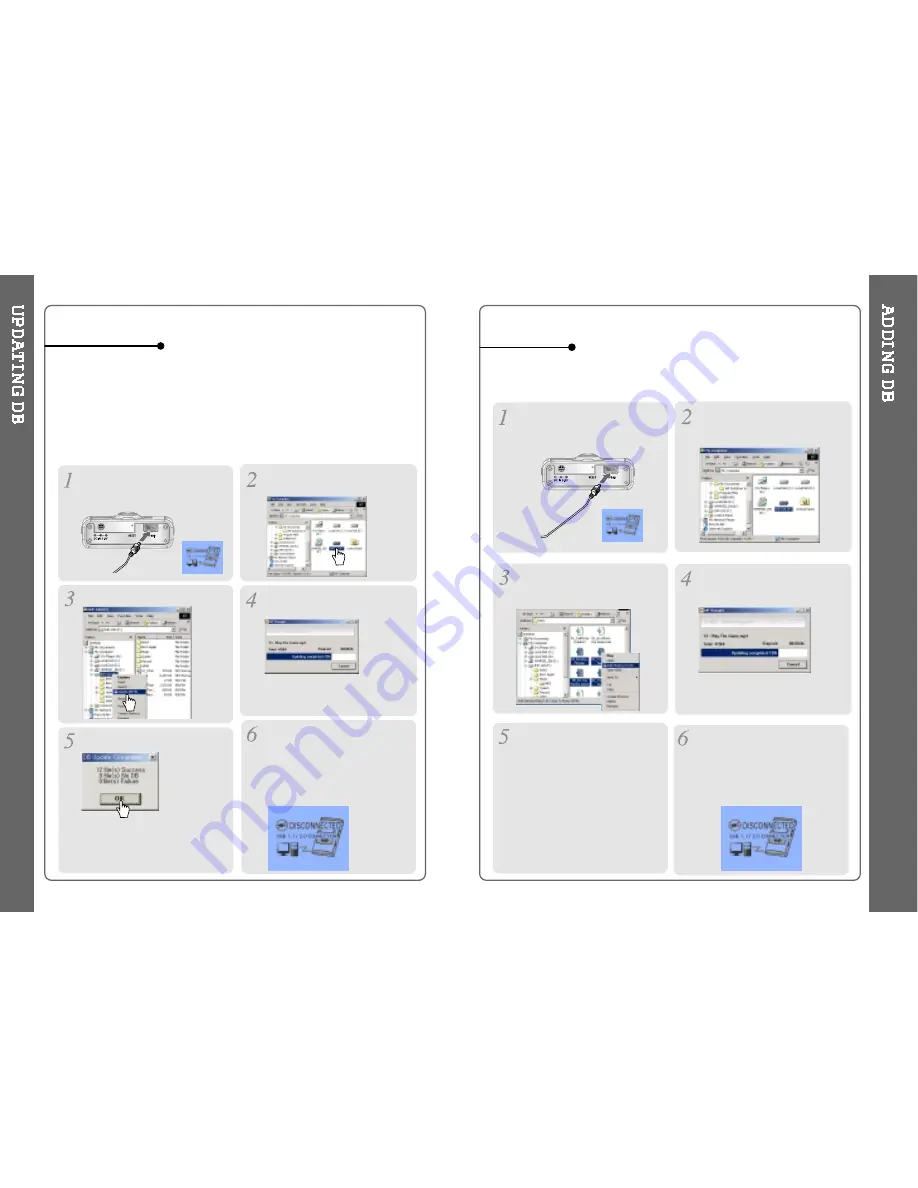
Open Windows Explorer and
select the iHP drive.

Connect the player to the host PC.
(Refer to “Connecting the iHP to the
Host PC”, page 10)

Right click on the iHP.

Select “DB File update” to
activate DB File update.

TO UPDATE DB

If you are adding songs to the iHP and not deleting any files, you can save
time by adding the files to the DB instead of updating the entire DB file.

After activating the explorer on
the PC, select iHP driver.

Connect the player to the host PC.
(Refer to “Connecting the iHP to
the Host PC”, page 10)

Select “Add Music(s) to DB” to
activate this function.

ID3 Tag information of the
selected files are added to DB. In
case DB file is not, new DB file
(iRivNavi.iDB) is created.

TO ADD DB

After disconnecting the player
from the host PC, you can
search the added music by using
ID3 Tag. (Refer to
“Disconnecting the player from
the Host PC”, page 13.)

Click “OK”.

After disconnecting the player
from the host PC, you can use
the Navigation function to
search for songs using ID3 Tag
information. (Refer to
“Disconnecting the player from
the Host PC”, page 13.)

Click the right button of mouse
after selecting MP3 files or
Folders to add to DB.

The DB is a DataBase of the songs on your iHP player. It indexes all the
Artist, Album, Genre, and Title information as found in the ID tags of your
MP3 files. It is important to perform the steps below after loading the iHP
player for the first time. This can also be used to re-create the DB file if it is
damaged or accidentally deleted. Any time songs are deleted from the player,
the DB must be updated to keep the Artist, Album, Genre, and Title lists
accurate. When new songs are added the DB must be updated or the songs
must be added to the DB using the instructions on the following page.

24

25

The DB update will take from three
to five minutes depending on the
number of songs loaded on the iHP.

Summary of Contents for iHP-140

Page 1: ...P 140 http www iRiver com InstructionManual PORTABLESTORAGEDEVICE MULTI CODECJUKEBOX Model iHP 140 Thank you for your purchase Please read this manual carefully before using your new player http www iRiver com ...

Page 2: ...cause harmful interference to radio communications However there is no guarantee that interference will not occur in a particular installation If this equipment does cause harmful interference to radio or television reception which can be determined by turning the equipment off and on the user is encouraged to try to correct the interference by one or more of the following measures Reorient or rel...

Page 3: ... any responsibility for errors or omissions in this document or make any commitment to update the information contained herein iRiver is a registered trademark of iRiver Limited in the Republic of Korea and or other countries and is used under license All other brand and product names are trademarks of their respective companies or organization All other product names may be trademarks of the comp...

Page 4: ...mote Control 2 Getting started Using AC Power Adapter Software Installation Connecting the iHP to the Host PC Installing the iHP Device Driver Using as a Portable Storage Device Disconnecting the iHP to the Host PC Listening to Music Basic Operation 3 Useful Features Navigation Mode Menu Mode Playback Mode Navigation Upgrading DB Adding DB Using TEXT Files Operating the FM Tuner Recording Playback...

Page 5: ...FOLDER NAME SAMPLE RATE FILE FORMAT ARTIST NAME HOLD PLAY TIME TITLE NAME PROGRESSIVE BAR LEVEL METER STOP Power OFF Power ON FM HDD PLAY PAUSE 6 7 Main unit and Remote control both locked Only Main unit is locked Only Remote control is locked LCD WINDOW REMOTE CONTROL EQ SRS THE ORDER OF SONGS BIT RATE PLAYBACK INFORMATION PLAYBACK MODE BATTERY INDICATOR FOLDER NAME SAMPLE RATE FILE FORMAT HOLD P...

Page 6: ...HOD SOFTWARE INSTALLATION If the player has been connected to the PC disconnect it Click OK to install the installation program Insert the installation CD in the PC Locate and execute the file iHP 100Manager 1 10 exe The installation screen will appear Enter user information click Next Select installation folder click Next Select installation type Typical Minimal or Custom click Next Installation ...

Page 7: ...P 100 drivers click OK Once the path has been located Click Next Click Next Click Finish The installation of the Device Driver is complete Chose Search for the best driver for your device Recommended Click Next Connect the player to your PC Windows will display the Add New Hardware Wizard Click Next 10 11 Complete the driver installation after installing the iHP Manager software To PC To iHP Note ...

Page 8: ... the iHP Click and Drag files from the PC to the iHP player To delete files or folders from the iHP select the files folders to be deleted and press Delete on the keyboard Click Yes when asked to confirm the delete Click the Safely Remove Hardware icon in the System Tray Click OK after confirming the Safe To Remove Hardware massage Disconnect the USB cable between the iHP and host PC Click Stop iR...

Page 9: ...t again to play To select music To select previous track To select next track Put the HOLD switch to OFF To adjust the volume To increase volume To decrease volume When Hold is ON the buttons on the player will not function When the player is stopped it will automatically shut off according to the STOP POWER OFF setting Refer to page 43 Connect the headphones and remote control as shown below NOTE...

Page 10: ...ecording or turn off 10 HOLD Enable or disable HOLD function Buttons do not work when HOLD is enabled To activate Menu To adjust the volume Press on volume button to increase volume and press on button to decrease volume Refer to page 30 Press NAVI MENU button and find the desired track by pressing the VOL or VOL button or NAVI MENU button Selecting FM Mode when listening FM Stereo Mono Record sta...

Page 11: ...ove to upper folder click the STOP button or long click NAVI MENU button If there is no upper folder pressing the Stop button will exit the NAVIGATION mode Changing Mode Long press of NAVI MENU will enter the MENU Scrolling between menus Press and Select Function press Navi Menu button Exit Press the stop button While an audio file is playing press and hold the A B MODE button to activate playback...

Page 12: ...e Navigation function will use the normal File Tree method of searching Refer to page 24 for DB file information Press the NAVI MENU button to play the selected track or display the contents of a folder Once you select a folder choose the song you wish to listen to and press the NAVI MENU button Push the NAVI MENU handle toward to go the upper folder or the previous menu Press the NAVI MENU button...

Page 13: ... of matching tracks will begin immediately Repeat 4 5 steps to search for other tracks Push to go back the previous step When you select Select All all tracks matching the selected condition are played and Indicating List Repeat Mode is displayed To cancel List Repeat Mode press Stop to stop playback and press Stop again to cancel the List Repeat Mode In order to use the navigation by Artist Album...

Page 14: ...he player from the Host PC page 13 Click OK After disconnecting the player from the host PC you can use the Navigation function to search for songs using ID3 Tag information Refer to Disconnecting the player from the Host PC page 13 Click the right button of mouse after selecting MP3 files or Folders to add to DB The DB is a DataBase of the songs on your iHP player It indexes all the Artist Album ...

Page 15: ... FILE Click the NAVI MENU button to go to NAVI mode Or select the fifth icon To search by files folders on the Navigation using Music Information You can read text files on your iHP player by creating a TEXT folder and copying TXT files into it The screen can display 19 characters across and 8 lines The text is not displayed on the remote Text files can not be deleted directly from the player it m...

Page 16: ...ile 1 To Search a Text files generally 2 To go to specific position Useful for large files Push lever to move to the next page during reading the text Click the NAVI MENU button to move the desired position of the text Push lever to select the desired Digit Push lever to select the desired numeral Click the NAVI MENU button The TEXT goes to the selected position NOTE ...

Page 17: ...on picture displays on the LCD Push the or button to select FM frequency Press the STEREO PLAY PAUSE button to select Stereo Mono To change frequency push the or switch to the left or the right Auto Scan function To select a station to store press the NAVI MENU button to exit Preset mode and find a station by using or or or OPERATING THE FM TUNER SELECTING FREQUENCY AUTO MEMORY FUNCTION Save stati...

Page 18: ...DIO SOURCE Press the REC button to activate recording standby mode Press A B MODE button or push the REC switch toward SOURCE TYPE to select the source to record To record voice with internal microphone INT MIC To record voice with the external microphone EXT MIC To record from an external audio device with an Optical Out OPTICAL To record from an external audio device with a standard Line Out or ...

Page 19: ...ECORDED FILE Press button to play the recorded file at the recording standby mode TO PAUSE RECORDING When saving as WAV file the Bitrate generally is 1411Kbps 44 1 KHz 16Bit Stereo When saving the optical signal with 48KHz as WAV file the Bitrate is 1536Kbps 48 KHz 16Bit Stereo NOTE Recorded files are stored in folders matching the source name from where the audio was recorded Line In Optical In R...

Page 20: ...You can change the EQ to match your music style Normal Rock Jazz Classic Ultra Bass User EQ SRS TruBass WOW Preset WOW User Whenever the REC button is pressed EQ changes as the following order Normal Rock Jazz Classic Ubass User EQ SRS TruBass WOW Preset WOW User You can set the EQ function by using Function Menu Refer to page 44 45 EQ SRS EQ SRS 1 SRS Selection SRS SRS is activated TruBass TruBas...

Page 21: ...st Skip Repeat Shuffle Intro Sound Balance EQ Bass Boost Treble Boost SRS SRS Settings General Control Mode Sound Timer Display Record Type Bitrate AGC Voice Monitor EXT MIC Volume Record CONFIGURATION MENU OPERATION Scroll between Menu Use the to select a sub menu push the NAVI MENU button to display the contents of that sub menu From Main Menu to Sub Menu Press and hold the NAVI MENU button to d...

Page 22: ...ize all settings to original factory setting FIRMWARE UPGRADE You can upgrade the player s Firmware Refer to page 49 for details BACK LIGHT Battery You can adjust the time that the Backlight stays on while the player is operated using the battery built in the player Time range can be made from 1 60 sec BACK LIGHT Adapter You can adjust the time that the Backlight stays on while the player is opera...

Page 23: ...l The scroll goes from the left to the right SCAN SPEED The fast scan speed can range from OFF 1x 2x 4x STOP POWER OFF Automatically turns power off at stop mode Time range can be made from 1 60 minutes SLEEP POWER OFF Automatically power off after fixed time Time range can be set from 1 to 99 minutes When the power is off the sleep power off setting goes back to 0 TIMER Set Auto Power Off CONTROL...

Page 24: ...d outputs at the right earphone The default value is 0 the sound outputs the same level at both earphones EQ You can select 6 EQ EQ is selected as follows Normal Rock Jazz Classic Ultra Bass User EQ BASS BOOST Bass Boost level is from 0 to 24dB by 2 step The value set on the BASS BOOST is applied to USER EQ TREBLE BOOST Treble Boost level is from 0 to 6dB by 2 step The value set on the TREBLE BOOS...

Page 25: ...ngs from long distances will be improved AGC function is operated at voice recording mode REC MODE VOICE MONITOR Allows you to listen to the sounds being recorded through the headphones in real time EXT MIC VOLUME You can control sound level recorded by using the external microphone 16 Make a PLAYLIST M3U using WINAMP Note WINAMP software is not included with the player Winamp execution picture 2 ...

Page 26: ...ade your firmware at www iRiver com What is FIRMWARE It is the operating system that works in the iHP iRiver provides you with the latest and best features through Firmware Upgrade Visit www iriver com to upgrade your Firmware After selecting the song to play next A total of 200 playlists can be recognized RESERVATION FUNCTION Press NAVI MENU button during playback to select the next song to be pl...

Page 27: ...y occur if the player comes into contact with water If your player gets wet dry the outside with a soft cloth as soon as possible Do not leave the player in a location near heat sources or in a place subject to direct sunlight excessive dust or sand moisture rain mechanical shock unleveled surface or in a car with its windows closed Keep the player away from a material with strong magnetic forces ...

Page 28: ...n off the power of other electronic devices near the player The headphone cord functions as the antenna they must be plugged in for best reception Check the connection between your computer and the player to ensure that the cable is secure Check the condition of the battery Check the operation after connecting AC Adapter Check whether the adapter plug is properly connected Fully charged batteries ...

Page 29: ...or the manufacturer to make them if you are to keep the device s FCC registration valid This equipment like other electronic equipment generates and uses radio frequency energy If not installed and used according to the instructions in this manual this equipment may cause interference with your radio and television reception If you think this equipment is causing interference with your radio or te...

Page 30: ...56 57 ...

Reviews: