background image

WARNING


•  Battery Level indicator light will blink when battery 

power is low .  

•  When battery runs out of power, Battery Level 

indicator light will blink rapidly before shutting off, 
and motor will stop . Please recharge .

CHARGING BATTERY

Do not charge battery with other charger except the original brand .

Battery does not come fully charged . Please charge to full power before first use . Full charge 
will take approximately 3 .5 hours .

Please do not use the device while charging .

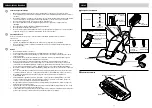
1.   Please put the battery into the vacuum cleaner.


Place the battery into the vacuum . Press battery into the socket until you  


hear a clicking sound . 


*Failure to fully insert the battery into the socket will affect operation and  


can result in injury or damage . 

Battery

Battery release 

button

Insert until clicking 

sound is heard

Please insert the battery tightly and 
firmly into the socket until there is a 
clicking sound .

Clicking

Sound

3.   Insert the charger into power socket.


Please insert the charger into the power socket tightly and firmly .


* The Battery Level red indicator light means the product has started  

 charging .

2.   Plug the charger plug into the power outlet.

Power outlet

Battery

Charger plug

5.   Removing the battery.


Press the battery release button and take out the battery . 

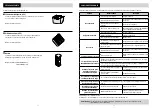
4.   Battery is fully charged

 .


The indicator light will shut off when done charging .

• 

For first time use or non-use for more than 6 months, please  
charge 2 or 3 times before use to achieve full charge .   

• 

If more than 10 days since last use, charge before next use .   

• 

Continual charging will decrease charge hold time .  

• 

Charging and running time will vary due to temperature and 
operating conditions .  

• 

Charge between temperatures of 41°F/5°C and 95°F/35°C . 
Charging in too low or too high temperatures can cause decreases 
in working time or lengthening in charging time .  

• 

Charger will be warm . This is normal . 

ON

Charging

OFF

Finished

Standard charging time about 3 .5 hours

Battery Level indicator light

High

Low

Battery Level

Safety Lock

(hold for 3 sec)

HOW TO USE

3.   Start the product.


Pressing the Menu ON/OFF button changes the mode .  

• 

Press the Menu ON/OFF button to change to High mode .  

• 

Press the Menu ON/OFF button again to change to Low 
mode .  

Do not use this vacuum cleaner to clean the following objects: 
Liquid, wet litter/debris, powder, broken glass, sharp or pin type objects, sand or gravel, plastic 
bags .

Please do not clean large amounts of litter/debris in one pass to avoid blocking the intake port and 
decreasing suction .   

Do not use on floors, walls or furniture .  Do not pull on the main body and avoid hitting walls or 
furniture .  

Empty the dust cup after use to avoid decreased suction or issues with the sensor . 

CAUTION

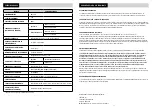
1.   Adjust the collection head angle.


Please place the vacuum on the floor, then adjust the angle up  


and down by hand .  

• 

Please adjust the vacuum body to the horizontal position, 
which should be used for soft surfaces such as bedding .

• 

The collection head is fastened in horizontal position by a 
magnet to keep it in place during use .  

Storage position

Carpet or car cushion
material angle . 

Bedding/soft
materials
angle

2.   Unlock.


Hold the Menu ON/OFF button for 3 seconds, wait for the Safety  


Lock indicator to light up, then start cleaning as directed below .   

• 

Safety Lock will automatically lock again after one minute 
of non-use .  

• 

Device will not work when locked . Pressing the Menu ON/
OFF button to start when it is locked will cause the Safety 
Lock light to blink .

Safety Lock
indicator light

Menu

ON/OFF

High

Low

Battery Level

Safety Lock

(hold for 3 sec)

4.   When finished cleaning.


Press the Menu ON/OFF button to change the mode until the  


vacuum stops and the indicator light shuts off .    

• 

Device will automatically lock after one minute of  
non-use .  

• 

Please follow step 2 to restart .

High

Low

Battery Level

Safety Lock

(hold for 3 sec)

High

Low

Stop

Indicator light

Menu

ON/OFF

Indicator light

High

Low

Battery Level

Safety Lock

(hold for 3 sec)

Menu

ON/OFF

Blinking: Low power

Blinking rapidly (then off): No power 

5

6

Summary of Contents for IC-FDC1U

Page 1: ... Warranty 14 by IRIS USA Inc Series IC FDC1U Thank you for your purchase Please read this instruction manual carefully to ensure proper use Read all safety precautions prior to use Please store this instruction manual in a safe place for future reference READ AND SAVE THESE INSTRUCTIONS Rechargeable Mattress Cleaner High Low Batte ry Leve l Safe ty Lock hold for 3 sec Men u ON O FF Du st In di ca ...

Page 2: ...g in any way Please remove the plug from the outlet and remove dust or dirt regularly to avoid electrical shock or injury Please be sure that the plug is tightly inserted into the power base to avoid electrical shock short circuits or fire Please do not insert or pull plug with wet hands to avoid electric shock burn or injury Do not damage modify bend forcibly pull twist pinch or put heavy objects...

Page 3: ...in fire explosion or injury Please do not connect the power terminals to any other pieces of metal Do not connect batteries together using metal chains hairpins etc as this may cause leakage overheating breakage or fire Please do not splash or immerse the battery in water as this could cause a short circuit resulting from overheating To ensure that the safety of the product is maintained please do...

Page 4: ...charging time about 3 5 hours Battery Level indicator light High Low Battery Level Safety Lock hold for 3 sec HOW TO USE 3 Start the product Pressing the Menu ON OFF button changes the mode Press the Menu ON OFF button to change to High mode Press the Menu ON OFF button again to change to Low mode Do not use this vacuum cleaner to clean the following objects Liquid wet litter debris powder broken ...

Page 5: ...t which can disrupt product use Incorrect assembly of the mesh filter and dust cup can allow dust and dirt inside which can damage the terminals Dust Indicator Sensors Remove the dust cup and clean both sides of the sensors with a cotton swab Please clean regularly to avoid dust buildup causing sensor to function poorly Dust sensors Collection Head Clean hair string and other small objects from th...

Page 6: ... clicked firmly in place Dust cup Clicking sound Please follow the instructions below for replacing the mesh dust filter mesh exhaust filter and battery REPLACEABLE COMPONENTS Dust Filter Replacement Please see Cleaning and Maintenance P9 for how to remove filter set 1 Remove the dust filter Press the filter frame with fingers Pull the filter button out of the hole and the filter away from frame 2...

Page 7: ...nditions Battery has lost ability to hold charge Please replace the battery Vacuum and charger heat up while charging Temperature rise is caused by the current This is normal Vacuum body heats up while running Temperature rise is caused by the battery heating up from use This is normal Not running but dust sensor is on Sensor is coated in dust Please clean sensor P8 Running but dust sensor is off ...

Page 8: ...RER S SOLE AND EXCLUSIVE OPTION THE MANUFACTURER WILL REPLACE ANY ITEM FOUND TO BE DEFECTIVE IN MATERIAL OR WORKMANSHIP WITH THE MOST COMPARABLE CURRENT ITEM IRIS USA INC DOES NOT ACCEPT SPECIAL REQUESTS NOR DO WE HAVE THE ABILITY TO UPGRADE IN EXCHANGE FOR MONEY THE MANUFACTURER SHALL NOT BE LIABLE FOR ANY SPECIAL INCIDENTAL OR CONSEQUENTIAL DAMAGES WHETHER DIRECT OR INDIRECT THE WARRANTIES SET F...

Page 9: ...icaciones 29 Garantía 30 de IRIS USA Inc Series IC FDC1U Gracias por su compra Lea este manual de instrucciones para garantizar un uso adecuado Lea todas las precauciones de seguridad antes de usar Guarde este manual de instrucciones en un lugar seguro para consultas futuras LEA Y GUARDE ESTAS INSTRUCCIONES Limpiador recargable de colchón High Low Batte ry Leve l Safe ty Lock hold for 3 sec Men u ...

Page 10: ...edas para evitar descargas eléctricas quemaduras o lesiones No dañar modificar doblar a la fuerza jalar torcer pellizcar o poner objetos pesados sobre el cable de alimentación Esto puede causar daños en el cable incendios o descargas eléctricas No utilizar con el cable de alimentación enrollado Esto puede causar sobrecalentamiento del cable o incendios Asegúrese de extender el cable de alimentació...

Page 11: ...te el contacto ya que esto puede causar irritación o quemaduras Enjuagar con agua Si el líquido de la batería entra en contacto con los ojos no use las manos para limpiarse o frotarse Enjuáguese bien los ojos con agua y busque ayuda médica No utilizar si la batería o la aspiradora están dañadas o modificadas Esto puede causar incendios explosión o lesiones No conecte las terminales de alimentación...

Page 12: ...Lock hold for 3 sec 3 Para poner en marcha al producto Pulsar el botón de Menu ON OFF cambia el modo Pulse el botón de Menu ON OFF para cambiar al modo High alto Pulse el botón de Menu ON OFF otra vez para cambiar al modo Low bajo No usar para limpiar los siguiente objetos Líquidos suciedad desechos húmedos polvo vidrios rotos objetos filosos o puntiagudos arena o grava bolsas de plástico No limpi...

Page 13: ...r el uso del producto El ensamblaje incorrecto del filtro de malla y del recipiente de polvo puede permitir el ingreso de polvo y suciedad los cuales pueden dañar las terminales Sensor de Dust Indicator Quite el recipiente de polvo y limpie ambos lados de los sensores con un hisopo Limpie con frecuencia para evitar la acumulación de polvo lo que disminuye la eficacia del sensor Sensor de polvo Cab...

Page 14: ...ones a continuación para reemplazar el filtro de malla del polvo el filtro de malla de salida y la batería COMPONENTES REEMPLAZABLES Reemplazo del filtro del polvo Consulte la Limpieza y mantenimiento P25 donde se detalla cómo quitar el conjunto del filtro 1 Quite el filtro del polvo Presione el marco del filtro con los dedos Hale el botón del filtro fuera del conjunto y el filtro fuera del marco ...

Page 15: ...ura recomendadas La batería perdió la capacidad de retener carga Reemplazar la batería La aspiradora y el cargador se calientan mientras se carga La corriente causa el aumento de temperatura Esto es normal El cuerpo de la aspiradora se calienta mientras funciona El calentamiento de la batería por el uso causa el aumento de temperatura Esto es normal No funciona pero el sensor de polvo está encendi...

Page 16: ...producto PARA OBTENER SERVICIO AL CLIENTE Si necesita ayuda debe comunicarse con el Servicio al cliente de IRIS USA Inc Servicio al cliente al 1 800 320 4747 Puede devolver el producto empacado apropiadamente usando el embalaje y material de protección adecuados para evitar que se dañe durante el envío con el franqueo prepagado nombre dirección número de teléfono número de modelo y prueba de la fe...

Page 17: ...5 Garantie 46 de IRIS USA Inc Series IC FDC1U Merci de votre achat Veuillez lire attentivement ce guide d utilisation afin d assurer sa bonne utilisation Lire les précautions de sécurité à prendre avant utilisation Veuillez conserver ces instructions pour référence future LIRE ET CONSERVER CES INSTRUCTIONS Aspirateur rechargeable pour matelas High Low Batte ry Leve l Safe ty Lock hold for 3 sec Me...

Page 18: ...lisation inadéquate peut entraîner des blessures des dégâts matériels une déformation etc Nettoyage et pièces de rechange Remplacer les pièces interchangeables selon les instructions dans ce manuel Dépoussiérer régulièrement l appareil afin d éviter un dépôt pouvant diminuer sa capacité d isolation Débrancher le produit avant de changer les pièces interchangeables pour éviter un choc électrique ou...

Page 19: ...ou un autre dommage Faire tomber la batterie ou appuyer trop fort dessus peut provoquer une fuite une surchauffe ou un autre dommage La batterie risque de fuir en cas de mauvaise utilisation chute ou dommage Éviter tout contact car cela pourrait provoquer une irritation ou des brûlures Rincer à l eau En cas de contact accidentel du liquide de la batterie avec les yeux ne pas frotter ou essuyer ave...

Page 20: ... Battery Level Safety Lock hold for 3 sec 3 Allumer l appareil Appuyer sur la touche Menu ON OFF change le mode de fonctionnement Appuyer sur la touche Menu ON OFF pour passer au mode High élevé Appuyer de nouveau sur la touche Menu ON OFF pour passer au mode Low faible Ne pas utiliser cet appareil pour nettoyer Liquides litière ou débris humides poudre verre brisé objets pointus ou épingles sable...

Page 21: ...nt du produit L assemblage incorrect du filtre maillé et du bac à poussière peut permettre à la poussière ou aux saletés de pénétrer et d endommager les bornes Capteurs de Dust Indicator Retirer le bac à poussière et nettoyer les capteurs des deux côtés avec un coton tige Nettoyer régulièrement pour éviter les dépôts de poussière qui peuvent produire un mauvais fonctionnement des capteurs Capteurs...

Page 22: ...sous pour remplacer le filtre à poussière maillé le filtre maillé d échappement et la batterie COMPOSANTS INTERCHANGEABLES Remplacer le filtre à poussière Voir les instructions Nettoyage et entretien P41 pour savoir comment retirer le système de filtre 1 Retirer le filtre à poussière Presser le cadre de filtre avec les doigts Tirer sur le bouton du filtre pour le retirer du système et séparer le f...

Page 23: ...batterie ne tient plus sa charge Remplacer la batterie L aspirateur et le chargeur chauffent pendant la charge Une hausse de température est causée par le courant Ceci est normal Le boîtier de l aspirateur chauffe quand l aspirateur est en marche Une hausse de température est causée par la batterie qui chauffe pendant l utilisation Ceci est normal N est pas en marche mais le capteur de poussière e...

Page 24: ...ervice à la clientèle d IRIS USA Inc au 1 800 320 4747 Vous pouvez renvoyer le s produit s correctement emballé s avec les matériaux d emballage et d expédition adéquats afin de prévenir tout dommage pendant le transport port payé avec votre nom adresse numéro de téléphone numéro du modèle et preuve de la date d achat copie du reçu et une description détaillée du défaut signalé Cette garantie ne c...

Reviews: