background image


10 


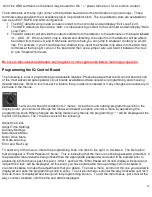
  Attach the battery wires to the batteries after the AC power has been terminated and energized. 


 DO NOT REVERSE BATTERY POLARITY AT THE BATTERY 

OR THE CIRCUIT BOARD.  SEVERE DAMAGE WILL OCCUR 


The IntelliSlide IQ-5000-S is a 24 volt DC gate operator.  Utilizing (2) 12 vdc batteries, 
the batteries must be connected in series, and then the positive (+) power wire (RED) 
is to be connected to the positive (+) battery terminal 


For Solar powered IntelliSlide IQ-5000-S operators, the AC power supply should be 
disconnected and removed.  The Solar panel should be wired into the power 
terminal block or solar regulator (if provided). 


  Take note of the software version on the LCD display upon power up. 

 
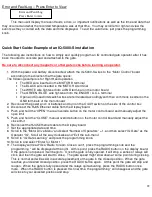
Chain Attachment and Limit Settings 
 

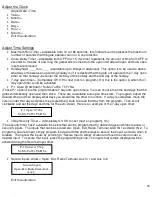
Using the supplied chain brackets, mount the brackets with 
the chain bolt holes at the same height as the bottom of the 
idlers. Roughly 9-10 inches from the base of the operator. 
 
Once the chain is attached, it needs to be tightened.  Be 
careful not to over tighten the chain.  Proper adjustment is 
1-2” of sag for every 10’ feet of chain. 
 

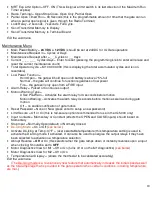
After the chain has been installed, limit adjustments can be made when applying power to the gate operator.  
Using the cam nuts that travel along the shaft, rotate these nuts, by depressing the stop plate, until they activate 
the appropriate limit 


Summary of Contents for IntelliSlide IQ-5000

Page 1: ... iqgatesystems com www iqgatesystems com www iqgatesystems com www iqgatesystems com IntelliSlide IQ 5000 S Installation And Instruction Manual UL 325 Compliant ETL Listed REV J 1 2014 www iqgatesystems com 1 801 455 7961 ...

Page 2: ...anty All implied warranties including warranties for marketability as well as implied warranties for suitability are valid only until the warranty expires or is voided whichever comes first This IQ Gate Systems Limited Warranty is in lieu of all other warranties express or implied and all IQ Gate Systems warranties are subject but not limited to the following conditions NEW PRODUCT POLICY 1 The pr...

Page 3: ...reserves the right to replace a previously repaired product with a like product of equal value in the event of repair failure provided repair failure occurs within the specified warranty period 6 Distributors and or Dealer Installer must first obtain a Return Merchandise Authorization RMA number from IQ Gate Systems Technical Department before returning any product to factory for non warranty repa...

Page 4: ...e following 1 Read follow and understand all instructions 2 The automated gate is not for pedestrian use 3 Do not activate your gate operator unless it is in sight and you can determine that it will travel without interfering with any objects or persons Always keep people and objects away from the gate and its area of travel 4 Keep all access devices such as key switches push buttons and telephone...

Page 5: ...e for a damaged gate 5 For gate operators utilizing Type D protection The gate operator controls must be placed so that the user has full view of the gate area when the gate is moving The placard be placed adjacent to the controls An automatic closing device such as a timer loop sensor or similar device shall not be employed No other activation device shall be connected RESIDENTIAL VEHICULAR GATE ...

Page 6: ...l moving One or more non contact sensors shall be located where the risk of entrapment or obstruction exists such as the perimeter reachable by a moving gate or barrier 9 For a gate operator utilizing a contact sensor such as an edge sensor One or more contact sensors shall be located where the risk of entrapment or obstruction exists such as at the leading edge trailing edge and post mounted both...

Page 7: ...ies Installation of contact and non contact sensors such as edges and photoelectric sensors is suggested to enhance the prevention of entrapment Determine the best level of open and close force for the installation An improper level will defeat the inherent current sensing purpose and make the installation unsafe By utilizing the Motor Diagnostic feature proper and accurate levels can be obtained ...

Page 8: ...cessary bolts and prepare the gate and operator for motion Properly secure and attach the desired form of power in the control box where power termination is labeled Black 110 220 VAC Line Input Power White Neutral 110 VAC Neutral or 220 VAC second leg circuit Green Ground Input from and approved grounding method The unit must be grounded Be sure to use the proper size gauge of wire in accordance ...

Page 9: ...oper operation the gate must slide back and forth at a level plane For Master Slave Applications It is recommended that a total linear footage distance of 90 feet is not exceeded when running the power and communication wires between the master and slave operators When using larger gauge wires a junction or terminal block not included may be required If the wire run distance is to exceed 90 feet p...

Page 10: ... wired into the power terminal block or solar regulator if provided Take note of the software version on the LCD display upon power up Chain Attachment and Limit Settings Using the supplied chain brackets mount the brackets with the chain bolt holes at the same height as the bottom of the idlers Roughly 9 10 inches from the base of the operator Once the chain is attached it needs to be tightened B...

Page 11: ...he Right the Red wire should be inserted into the Motor B terminal with the Black motor wire being inserted into the Motor A terminal The open and close limit switch wires will need to be switched accordingly If the gate opens to the Right then the limit switch that is farthest away from the gate is the Open limit switch If the gate opens to the Left then the limit switch that is closest to the ga...

Page 12: ...12 ...

Page 13: ... Dip switch 3 can be set to reverse the gate from closing when set as the SAFE option or it can be switched to the EDGE option which will reverse the gate in either direction When dip switch 4 is turned on channel 2 will take the action of the auxiliary input terminal that is programmed in the Auxiliary Settings Menu The following is how to program a 433 MHz transmitter into the on board receiver ...

Page 14: ...14 Antenna Connection Receiver Programming Buttons Programming LED Board Communication LED s Receiver Channel 1 Options Receiver Channel 2 Options 2 Channel Receiver Option Switches ...

Page 15: ...15 12 24 VDC Power Input Terminals Inductance Loop Terminals Input Power Ground Terminals ...

Page 16: ... gate will not stop unless the button is released or the power is shutoff Wiring the IQ Control Board The IQ Control board utilizes spring loaded terminal connections To connect or disconnect wires push the white prong inwards towards the circuit board using a 3 16th inch blade screwdriver insert or remove the desired wire and release the pressure on the terminal spade The IQ control board has num...

Page 17: ...oards available and take care when programming and choosing desired features Refer to this manual if a feature that you desire is needed or if any changes are necessary to be made in the menus The IQ control board is divided into 7 menus Using the round rotating programming knob on the display board you can scroll through the menus and select an option or enter a menu by depressing the programming...

Page 18: ...hat the gates automatically open and then close There are 4 available auto open time slots To program adjust the desired time and then display what days you would like the timer to function If a day is undesired move the cursor under that day and press the programming knob to erase that day from the program Then scroll clockwise and set the days and time for the auto close Here is an example of th...

Page 19: ... 2 second relay activation on the open limit o Pulse on Close Limit a 2 second relay activation on the close limit o Hold on Open Limit latches the relay on the open limit o Hold on Close Limit latches the relay on the close limit o Pulse on Motor Open a 2 second relay activation when gate is opening o Pulse on Motor Close a 2 second relay activation when gate is closing o Hold on Motor Open latch...

Page 20: ... Pre Warn Activates the alarm relay for 3 seconds before motion Motion Warning Activates the alarm relay 3 seconds before motion as well as during gate motion Off no audible notification of gate motion Reset Password None or New press enter to setup a new password Limit Secure Off or On this is fail secure option recommended for use in the IQ 5000 only Input Contacts Momentary or Constant affects ...

Page 21: ...elay from 0 0 seconds to 5 0 seconds M 1 Acceleration Step Size sets the rate of motor acceleration the higher the rate the faster the ramp up to the maximum set speed M 1 Deceleration Step Size sets the rate of motor deceleration the higher the rate the faster the ramp down to the minimum set speed Operator 2 IQ IQ Gate or Standard All M 2 options are the same as M 1 Exit the sub menu IQ Gate Lea...

Page 22: ...onnect the RJ45 Ethernet cable from the Display board 4 Push and hold the OPEN manual override button on the motor control board and manually adjust the open limit 5 Push and hold the CLOSE manual override button on the motor control board and manually adjust the close limit 6 Reconnect the RJ45 Ethernet cable to the Display board 7 Set the appropriate date and time 8 Scroll to the Motor Drive Men...

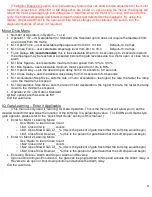
Page 23: ...he programming knob from the date and time clockwise until the display reads Maintenance Menu and push enter to adjust Scroll clockwise until the display reads Motor Diagnostics View for M1 Off Press the programming knob to enter and the programming will be displayed Rotate the knob until ON is displayed press the programming knob again so that the disappears and then rotate the programming knob c...

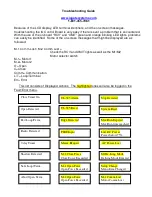
Page 24: ...or selector switch M 1 Motor 1 M 2 Motor 2 O Open C Close Comm Communication L T Loop Terminal Err Error This list consists of Displayed Actions The highlighted ones will also be logged in the Fault Error menu Close Timer On Open Detected Exit Loop Term Radio Detected 7 day Timer Shadow Detected Safe Loop Term Abort Open Term UL 325 Alarm UL 325 Reset Edge Detected FIRE Input Maint Request M 1 Clo...

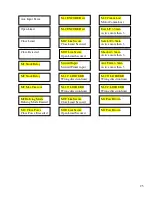
Page 25: ...Exit L T 3min Active more then 3 Safe L T 3min Active more then 3 Shadow 3min Active more then 3 Aux Term 3min Active more then 3 M1 Stuck Relay M2 Stuck Relay M2 Max Timeout M2De Icing Mode DeIcing Mode Entered M 1 C L DIR ERR Wrong direction limit M 1 O L DIR ERR Wrong direction limit M2C Lim Secure Close Limit Secured M2O Lim Secure Open Limit Secured M 2 O L DIR ERR Wrong direction limit M 2 C...

Page 26: ...elay 1 ORANGE DS 4 Lock Relay ORANGE DS 19 Overcurrent 3 DS 5 Overcurrent 1 DS 6 Overcurrent 2 DS 20 Communication Receive GREEN BLINK DS 21 Communication Transmit ORANGE BLINK DS 27 Receiver Program GREEN Motor Board DS 1 Communication Lines Overcurrent RED DS 3 Communication Transmit ORANGE BLINK DS 2 Communication Receive GREEN BLINK DS 8 Advanced Open Limit Terminal RED DS 7 Open Limit Termina...

Page 27: ...inal Check for any indication of power supplied Operate gate and view the blinking output from the Motor board terminal DS 10 Verify AUX IN setting and remove contact Increase force delay time to at least 0 5 seconds Gate Won t Close Low Power 7 day timer hold open Close timer not on active Exit loop detector terminal active Safe loop detector terminal active Shadow terminal active Open input acti...

Page 28: ...d remove contact Increase force delay time to at least 0 5 seconds Gate reverses when closing Check all of the above causes Check the display for a M 1 or M 2 Close Force alert Check the Display and all LED s Check all of the above solutions Verify close force setting and adjust if necessary The IQ Control Board and operators are virtually maintenance free However every 6 months to 1 year a qualif...

Reviews: