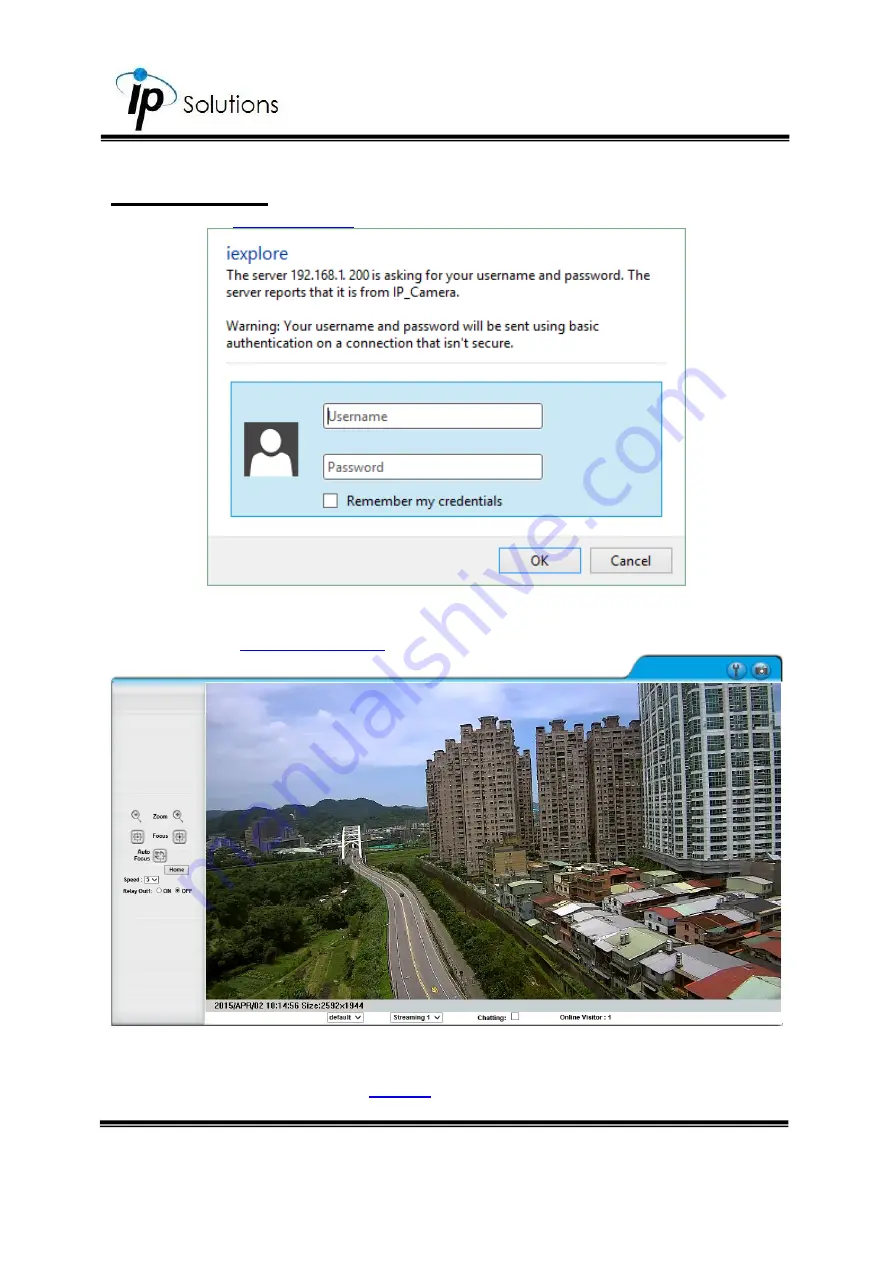
IP Solutions HLZ-61KDS User Manual Download Page 24


18 


LIVE VIDEO 

Once your


IP Assignment

 has been completed, log in to the IP camera. 


When IP Camera is successfully connected it shows the following interface. 
Please refer to 

Live Video Panel

 for icons representing different functions. 


Please change default password

 is a sign which flickers on the live view screen as a 

reminder, to suggest the user to change the default password. You may 
configure the login settings in 

System

 to secure your account privacy. 

Summary of Contents for HLZ-61KDS

Page 1: ...User Manual Explosion Proof 10X Motorized H 264 2MP Bullet IP Camera V1 0_20220113...

Page 2: ...THROUGH VENTILATION GRILLS CAUTION CAUTION RISK OF ELECTRIC SHOCK DO NOT OPEN CAUTION TO REDUCE THE RISK OF ELECTRIC SHOCK DO NOT REMOVE COVER OR BACK NO USER SERVICEABLE PARTS INSIDE REFER SERVICING...

Page 3: ...are introduced below While the camera is being assembled for operation and maintenance the operator must follow the requirements of the IEC 60079 14 latest version Explosive atmosphere Part 14 Electri...

Page 4: ...such as sunlight or incandescent light bulbs For proper protection please keep the camera away from environments where laser equipment is near For it may also cause damage of the sensor within the ca...

Page 5: ...t System 28 Factory Default 28 Setting Management 28 Save As a File 28 New Setting File 28 Network 29 IP Settings 30 IP Assignment 30 DHCP 30 Static IP 30 IPv6 Assignment 30 Manually setup the IPv6 ad...

Page 6: ...Event Setting 66 Motion Detection 66 Tampering Detection 67 Interval 68 Record File 69 Record Time Setting 69 Network Dis connected 70 Network IP Check 70 Schedule 71 Schedule 71 Profile 71 Profile 1...

Page 7: ...n easy to use IP camera for security applications PRODUCT SPECIFICATIONS Main Features Certification for use in Zones 1 2 IIC T6 Group Gas Zones 21 22 IIIC T85 C Group Dust 1080P 30FPS Starvis Sensor...

Page 8: ...40 C Heater on Optional Heater 9W ICR IR cut Filter Mechanism Operating Temperature 40 C 65 C Dimensions 95mm X 145 5mm H Enclosure Certificate IP68 IK10 Alarm In Out 1DI 1DO Sunshield Yes Wide Dynam...

Page 9: ...P address filtering HTTPS encrypted data transmission 802 1X port based authentication for network protection QoS DSCP Firmware Upgrade HTTP mode can be upgraded remotely Simultaneous Connection Up to...

Page 10: ...4 PRODUCT INSTALLATION Monitor Settings Caution This setting only applies to Windows 7 system users a Right Click on the desktop Select Properties b Change color quality to highest 32bit...

Page 11: ...5 Hardware Installation...

Page 12: ...on top of where the power socket and internet outlet are Make consideration for this process in relation of setting up a functional surveillance site 2 Pull the cables of the camera through winding tu...

Page 13: ...he mount base of the camera unto the pedestal bracket with washers and screws 4 Adjust the tilting position and the panning angles for the pedestal bracket and the camera base for manageable monitorin...

Page 14: ...d from the junction box inside sort out the cables if necessary Finally use screwdriver to close seal the lid of the junction box right after it is properly assembled with the winding tube 6 It is cru...

Page 15: ...Night mode and then select Synchronize with DI from the drop down menu When setting up NC with DI and DI GND as the external cables the video will be displayed in black white mode and when setting up...

Page 16: ...Mode If DI and DI are disconnected then it is in Color Mode PoE Power Over Ethernet 60W PoE single port is recommended Optional Power over Ethernet PoE is a technology that integrates power into a sta...

Page 17: ...ation You may also establish connection between the camera and the PC using IP Scanner It is recommended for user to enter new Username and Password to replace the default one in order to secure your...

Page 18: ...ndows Security Alert may pop up Choose the network type based on your surveillance environment and click on Allow access iv IP Scanner will search for all the IP Cameras connected on the LAN The user...

Page 19: ...at you are currently connected to from the drop down menu at the top right corner You can also select the online device from a specific network card in Device lists or choose Select All to include all...

Page 20: ...Quick Access to Main Menu To quickly access remote monitoring left click the mouse twice on the selected IP Camera listed under Device list of IP Scanner A mini window will then pop up for you to log...

Page 21: ...1 Go to Start Up Menu on the lower left corner of the Windows 2 Select Control Panel and double click 3 You will then enter the page of Internet Properties settings Starting from Internet Properties...

Page 22: ...16 Iii vi v When popup the following dialogue box click Yes Another Method Go to IE Tools Internet Options Security Tab Trusted sites...

Page 23: ...sites manually add the IP address and click OK You can enter a certain IP address or domain such as http 192 168 21 for all URLs under this domain The system will consider all pages opened under this...

Page 24: ...ows the following interface Please refer to Live Video Panel for icons representing different functions Please change default password is a sign which flickers on the live view screen as a reminder to...

Page 25: ...t image size by its ratio of 1 2x default 1x and 2x Select the video streaming source If the streaming 2 is set closed in Video Setting this function will not be displayed Tick on Chatting checkbox to...

Page 26: ...e audio Click again to turn it on iv Full Screen Full screen mode v Zoom Select zoom within the pop up dialogue box and then drag the bar to adjust the zoom factor vi Frame Buffm Sec This function aim...

Page 27: ...will not be seen as a result of the actual video data vii Hide Show ROI frame Once the ROI frame has been set up from AV Settings there will be frames in colors appearing on the live view Choose to hi...

Page 28: ...22 CAMERA CONFIGURATION System Click to get into the administration page Click to go back to the live video page...

Page 29: ...the IP Scanner Tick the checkbox of Status Bar to display the Server Name in live video For example if you key in DEMO it will be displayed at live video mode at the bottom LED Indicator Turn on off t...

Page 30: ...the arbitrary content of the OSD on Live video screen Size Adjust the size of the OSD text on Live video screen Color Adjust the color of the OSD text on Live video screen Transparency Adjust the tran...

Page 31: ...n which allows user to watch IP camera live view on self owned mobile phones Once the installation is done either enter the EasyLink ID from the IP camera web browser or simply scan the QR Code to hel...

Page 32: ...ut having to enter username and password Yet when entering the configuration page of the IP camera the system will do otherwise Select No for requiring a username and login to access the camera Univer...

Page 33: ...ed to enter the configuration page Click Edit or Remove in the user list to modify them The system will ask you to input the password in the pop up window before you edit the user information Default...

Page 34: ...om previous saved settings Save As a File Right click the mouse button on Setting Download Select Save AS to save current IP Camera settings in PC Select saving directory Save New Setting File To upgr...

Page 35: ...29 Network Click to get into the administration page Click to go back to the live video page Enter the Network by clicking on titles from IP Setting Advanced PPPoE DDNS and Server Settings...

Page 36: ...configure the following IPv6 address settings Manually setup the IPv6 address Key in the Address Gateway and DNS DHCPv6 If you have a DHCPv6 server enable it to assign the IPv6 automatically The assi...

Page 37: ...l be added to My Network Places UPnP Port Forwarding Enable UPnP Port Forwarding for accessing the IP Camera from the Internet this option allows the IP Camera to open ports on the router automaticall...

Page 38: ...might ask your confirmation for enabling the components Click Yes iv Now the IP device is displayed under the LAN v Double click the icon to access the camera via web browser vi Click Hide icons for...

Page 39: ...s the authentication schemes RTSP Port Setup port for RTSP transmitting Default 554 RTP Start and End Port In RTSP mode you can use TCP and UDP for connecting TCP connection uses RTSP Port 554 UDP con...

Page 40: ...rd are not required for accessing the camera via ONVIF By selecting Enable the username and password are necessary RTSP Keepalive When the function is enabled the camera will check once in a while if...

Page 41: ...pear under the bonjour category Click the icon to connect to the IP camera The Bonjour function on Safari browser however doesn t support HTTPS protocol If on the camera you select https the camera wi...

Page 42: ...map If the computer is running Windows Vista or Windows 7 you can find LLTD through the path Control Panel Network and Internet Network and Sharing Center Click See full map Speed of Network Optional...

Page 43: ...the user access a website via Https the browser will check the certificate of that domain and verify its trustiness and security The process of generating a certificate is as below Connection Types T...

Page 44: ...h the protocol directly Therefore HTTP HTTPS mode is necessary If you want to change from Http to Https please switch to HTTP HTTPS mode first and then switch to HTTPS mode and vice versa Remove Exist...

Page 45: ...he name of the city where the company is located Organization Needs to be consistent with legally registered name Organizational Unit Company department you can fill in its common name Common Name The...

Page 46: ...gning and receiving a signed certificate click browse and find the certificate file in your computer Click Apply to install it If you choose to generate a self signed certificate fill in the following...

Page 47: ...munity name has the authority to read or edit the information of IP camera via SNMP SNMPv1 or SNMPv2 Fill in the name of both Write Community and Read Community Tick the box to enable SNMPv1 or SNMPv2...

Page 48: ...ve not only the security name the same as community name in v1 v2c or sometimes we call it context name but the password in order to access the IP camera Please set security name authentication type a...

Page 49: ...and key in encryption password of write security 4 Click OK to add the user who has write authority to the camera 5 Connection succeeds If you want to add the new user who has read authority key in co...

Page 50: ...A Micro SD card is inserted or removed Open the MIB Browser Use SNMPv1 or SNMPv2 to access the camera When the SNMP setting is edited Manager s MIB Browser 192 168 40 159 will receive the trap messag...

Page 51: ...lowed to connect Note When using this method the order of the conditions of Allow in the list must be the input entry above the entry of deny If we reverse the entry order to Deny 192 168 50 151 192 1...

Page 52: ...eam Event Alarm and Management IEEE 802 1x It is an IEEE standard for port based Network Access Control It provides an authentication mechanism to a device on LAN WLAN The EAPOL protocol supports serv...

Page 53: ...NS PPPoE Setting Select Enabled input the Username and password for ADSL connection Send mail after PPPoE dialed When connected to the internet the camera will send a mail to a specific mail account D...

Page 54: ...already been used Please change it 5 Update Failed please check your internet connection Network connection failed 6 Update Failed please check the account information you provided The server user nam...

Page 55: ...he folder properties must be shared and the permissions must be Full Control Mail Setting To send out the video via mail of FTP set up the configuration first Click Apply to confirm settings at the bo...

Page 56: ...at the bottom of Server Settings then click Test icon to test the server connection Samba Network Storage Select this option to send the media files via a neighbor network when an event is triggered...

Page 57: ...51 A V Settings Click to get into the administration page Click to go back to the live video page...

Page 58: ...ttings made in Image Setting Privacy Mask An area on the monitoring screen can be masked as a block of particular color only in live view for security and privacy purposes but will not be visible in t...

Page 59: ...mouse Click Save to apply settings and create the mask Click Area 1 2 3 4 5 button again to discard the masked area previously set Image Setting Day Profile Night Profile Settings can be adjusted und...

Page 60: ...r The shutter time varies in a range by camera automatically Sense Up This function increases the sensitivity of camera to get brighter image at night The smaller value you select the slower shutter s...

Page 61: ...Straighten the curves in the borders of the image caused by the lens angles IR LED Choose Auto to enable IR LED to help the camera observe a clearer view when the lighting condition of the monitored...

Page 62: ...he user can define when the day time Day starts by filling in the digits such as 05 00 or 12 35 Hours range 0 23 minutes range 0 59 For example If the time range is inaccurate a window will pop up to...

Page 63: ...Be aware that when these levels are increased the image quality will become sharper to a point that noise of the image will also be increased Outdoor Threshold Values applied for this feature will de...

Page 64: ...58 Corridor Mode 90 or 270 degrees Degrees Position Image 90 degrees 270 degrees 0 degrees...

Page 65: ...59 Corridor mode None Degrees Position Image 0 degrees 90 degrees 270 degrees Streaming Setting Basic Mode Resolution range varies depending on different modes...

Page 66: ...refreshing rate per second Select from H 264 H 264 or JPEG Stream Feature Select from the options for operating different features Note You MUST click at the bottom after selecting the feature to ena...

Page 67: ...ROI is activated Smart Stream Enable this mode set the range of FPS and Bitrate to limit its stream capacity in order to preserve a better performance of image quality and save more bandwidth RTSP Pa...

Page 68: ...the image quality will need to be configured with a higher parameter value The parameter value set in Video Bitrate Limit can reach the maximum bitrate once CVBR is applied Therefore the higher the pa...

Page 69: ...o quality is Video Frame Rate Video Format RTSP Path Please click on the button to keep the changes when all the settings are completed and confirmed Audio The user can send audio from the IP Camera b...

Page 70: ...shut down to avoid echoing effects If you wish to keep the two way audio function active assign an option from Audio Out under the Adjust Volume option the built in microphone will then be enabled to...

Page 71: ...65 Event Click to get into the administration page Click to go back to the live video page The IP Camera provides multiple event settings...

Page 72: ...tion detection operation allows user to define a certain area which detects anything moving or changing its position within It helps user to target on details inside a smaller picture and effectively...

Page 73: ...in the motion area can be assigned by marking the checkboxes of the source and destination Log Popped up after Save to SD card checkbox is ticked by your mouse Check E mail FTP Samba checkboxes on the...

Page 74: ...efore Tampering Detection Tampering Triggered Lens Covered Before Tampering Detection Tampering Triggered Glare Before Tampering Detection Tampering Triggered Camera Moved Interval The tampering detec...

Page 75: ...Only Streaming 1 with JPEG file format Only when selecting JPEG in streaming 1 video format of Video Setting this option can be enabled Select this option to save several JPEG picture files The succe...

Page 76: ...he IP Camera detects network disconnection once Save to SD card is ticked Network IP Check After enabling IP Check the IP camera can check if the network server is connecting If the checking fails for...

Page 77: ...hedule Schedule Tick the grids on the calendar to manage your schedule time Profile Select a Profile from the drop down list Profile 1 2 3 Name Input assign a profile name for each profile Snapshot Re...

Page 78: ...edule Profile time selected from the drop down list first Snapshot After enabling the snapshot function Assign the Schedule Profile time selected from the drop down list first Interval Users can set t...

Page 79: ...73 I O Setup Enter Live Video via internet browser check Out1 to enable I O signal I O Connection...

Page 80: ...r device Connect the GND DI pin to the external trigger device I O PIN Definition GND Ground Initial state is LOW DO Digital Output Max 50mA DC 12V DI Digital Input Max DC 6V I O Setting Enter I O Set...

Page 81: ...edit the message you would receive for triggered alarm Interval For example if you select 10 sec here once the motion is detected and action is triggered it cannot be triggered again within 10 second...

Page 82: ...s for certain time according to the internal setting and the user is not allowed to break off the alarm manually The duration length is based on the interval drop down list below Click Pulse from the...

Page 83: ...ystick controller by RS 485 Connect the D of the camera with the D of the device of your preference and connect the D of the camera with the D of the device of your preference After the RS485 Setting...

Page 84: ...clicked all events happened within that year month date will then appear in a list like the one below under the Video category There are 3 types of file formats with each represents a specific type of...

Page 85: ...means Motion Detection and avi represents the file format Double click on the file name to open the file For avi files you need Microsoft Media Player which is supposedly built in in your PC The defa...

Page 86: ...80 Clicking on any title that is formatted as a time unit such as 21 o clock will summon a pop up window indicating the snapshot taken as scheduled in Schedule mode and enabled in Snapshot mode...

Page 87: ...dule mode Take the schedule calendar below for example the grids coloured in green between 3 12 are scheduled to start recording from 3 o clock to 12 o clock from Monday to Thursday Once the recording...

Page 88: ...es The left side shows how much memory is still available and the right side shows how much the total memory is If the memory of the SD card is over 128G 70 of the memory will be used for scheduled re...

Page 89: ...e icon to process the SD Card formatting into FAT32 format Be cautious that since it only supports FAT format for SD Card over 64G please format SD Card into FAT32 before installation SD Card Files Do...

Page 90: ...tead to download the files from the IP camera In this way you do not need to pull out the Micro SD card from the camera To use FlashGet for downloading image and video data from the Micro SD card plea...

Page 91: ...e the directory path in the new download window and remember to enable Login to Server key in the IP Camera username and password Click OK to start download FlashGet is free software that can be downl...

Page 92: ...cted to the internet For fixed real IP set up the IP into IP Camera For dynamic IP start PPPoE Configuration II Internet Access ADSL or Cable Modem IP address More than one real IP or one dynamic IP I...

Page 93: ...guration III Internet Access ADSL or Cable Modem IP address one real IP or one dynamic IP IP Camera and PC connect to the internet Device needed IP sharing Use virtual IP set up port forwarding in IP...

Page 94: ...with an electronic wire Connect the power for the camera to reboot for around 30 seconds Remove the wire in the terminal block after rebooting completes Open the internet browser using default IP http...

Page 95: ...89 PACKAGE CONTENTS IP Camera Pedestal Bracket Junction Box Winding Tube CD Screws Washers Quick Installation Guide The CD includes user manual and software tools...

Page 96: ...ass4 16GB SDHC class4 32GB SD class4 32GB SD class6 4GB SDHC class6 4GB SD class6 8GB SDHC class6 8GB SD class6 16GB SDHC class6 16GB SDHC class10 4GB SDHC class10 8GB SDHC class10 16GB SDHC class 10...

Page 97: ...sion 8 0 Official website http windows microsoft com en US internet explorer products ie home DirectX Version 9 0c Official website http www microsoft com en us download details aspx id 35 Adobe Reade...

Reviews: