background image


 FRONT PANEL OVERVIEW


1

3

4

2

5

9

6

7

8


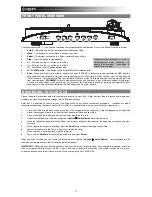
The following controls, 1-7, can be used to browse and navigate menus and features of your iPod directly from the turntable. 

1.


Scroll 

– This knob acts as the Touchwheel controller on your iPod. 

2.


Menu 

– This button acts as the ‘Menu’ button on your iPod. 

3.


Select 

– This button functions as the ‘Select’ command on your iPod. 

4.


Stop 

– Press this button to stop playback. 

5.


>>| 

– Functions as the ‘>>|’ button on your iPod. 

6.


|<< 

– Functions as the ‘|<<’ button on your iPod. 

7.


>|| 

– Functions as the ‘>||’ button on your iPod.


8.


33 / 45 RPM Button – 

This button controls the RPM of the turntable platter. 

9.


Sync 

– When your iPod is connected to the dock and when iPROFILE is connected to your computer via USB, hold this 

button down for two seconds to sync your iPod to your computer's iTunes library.  When finished, eject the iPod from the 
iTunes interface.  Only remove the iPod from the dock or disconnect the USB cable after you've safely ejected the iPod 
from your computer.  

(

WARNING:

 Failure to properly eject your iPod can result in loss of data or damage to the player.)


Once your iPod has been safely ejected, you can reconnect the iPod to the turntable by pressing and holding the Sync 
button again for two seconds or removing the iPod and placing it back in the dock.


 RECORDING TO YOUR iPod 


Please follow the instructions below to record music directly to your iPod.  Note that your iPod will record audio from your 
turntable, as well as audio coming through the 1/8” Stereo Aux Input.   
 

Note that it is possible to record to your iPod without having any audio connections plugged in.  However, we highly 
recommend connecting the audio outputs (RCA or USB) to a speaker system so you can monitor your recordings.   

 
1.


Place your iPod into the dock, making sure that it fits snuggly over the connector.  Note that depending on your iPod 
model, you may need to use the Universal Dock Adapter included with your iPod. 

2.


Place a record on the platter and cue the music you would like to record.  

3.


Enter Record Mode in your iPod by navigating to 

Extras   Voice Memos 

from the main menu. 

4.


Raise the turntable's tonearm with the Raise / Lower Lever and place the needle at the beginning of the song you want 
to record.   

5.


When you are ready to start recording, press the 

Select

 button to begin recording to your iPod. 

6.


Lower the tonearm with the Raise / Lower Lever to play the song. 

7.


When you wish to stop recording, stop the turntable. 

8.


Then, use the 

Scroll

 knob to select ‘Stop and Save’ and press 

Select

 
When you have finished, you can locate the recording by navigating to 

Extras 

 Voice Memos

.  Your recordings will be 

identified by the date and time that the recording was completed.   
 

IMPORTANT:  

Renaming your recordings directly from your iPod is not recommended.  If you change the filename, your iPod 

may no longer be able to access the file.  If you would like to rename the recording, you should transfer the file to your 
computer, rename it and import it back into your iTunes library as an AAC or MP3 file.   

Please note that pressing 

|<< 

and 

>>| 

simultaneously while recording will 
enable iPod charging.  Press again to 
disable iPod charging.


Summary of Contents for IPROFILE

Page 1: ...ROFILE QUICKSTART GUIDE ENGLISH 1 5 MANUAL DE INICIO R PIDO ESPA OL 6 10 GUIDE D UTILISATION RAPIDE FRAN AIS 11 15 KURZANLEITUNG DEUTSCH 16 20 GUIDA RAPIDO ITALIANO 21 25 SNELSTARTGIDS NEDERLANDS 26 3...

Page 2: ...receptacle AFTER all audio connections are made 2 Power Switch Turns the unit on and off 3 Audio Output RCA These cables should be plugged into the audio inputs of your home stereo system Please note...

Page 3: ...put When connected to the dock you can sync your iPod to your iTunes music library if the iPROFILE is connected to your computer via USB The iPROFILE is compatible with the following iPod models On th...

Page 4: ...the 1 8 Stereo Aux Input Note that it is possible to record to your iPod without having any audio connections plugged in However we highly recommend connecting the audio outputs RCA or USB to a speake...

Page 5: ...COMPUTER OTHERWISE YOU MAY DAMAGE YOUR iPod AND DESTROY ITS CONTENTS 3 Once your iPod is properly connected to your computer iTunes should start automatically PC users if you have not yet installed iT...

Page 6: ...h the turntable s RCA outputs When recording into my computer on Windows Vista my recordings are mono instead of stereo Recording input properties in Vista not set to stereo In Vista you may need to m...

Page 7: ...hagan todas las conexiones de audio 2 Switch de encendido Enciende y apaga la unidad 3 Salida de audio RCA Estos cables se deben enchufar en las entradas de audio de su sistema est reo hogare o Para...

Page 8: ...iPROFILE est conectado a la computadora por USB iPROFILE es compatible con los siguientes modelos de iPod En el iPod de 3ra generaci n s lo se soportan los botones Play Rewind y Fast Forward No se so...

Page 9: ...ada auxiliar est reo de 1 8 Observe tambi n que es posible grabar en el iPod sin tener ninguna conexi n de audio enchufada No obstante recomendamos especialmente conectar las salidas de audio RCA o US...

Page 10: ...S DE EXPULSAR CORRECTAMENTE EL iPod DE LA COMPUTADORA DE LO CONTRARIO PUEDE DA AR EL iPod Y DESTRUIR SU CONTENIDO 3 Una vez que el iPod est correctamente conectado a la computadora iTunes debe iniciar...

Page 11: ...s RCA del giradiscos Cuando grabo en la computadora bajo Windows Vista mis grabaciones son mono en lugar de est reo Propiedades de entrada de grabaci n en Vista no configuradas a stereo est reo En Vis...

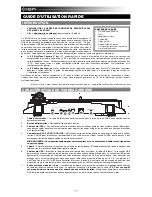
Page 12: ...anch dans la prise murale APR S avoir effectu tous les autres branchements 2 Bouton d alimentation Met l appareil sous et hors tension 3 Sortie audio RCA Ces c bles doivent tre branch s dans les entr...

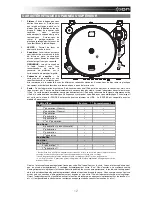
Page 13: ...synchroniser votre iPod avec votre biblioth que iTunes lorsqu il est sur le socle et que le iPROFILE est branch votre ordinateur via USB Le iPROFILE est compatible avec les mod les iPod suivants Sur...

Page 14: ...e auxiliaire st r o de 1 8 po Notez qu il est possible d enregistrer sur l iPod sans avoir aucune connexion audio branch e au tourne disque Cependant nous vous recommandons de brancher les sorties au...

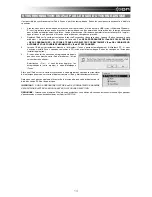
Page 15: ...US POURRIEZ ENDOMMAGER L iPod ET SES DONN ES 3 Lorsque l iPod est correctement branch l ordinateur iTunes s ouvre automatiquement Utilisateurs PC si vous n avez pas install iTunes vous pouvez ins rer...

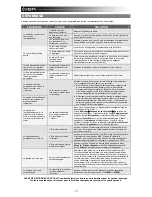
Page 16: ...ture audio et l audio depuis votre ordinateur sera achemin aux sorties RCA du tourne disque Lorsque je fais l enregistrement sur mon ordinateur avec Windows Vista mes enregistrements sont en mono plut...

Page 17: ...en 2 Power Schalter Schaltet das Ger t ein und aus 3 Audioausgang RCA Diese Kabel schlie en Sie an die Audioeing nge Ihrer Stereoanlage an Beachten Sie bitte Sie k nnen auch dann noch Musik auf Ihren...

Page 18: ...Ihnen Ihre Schallplatten direkt auf dem iPod aufzunehmen oder Musik von Ihrem iPod ber den Audioausgang wiederzugeben Ist das Dock angeschlossen kann der iPod mit dem iTunes Musikverzeichnis dann abge...

Page 19: ...auch dann aufnehmen wenn keine Audioverbindungen am Plattenspieler hergestellt wurden Jedoch empfehlen wir ausdr cklich die Audioausg nge RCA oder USB mit einem Lautsprecher zu verbinden um die Aufna...

Page 20: ...ALLS KANN ES ZU SCH DEN AM iPod ODER AN DEN DATEN DES GER TES KOMMEN 3 Wenn Ihr iPod richtig an Ihren Computer angeschlossen wurde sollte iTunes automatisch starten PC Anwender sollten zur iTunes Inst...

Page 21: ...t Unter Windows Vista sind meine Aufnahmen nur in Mono anstatt in Stereo Aufnahmeeinstellungen in Vista stehen nicht auf Stereo In Vista m ssen Sie m glicherweise f r den Aufnahmeeingang den Stereo Mo...

Page 22: ...i i collegamenti audio 2 Interruttore di alimentazione accende e spegne l apparecchio 3 Uscita audio RCA questi cavi vanno collegati a livello degli ingressi audio dell impianto home stereo Nota bene...

Page 23: ...eniente dall iPod attraverso la uscita audio del giradischi Una volta collegato al dock si pu sincronizzare l iPod alla propria libreria musicale iTunes se l iPROFILE collegato al computer tramite USB...

Page 24: ...ne possibile registrare sull iPod senza avere collegamenti audio inseriti Tuttavia raccomandiamo di collegare le uscite audio RCA o USB ad un impianto di casse in modo da poter monitorare le registraz...

Page 25: ...A IN CASO CONTRARIO SI RISCHIA DI DANNEGGIARE L iPod E DI DISTRUGGERNE IL CONTENUTO 3 Una volta collegato adeguatamente l iPod al computer iTunes si dovrebbe avviare automaticamente Utenti PC Nel caso...

Page 26: ...ie registrazioni risultano mono anzich stereo Le propriet di ingresso di registrazione in Vista non sono impostate su stereo In Vista va specificato stereo per l ingresso di registrazione Recarsi su S...

Page 27: ...t te worden gestoken NADAT alle audio aansluitingen zijn gemaakt 2 Aan Uit schakelaar Schakelt de eenheid in of uit 3 RCA Audio uitgangskabels Deze kabels worden in de audio ingangen van uw stereosyst...

Page 28: ...n de draaitafel Wanneer verbonden met de docking kan uw iPod worden gesynchroniseerd met uw iTunes muziekbibliotheek als de iPROFILE via USB op uw PC is aangesloten De iPROFILE is compatibel met de vo...

Page 29: ...nemen naar uw iPod zonder aangesloten audio aansluitingen We raden u echter aan de audio uitgangen aan te sluiten RCA of USB op een speakersysteem zodat u de opnamen kunt monitoren 1 Plaats uw iPod i...

Page 30: ...INHOUD ERVAN VERNIETIGEN 3 Nadat uw iPod juist aangesloten is op uw computer zou iTunes automatisch gestart moeten worden voor PC gebruikers wanneer u iTunes nog niet ge nstalleerd heeft kunt u de bi...

Page 31: ...gangen van de draaitafel afgespeeld Bij het opnemen van platen naar mijn computer met Windows Vista zijn de opnamen mono in plaats van stereo Ingangseigenschappen voor opname onder Vista zijn niet ing...

Page 32: ...www ion audio com MANUAL VERSION 1 3...

Reviews: