background image

5

Installation rapide

Pour de meilleures performances, connectez le disque à 
une carte PCI eSATA ou à une connexion eSATA externe 
intégrée. Connectez le lecteur au port USB si aucune 
connexion eSATA n’est disponible.

  1.  En cas de connexion à une carte PCI eSATA, assurez-

vous que les pilotes pour la carte ont été installés 
et que la carte est correctement reconnue par votre 
système d’exploitation.


REMARQUE :

 il n’est pas nécessaire d’installer 

des pilotes particuliers pour le disque dur Iomega 
Professionnel. Il est pris en charge par les pilotes 
inclus avec la carte eSATA PCI. Si votre ordinateur 
dispose d’une connexion eSATA intégrée, le lecteur 
est pris en charge par les pilotes natifs du système 
d’exploitation.

 2. Eteignez 

l’ordinateur.


REMARQUE :

 l’interface eSATA ne dispose PAS de la 

fonction plug-and-play. Eteignez toujours l’ordinateur 
avant de connecter ou de déconnecter le disque.

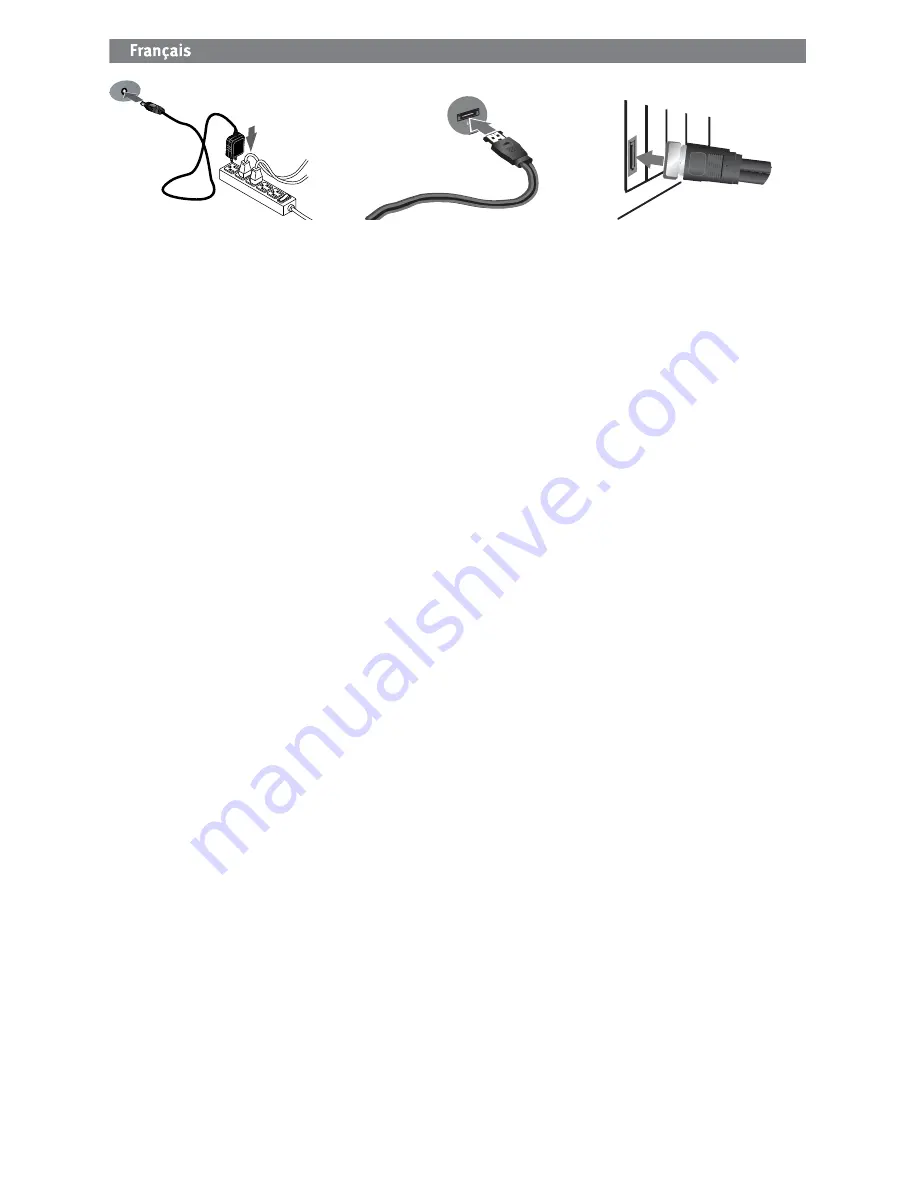
  3.  Connectez le câble d’alimentation inclus à l’arrière 

du disque. Placez le disque sur une surface stable et 
connectez l’alimentation à une prise secteur.


ATTENTION !

 Pour éviter d’endommager le connecteur 

d’alimentation, assurez-vous de son alignement avant 
de le raccorder au disque. Ne déplacez pas le disque 
lorsqu’il est sous tension pour éviter tout dommage ou 
perte de données.

  4.  Identifiez le câble eSATA et connectez-le à l’arrière du 

disque. Ne connectez 

JAMAIS

 le disque à l’ordinateur 

à l’aide de plusieurs câbles.

  5.  Connectez l’autre extrémité du câble à votre carte PCI 

eSATA ou à la connexion eSATA intégrée. 

  6.  Redémarrez votre ordinateur à l’aide de l’interrupteur 

d’alimentation situé à l’arrière du disque. 


Utilisateurs de PC :

 l’icône du disque dur doit apparaître 

sur le Poste de travail ou dans l’Explorateur Windows.


Utilisateurs de Mac :

 vous devez reformater le disque dur. 

Reportez-vous aux instructions ci-dessous.

Formatage du disque pour Mac OS

Le disque dur est livré formaté NTFS. Utilisez l’utilitaire 
de disque pour reformater le disque dur 

Mac OS étendu 

(journalisé)

.

REMARQUE :

 les instructions suivantes fonctionnent pour 

Mac OS X, version 10.4 ou ultérieure. Pour les versions Mac 
OS X versions 10.1 à 10.3.9, utilisez Utilitaire de disque, 
puis Effacer pour reformater le disque. Consultez l’Aide Mac 
si vous souhaitez des instructions plus détaillées.

 1. Sélectionnez 

Applications


Utilitaires


Utilitaire de disque

  2.  Dans la colonne de gauche, cliquez sur l’icône du 

disque dur Iomega. Assurez-vous de cliquer sur l’icône 
orange du disque, pas sur l’icône de volume.

 3. Sélectionnez 

l’onglet 

Partitionner

.

 4. Sélectionnez 

Mac OS étendu (journalisé)

 dans le menu 

déroulant 

Format

.

  5.  Cliquez sur le bouton 

Options

.

  6.  Sélectionnez le type de partition requise pour votre 

Mac :


Tableau de partition GUID

 pour l’amorçage sur un 

ordinateur Macintosh basé sur Intel.


Carte de partition Apple

 pour un Mac basé sur 

PowerPC.

 7. Cliquez 

sur 

OK

.

  8.  Cliquez sur le bouton 

Partitionner

. Le disque peut être 

utilisé dès que le formatage est terminé.

SA

TA

S

A

TA

Summary of Contents for 34278

Page 1: ...zione rapida Guía de instrucciones rápidas Guia de uso rápido Snel aan de slag Snabbstartguide Introduktion Hurtigreferanse Pikaopas Gyors útmutató Stručná příručka Wprowadzenie Краткое руководство по началу работы Οδηγός γρήγορης εκκίνησης Professional DesktopHardDrive eSATA USB 2 0 ...

Page 2: ...ntation 34 Schnellstart 6 Formatieren des Laufwerks für Mac OS 6 Verwenden des Laufwerks 22 Fehlerbehebung 23 Eingeschränkte Garantie 29 Gesetzliche Bestimmungen 34 Installazione rapida 7 Formattazione dell unità per Mac OS 7 Uso dell unità 23 Risoluzione dei problemi 23 Garanzia limitata 29 Informazioni sulle regolamentazioni 34 Instalación rápida 8 Formateo de la unidad para Mac OS 8 Uso de la u...

Page 3: ...tasjonen for Mac OS 13 Pika asennus 14 Levyn alustaminen Mac OS 14 Gyorstelepítés 15 Meghajtó formázásához Mac OS 15 Rychlá instalace 16 Formátování jednotky pro systém Mac OS 16 Szybka instalacja 17 Formatowanie napędu w systemie Mac OS 17 Быстрая установка 18 Форматирование диска для Mac OS 18 Использование диска 27 Поиск и устранение неисправностей 27 Ограниченная гарантия 32 Сведения о нормати...

Page 4: ...TA cable and connect it to the back of the drive Never connect the drive to the computer with more than one cable 5 Connect the other end of the cable to your eSATA PCI card or built in eSATA connection 6 Turn on the power switch on the back of the drive and restart your computer PC Users The drive icon should appear in My Computer or Windows Explorer Mac Users You will need to reformat the drive ...

Page 5: ... à l ordinateur à l aide de plusieurs câbles 5 Connectez l autre extrémité du câble à votre carte PCI eSATA ou à la connexion eSATA intégrée 6 Redémarrez votre ordinateur à l aide de l interrupteur d alimentation situé à l arrière du disque Utilisateurs de PC l icône du disque dur doit apparaître sur le Poste de travail ou dans l Explorateur Windows Utilisateurs de Mac vous devez reformater le dis...

Page 6: ...rückseite an Schließen Sie das Laufwerk niemals mit mehr als einem Kabel am Computer an 5 Verbinden Sie das andere Ende des Kabels mit der eSATA PCI Karte oder dem integrierten eSATA Anschluss 6 Schalten die den Hauptschalter auf der Laufwerksrückseite an und starten Sie Ihren Computer neu PC Benutzer Das Laufwerksymbol sollte im Arbeitsplatz oder im Windows Explorer angezeigt werden Mac Benutzer ...

Page 7: ...ilizzando più di un cavo 5 Collegare l altra estremità del cavo alla scheda PCI eSATA o alla connessione integrata eSATA 6 Accendere l interruttore di alimentazione situato sulla parte posteriore dell unità e riavviare il computer Utenti PC l icona dell unità compare in Risorse del computer o in Esplora risorse Utenti Mac sarà necessario riformattare l unità Vedere le istruzioni riportate qui di s...

Page 8: ...de un cable 5 Conecte el otro extremo del cable a su tarjeta PCI eSATA o conexión eSATA incorporada 6 Pulse el interruptor de encendido de la parte posterior de la unidad y reinicie el equipo Usuarios de PC En Mi PC o en el Explorador de Windows debe aparecer el icono de unidad Usuarios de Mac Tendrá que volver a dar formato a la unidad Consulte las instrucciones que aparecen a continuación Format...

Page 9: ... conecte o à parte traseira da unidade Nunca conecte a unidade ao computador através de mais de um cabo 5 Conecte a outra extremidade do cabo à placa eSATA PCI ou à conexão eSATA embutida 6 Ligue o botão de alimentação na parte traseira da unidade e reinicie o computador Usuários de PC O ícone da unidade deve aparecer em Meu computador ou no Windows Explorer Usuários de Mac Será preciso reformatar...

Page 10: ... één kabel aan op de computer 5 Sluit het andere uiteinde van de kabel aan op uw eSATA PCI kaart of geïntegreerde eSATA aansluiting 6 Schakel de drive in met de aan uit knop op de achterzijde van de drive en start uw computer opnieuw op Pc gebruikers het pictogram van de drive verschijnt normaal in Deze computer of in Windows Verkenner Mac gebruikers u dient de drive opnieuw te formatteren Lees de...

Page 11: ...da Anslut aldrig enheten till datorn med fler än en kabel 5 Anslut den andra änden av kabeln till eSATA PCI kortet eller den inbyggda eSATA anslutningen 6 Slå på strömbrytaren på enhetens baksida och starta om datorn PC användare Ikonen för enheten kommer att visas i Den här datorn eller i Utforskaren Mac användare Måste omformatera enheten Se instruktioner nedan Formatera enheten för Mac OS Enhet...

Page 12: ...t og sæt det i på bagsiden af drevet Slut aldrig drevet til computeren med mere end ét kabel 5 Slut den anden ende af kablet til eSATA kortet eller det indbyggede eSATA stik 6 Tænd for afbryderen bag på drevet og genstart computeren Pc brugere Drevikonet bør vises i Denne computer eller Windows Stifinder Mac brugere Du skal genformatere drevet Se instruktioner herunder Formatering af drevet til Ma...

Page 13: ...til på baksiden av stasjonen Koble aldri stasjonen til datamaskinen med mer enn én kabel 5 Koble den andre enden av kabelen til eSATA PCI kortet eller den innebygde eSATA tilkoblingen 6 Slå på strømbryteren på baksiden av stasjonen og start datamaskinen PC brukere Ikonet til stasjonen skal vises i Min datamaskin eller Windows Utforsker Mac brukere Du må formatere stasjonen på nytt Se veiledningen ...

Page 14: ...lla 5 Kytke kaapelin toinen pää eSATA PCI korttiin tai sisäänrakennettuun eSATA liitäntään 6 Kytke laitteeseen virta kiintolevyn takana olevasta virtakytkimestä ja käynnistä tietokone uudelleen PC tietokoneen käyttäjät Aseman kuvakkeen pitäisi tulla näkyviin Oma tietokone ikkunaan tai Windowsin Resurssienhallintaan Macintosh käyttäjät Asema pitää alustaa uudelleen Katso seuraavat ohjeet Levyn alus...

Page 15: ... az eSATA kábelt és csatlakoztassa a meghajtó hátsó részéhez A meghajtó és a számítógép csatlakoztatásához soha ne használjon egynél több kábelt 5 Csatlakoztassa a kábel másik végét az eSATA PCI kártyához vagy a beépített eSATA csatlakozóhoz 6 Kapcsolja be a meghajtó hátoldalán található főkapcsolót és indítja újra a számítógépet PC felhasználók A meghajtó ikonja nem jelenik meg a Sajátgép vagy a ...

Page 16: ... více než jednoho kabelu 5 Připojte opačný konec kabelu ke kartě PCI eSATA nebo vestavěnému připojení eSATA 6 Zapněte síťový vypínač na zadní straně jednotky a restartujte počítač Uživatelé počítačů Ve složce Tento počítač nebo v programu Průzkumník Windows by se měla objevit ikona jednotky Pro uživatele systému Mac Bude třeba zformátovat jednotku Viz pokyny níže Formátování jednotky pro systém Ma...

Page 17: ... złącza eSATA 6 Włącz dysk za pomocą przełącznika z tyłu obudowy i uruchom ponownie komputer Użytkownicy komputerów PC Ikona dysku zostanie wyświetlona w oknie Mój komputer lub w oknie programu Eksplorator Windows Użytkownicy komputerów Macintosh Konieczne będzie ponowne sformatowanie napędu Patrz poniższe instrukcje Formatowanie napędu w systemie Mac Napęd jest dostarczany jako sformatowany w sys...

Page 18: ... не подключайте диск к компьютеру используя более одного кабеля 5 Подключите другой конец кабеля к карте eSATA PCI или встроенному разъему eSATA 6 Нажмите кнопку питания на задней панели диска и перезагрузите компьютер Пользователям ПК В окне Мой компьютер и Проводник Windows появится значок дисковода Пользователям Mac Необходимо выполнить повторное форматирование диска См инструкции справа Формат...

Page 19: ...ς καλώδια 5 Συνδέστε το άλλο άκρο του καλωδίου στην κάρτα eSATA PCI ή στην ενσωματωμένη υποδοχή eSATA 6 Ανάψτε το διακόπτη τροφοδοσίας στο πίσω μέρος του δίσκου και κάντε επανεκκίνηση του υπολογιστή Χρήστες PC Το εικονίδιο της συσκευής πρέπει να εμφανιστεί στο φάκελο Ο Υπολογιστής μου ή στην Εξερεύνηση των Windows Χρήστες Mac Θα χρειαστεί να κάνετε διαμόρφωση του δίσκου Δείτε τις οδηγίες που ακολο...

Page 20: ... N dG Z 0T K eSATA PCI YhFd2 Sa eSATA 6 f7 Sa Tj YhFd3 T USB Sa Rd3g Z YhFd2 eSATA dN 0T K 3B YhFd3Z dU2 1aW eSATA PCI _ 0T K Z 0F Z YhPE3Z 6 1h 52 _ W 3R 9h F YXE 0T K Z e N YhPE3Z L x O2 0F YhPE2 6 1h 52 eZ 3 2 l 1 0L m Tj Iomega Professional 0 dN fcR 0 GZ 0T K M 0a I Z YhPE3Z 6 0KB d eSATA PCI YhFd2 Sa 3C2 1aW eSATA 6 YhPE2 6 0KB d Tj N 3g YhPE3Z L fR 0h 2dh XZ c7 YhPE2 Ug T 0c7 N 2 l 0L m eSAT...

Page 21: ... USB PC Users If you are connecting to an eSATA PCI card or USB 2 0 host adapter make sure the correct drivers for the card are installed and recognized by your operating system If you are connecting to USB check your BIOS to ensure USB is enabled Please refer to your computer s user s guide or manual for instructions Mac Users Make sure the drive is formatted correctly See instructions on page 4 ...

Page 22: ...ltez les instructions page 5 Ouvrez les préférences du Finder et assurez vous que la case Disques externes ou Disques durs est cochée Si aucune lettre n a encore été attribuée au lecteur consultez la section Support à l adresse www iomega com L ordinateur ne démarre pas Si votre PC ne démarre pas lorsque le disque est connecté il est possible que le BIOS de votre ordinateur rencontre des problèmes...

Page 23: ...r Speicherkapazität Sie können dieses Problem umgehen indem Sie das Laufwerk beim Starten des Computers ausschalten Nach dem Starten des Computers schalten Sie das Laufwerk ein Benutzerhandbuch vollständig Im Bereich Support unter www iomega com steht Ihnen ein vollständiges Benutzerhandbuch im HTML Format zur Verfügung Uso dell unità Scollegamento dell unità ATTENZIONE Per evitare che si verifich...

Page 24: ...rocedimiento de desconexión seguro para su sistema operativo al desconectar la unidad Realización de copias de seguridad con la unidad Iomega recomienda realizar con periodicidad copias de seguridad del sistema y copias de seguridad más frecuentes de los datos para garantizar que los datos importantes estén siempre protegidos La frecuencia de las copias de seguridad dependerá de la importancia de ...

Page 25: ...mazenamento de dados pode falhar Sempre mantenha no mínimo duas cópias em discos diferentes para todos os arquivos de dados importantes Solução de problemas A unidade não aparece em Meu computador no Windows Explorer ou na mesa do Mac Tente reiniciar seu computador Verifique todas as conexões Certifique se de que a unidade esteja recebendo energia verifique se a luz de status está ligada Certifiqu...

Page 26: ... is aangesloten controleer of het statuslampje brandt Zorg dat de aan uit knop aan de achterzijde van de drive is INgeschakeld Controleer of u wel de eSATA of USB kabel gebruikt die bij de drive is meegeleverd Controleer of de drive slechts op één interface eSATA of USB is aangesloten Pc gebruikers Als u aansluit op een eSATA PCI kaart of USB 2 0 hostadapter moeten de juiste stuurprogramma s voor ...

Page 27: ...ия Убедитесь в том что на диск поступает питание горит индикатор состояния Убедитесь в том что используется eSATA или USB кабель входящий в комплект поставки диска Убедитесь в том что диск подключен только к одному интерфейсу eSATA или USB Пользователям ПК Если осуществляется подключение к карте eSATA PCI или хост адаптеру USB убедитесь что были установлены соответствующие драйверы карты и она рас...

Page 28: ...UDING ANY IMPLIED WARRANTY OF MERCHANTABILITY OR FITNESS FOR A PARTICULAR PURPOSE Any implied warranty required by applicable law shall be limited in duration to the express warranty term Some jurisdictions do not allow disclaimers of implied warranties or limitations on how long an implied warranty lasts so the above limitation may not apply to you This warranty gives you specific legal rights an...

Page 29: ...s ursprünglichen Kaufpreises Die obigen Angaben stellen sämtliche Verpflichtungen dar die Iomega Ihnen gegenüber im Rahmen dieser Garantie hat IOMEGA IST UNTER KEINEN UMSTÄNDEN HAFTBAR FÜR MITTELBARE SCHÄDEN SCHADENSERSATZ FÜR AUFWENDUNGEN BEI VERTRAGSERFÜLLUNG FOLGESCHÄDEN ODER SPEZIELLE SCHÄDEN BZW VERLUSTE EINSCHLIESSLICH DATENVERLUST NUTZUNGSAUSFALL SOWIE BETRIEBSUNTERBRECHUNG SELBST WENN IOME...

Page 30: ...ente devono essere limitate nel tempo in base a quanto sancito dai termini della garanzia esplicita Poiché alcune giurisdizioni non prevedono il ricorso a formule di diniego di garanzie implicite o limitazioni sulla durata di validità di tale garanzia è possibile che la limitazione di cui sopra non abbia alcuna validità nel caso specifico La presente garanzia concede particolari diritti legali non...

Page 31: ...e 4059 South 1900 West Roy UT 84067 Informações de contato para o atendimento ao cliente da Iomega na Europa podem ser obtidas em nosso website de Suporte em www iomega com europe support Caso o produto tenha direito ao serviço de garantia será necessário devolvê lo à Iomega acompanhado da identificação apropriada o número da autorização de retorno obtido no website da Iomega ou fornecido pelo rep...

Page 32: ...ей возможных дефектов является ремонт или замена неисправного оборудования по усмотрению компании Iomega вопрос об оплате транспортных расходов решается отдельно при этом для устранения выявленных дефектов компания Iomega может использовать новые или восстановленные детали или изделия На замененную деталь продукцию будет распространяться оставшееся время исходной гарантия или период три 3 месяца с...

Page 33: ... contact your local authority or the retailer where this product was purchased FCC This equipment complies with Part 15 of the FCC Rules Operation is subject to the following conditions 1 This device may not cause harmful interference and 2 this device must accept any interference received including interference that may cause undesired operation NOTE This equipment has been tested and found to co...

Page 34: ...ingfähigen Materials sowie zur Verringerung von Gesundheits und Umweltschäden bei Weitere Informationen zur korrekten Entsorgung dieses Produkt erhalten Sie beim Händler oder der Behörde bei dem oder bei der es erworben wurde CE Unione Europea Questo prodotto Iomega è conforme alle direttive e agli standard europei Applicazione della direttiva comunitarie 2004 108 EC Dichiarazione di conformità ag...

Page 35: ...n en vermindert de impact ervan op het milieu en de gezondheid van de mens Voor meer informatie betreffende de juiste afvoermethode voor dit product neemt u contact op met de plaatselijke overheid of de winkelier bij wie dit product is gekocht CE Европейский Союз Данная продукция компании Iomega соответствует следующим директивам и стандартам Европейского Союза Директивы ЕС 2004 108 EC Стандарты т...

Page 36: ...ga com Sélectionnez votre région puis Support Deutsch Wenn Sie ein Problem haben können wir Ihnen helfen Bringen Sie dieses Produkt NICHT zu Ihrem Händler zurück Ihre Antwort steht im Netz Preisgekrönte Support Website www iomega com Wählen Sie Ihr Gebiet aus und klicken Sie auf Support Italiano In caso di problemi noi possiamo fornire assistenza NON restituire questo prodotto al rivenditore La ri...

Reviews: