background image

6

Using Your Drive

Disconnecting the Drive

Always use the safe removal procedure for your operating system when disconnecting the drive. 

CAUTION!

 To prevent data loss, do not disconnect the drive during data transfer (activity light flashing). Use caution 

when moving the drive while it is connected to power.
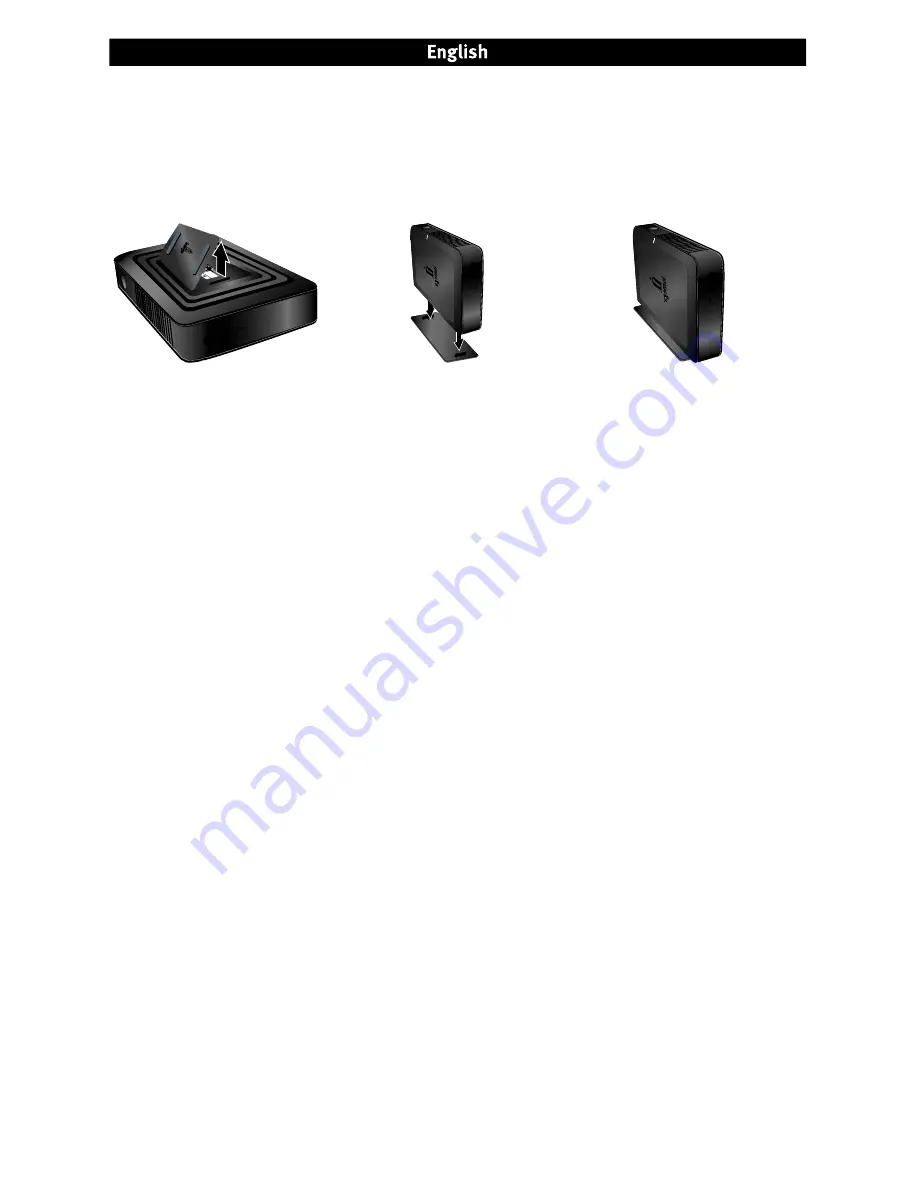
Using the Iomega

®

 Hard Drive Side Stand (Some Models)


The side stand is stored on the bottom of the drive. To use the side stand, remove the bottom plate from the hard drive. 
Lock the bottom plate tabs securely into the vent slots on the side of the drive opposite the drive access light.

Locating the Iomega Hard Drive Registration Number (Some Models)

On some models the registration number is stored under the drive’s bottom plate. To find the serial number, remove the 
bottom plate from the hard drive (as shown in the first illustration above).

Troubleshooting

PC USERS: Formatting the Iomega Hard Drive

The FireWire 800/400/USB 2.0 model ships preformatted as a Macintosh Extended (HFS+) volume. This format is not 
recognized on Windows operating systems, and you must reformat the drive to either FAT32 or NTFS. Users with Windows 
XP/2000 can use the following instructions to format the drive. Users with  Windows 98/Me, visit the support section on 

www.iomega.com

 to find detailed formatting instructions.

CAUTION!

 Reformatting the Iomega Hard Drive will erase all existing data on the drive.

  1

Connect the Iomega Hard Drive to your computer following the instructions on page 4.

  2.  Open Windows Disk Management (right click on 

My Computer

, select 

Manage

, and click on 

Disk Management

).

  3. 

If the Disk Wizard opens

, click 

Next

. Select the disk, click 

Next

, then 

Finish


If the Wizard does not open

, locate the drive in the lower list. Look for a disk that does not show a drive letter or file 

system. Right click on the drive name and select 

Initialize Disk

 (Windows XP) or 

Write Signature

 (Windows 2000), 

then 

OK

.

  4.  The drive will now appear as 

Unallocated

 and the bar will be black. Right click on the black bar and select 

New 

Partition

 (Windows XP) or 

Create Partition

 (Windows 2000).

  5.  When the Partition Wizard opens, click 

Next

  6.  Verify that the partition type is 

Primary partition

 and click 

Next

  7.  Leave the maximum disk space selected and click 

Next

.

  8.  Assign the next drive letter available and click 

Next

.

  9.  To format the drive with an NTFS file system, click 

Next

, then click 

Finish

. The drive will be ready to use when the 

format completes.

NOTE:

 If you want to use the drive with other operating systems, download the 

Iomega FAT32 Formatter

 from the 

Support and Downloads area on 

www.iomega.com

 and use it to change the format to FAT32 (provides cross-platform 

compatibility).

User’s Manual


A complete user’s manual in HTML format is available on the Support & Downloads area on 

www.iomega.com

.

Summary of Contents for 33115

Page 1: ...Desktop Hard Drive USB FireWire Quick Start Guide Guide de démarrage rapide Guía de instrucciones rápidas Guia de uso rápido ...

Page 2: ...e harmful interference and 2 this device must accept any interference received including interference that may cause undesired operation NOTE This equipment has been tested and found to comply with the limits for a Class B digital device pursuant to part 15 of the FCC Rules These limits are designed to provide reasonable protection against harmful interference in a residential installation This eq...

Page 3: ...t 12 Installation rapide 4 Utilisation du lecteur 7 Dépannage 7 Garantie Limitée 10 Assistance clientèle 12 Instalación rápida 5 Uso de la unidad 8 Solución de problemas 8 Garantía Limitada 11 Asistencia al cliente 12 Instalação rápida 5 Utilização da unidade 9 Solução de problemas 9 Garantia Limitada 11 Suporte ao cliente 12 ...

Page 4: ...ser s manual on the Solutions CD for instructions on disconnecting the drive 1 Insérez le CD Solutions S il ne démarre pas automatiquement double cliquez sur l icône du CD dans le Poste de travail dans l Explorateur Windows ou sur le bureau Mac puis double cliquez sur l icône Démarrer Connectez le lecteur à l ordinateur après que le CD Solutions a vérifié votre système 2 Connectez l alimentation i...

Page 5: ... parpadea Consulte el manual de usuario del CD de Soluciones para obtener instrucciones acerca de la desconexión de la unidad 1 Insira o CD Soluções Caso ele não seja iniciado automaticamente clique duas vezes no ícone do CD em Meu computador no Windows Explorer ou na mesa do Mac e em seguida clique duas vezes no ícone Iniciar Conecte a unidade ao computador após o CD Soluções verificar seu sistem...

Page 6: ...tting instructions CAUTION Reformatting the Iomega Hard Drive will erase all existing data on the drive 1 Connect the Iomega Hard Drive to your computer following the instructions on page 4 2 Open Windows Disk Management right click on My Computer select Manage and click on Disk Management 3 If the Disk Wizard opens click Next Select the disk click Next then Finish If the Wizard does not open loca...

Page 7: ...ue 1 Connectez le disque dur Iomega à votre ordinateur en suivant les instructions de la page 4 2 Ouvrez l utilitaire de gestion des disques de Windows cliquez avec le bouton droit de la souris sur Poste de travail Gérer puis Gestion des disques 3 Si l Assistant lecteur s ouvre cliquez sur Suivant Sélectionnez le lecteur cliquez sur Suivant puis sur Terminer Si l Assistant ne s ouvre pas recherche...

Page 8: ...e eliminarán los datos existentes en la unidad 1 Conecte el disco duro Iomega al ordenador siguiendo las instrucciones que se muestran en la página 5 2 Abra Administración de discos de Windows haga clic con el botón derecho del ratón en Mi PC seleccione Administrar y a continuación haga clic en Administración de discos 3 Si se abre el asistente para discos haga clic en Siguiente Seleccione el disc...

Page 9: ... irá apagar todos os dados existentes na unidade 1 Conecte o disco rígido Iomega ao seu computador seguindo as instruções da página 5 2 Abra o Gerenciamento de Disco do Windows clique com o botão direito do mouse em Meu Computador selecione Gerenciar e em seguida clique em Gerenciamento de Disco 3 Se o Assistente de Disco abrir clique em Avançar Selecione o disco clique em Avançar e Concluir Se o ...

Page 10: ...m 1 ano 90 dias pour produtos recondicionados Cette garantie limitée est strictement personnelle et s applique uniquement au premier utilisateur final Cette garantie ne s applique pas aux a logiciels Iomega b composants remplaçables tels que les fusibles ou les ampoules et c produits tiers matériels ou logiciels fournis avec le produit garanti Iomega ne garantit en aucun cas que tels produits s il...

Page 11: ...ones Cualquier demanda de incumplimiento de la garantía del producto deberá procesarse en el plazo de un año a partir de la fecha en que se realizó la demanda A Iomega garante este produto de hardware como isento de defeitos de material e mão de obra pelo período de um 1 ano 90 dias para produtos recondicionados Esta garantia limitada e intransferível é somente para você o primeiro comprador usuár...

Page 12: ...f Apple Computer Inc in the United States and or other countries Certain other product names brand names and company names may be trademarks or designations of their respective owners For service and support for your Iomega product visit us at www iomega com Pour obtenir du service et de l assistance pour votre produit Iomega visitez notre site à l adresse suivante www iomega com Para obtener info...

Reviews: