background image

7

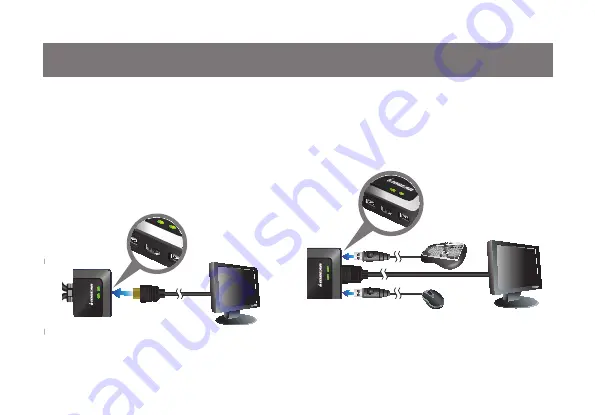
Step 1

Please make sure your computers and monitor are 
powered off before you start.

Step2

Connect the HD cable from your monitor to the 
console HD monitor port. Then, turn on the monitor.

Step 3

Connect your USB keyboard and mouse to the 
console USB keyboard port and console USB 
mouse port.

Standard Installation

Summary of Contents for GCS62HU

Page 1: ...Installation Installation Guide 2 Port HD Cable KVM Switch with Audio GCS62HU PART NO M1130...

Page 2: ......

Page 3: ...Indication 12 Port Switching 13 Hotkeys Summary Table 14 Hotkeys Summary Table Cont 15 Autoscan Interval Table 16 Mac Keyboard Emulation 17 Factory Default Settings 18 Firmware Upgrade 19 Upgrade Fai...

Page 4: ...4 Package Contents 1 x 2 Port HD Cable KVM Switch 1 x Installation Guide 1 x Warranty Card...

Page 5: ...microphone optional Computers 1 HD port 2 USB ports 3 5mm audio and microphone connections optional Operating System Windows XP Windows Vista 32bit 64bit Windows 7 Mac OS X or greater Sun Solaris work...

Page 6: ...e HD Port 4 Console USB Keyboard Port 5 Console Audio Port 6 Console Mic Port 7 CPUs Audio connection 8 CPUs USB Keyboard connection 9 CPUs HD connection 10 CPUs USB Keyboard connection 11 CPUs Mic co...

Page 7: ...powered off before you start Step2 Connect the HD cable from your monitor to the console HD monitor port Then turn on the monitor Step 3 Connect your USB keyboard and mouse to the console USB keyboar...

Page 8: ...ort and console mic port Step 5 Connect a set of your molded KVM cable to each of your computers HD cable to the HD output USB cables to open USB ports from your computer audio cable to your audio out...

Page 9: ...ers and monitor are powered off before you start Step2 Connect the HD cable from your monitor to the console HD monitor port Then turn on the monitor Step 3 Connect your USB keyboard to the console US...

Page 10: ...n the hub Then connect any peripherals that you want to share between your computers to the other available USB ports in the hub Note Please make sure mouse emulation has been disabled for this setup...

Page 11: ...of your molded KVM cable to each of your computers HD cable to the HD output USB cables to open USB ports from your computer audio cable to your audio output and mic cable to the mic input Final Step...

Page 12: ...12 LED will light up in Green showing the port that can be controlled by the console Both LEDs will be flashing together when the KVM is in Fireware Upgrade Mode LED Indication...

Page 13: ...ly be used when both Mouse Emulation Mode and Mouse Port Switching Mode are enabled Port Switching Port Switching via Hotkey Commands To trigger a Hotkey Mode simply press Scroll Lock Scroll Lock Plea...

Page 14: ...n the two computers with the specific time depending on the interval n that you have input Please see Autoscan Interval Table for details x Enter Change hotkey sequence to the alternative sequence m E...

Page 15: ...d document opened before you trigger this function F5 Enter Perform a USB keyboard and mouse reset F6 nn Enter Sets the keyboard language layout Note nn is a two digit number that represents one of th...

Page 16: ...16 Autoscan Interval Table n Description 1 3 seconds 2 5 seconds default 3 10 seconds 4 20 seconds...

Page 17: ...ed in the table below Mac Keyboard Emulation Note When using key combinations press and release the first key Ctrl then press and release the second key PC Keyboard Mac Keyboard Shift Shift Crtl Ctrl...

Page 18: ...Default Settings Function Default Setting Autoscan Interval 5 seconds Hotkeys Scroll Lock Scroll Lock Keyboard Operating Platform PC compatible Mouse Emulation On Mouse Port Switching Off Keyboard Em...

Page 19: ...lease disconnect all computers from the KVM Step 3 Press and hold the remote switch button of the KVM while connecting the 2 USB connections of a set of KVM cable to the computer that you will use to...

Page 20: ...the below message popup in tray icon area Step 5 After you see the below message Your new hardware is installed and ready to use extract the downloaded file with WinRAR or compatible software Then dou...

Page 21: ...Otherwise click Cancel to exit Step 7 Choose the correct KVM that you wish to perform firmware upgrade from the Device List and then click Next to continue Then the Firmware Upgrade Utility will veri...

Page 22: ...ick Yes to start the upgrade and No to cancel the upgrade Step 9 When the firmware upgrade is done you will see Firmware upgrade OK in the Status Messages window Then simply click Finish to complete t...

Page 23: ...Fail Unplug the 2 USB connections from your computer that has performed the firmware upgrade Then repeat the firmware upgrade process by following the procedure of firmware Upgrade section starting f...

Page 24: ...provide reasonable protection against harmful inter ference in a residential setting This product generates uses and can radiate radio frequency energy and if not installed and used as directed it ma...

Page 25: ...25 This device has been tested and found to comply with the following European Union directives Electro magnetic Capability 89 336 EMC Low Voltage 73 23 EEC and R TTED 1999 5 EC CE Compliance...

Page 26: ...26 The following contains information that relates to China SJ T 11364 2006 Pb Hg Cd Cr VI PBB PBDE SJ T 11363 2006 SJ T 11363 2006 SJ T 11363 2006...

Page 27: ...erchantability or fitness for any particular purpose The direct vendor also reserves the right to revise or update the device or documentation without obligation to notify any individual or entity of...

Page 28: ...stered trademarks of Microsoft Corporation All other brand and product names are trademarks or registered trademarks of their respective holders IOGEAR makes no warranty of any kind with regards to th...

Page 29: ...29...

Page 30: ...30...

Page 31: ...31...

Page 32: ...lish helping people enjoy daily life using our high technology products GREEN IOGEAR is an environmentally conscious company that emphasizes the importance of conserving natural resources The use of o...

Reviews: