background image

2

3

Table of Contents

Package Contents 

4

System Requirements 

5

Overview 

6

Rack Mounting 

8

Grounding  

11

Open/Close Console 

12

Installation  

14

Connect to a KVM 

17

External Console Ports (Optional) 

20

USB External Mouse Port (Optional) 

21

LCD Configuration 

22

LCD Adjustment Setting 

23

Reset Button 

24

Keyboard Function Keys 

25

Hotkey Commands 

26

Mac Keyboard Emulation 

27

Sun Keyboard Emulation 

28

Firmware Upgrade 

29

Upgrade Fail 

33

Safety Instructions 

34

Specifications 

38

Federal Communications Commission 
(FCC) Statement 

39

CE Statement 

40

SJ/T 11364-2006 

41

Limited Warranty 

42

Contact 

43

Summary of Contents for GCL1800

Page 1: ...1 GCL1800 PART NO M1122 Installation Installation Guide 17 LCD Combo Console...

Page 2: ...trademark of International Business Machines Inc Macintosh G3 G4 and iMac are registered trademarks of Apple Computer Inc IOGEAR makes no warranty of any kind with regards to the information presente...

Page 3: ...0 USB External Mouse Port Optional 21 LCD Configuration 22 LCD Adjustment Setting 23 Reset Button 24 Keyboard Function Keys 25 Hotkey Commands 26 Mac Keyboard Emulation 27 Sun Keyboard Emulation 28 Fi...

Page 4: ...Package Contents 1 x 17 LCD Console 1 x USB KVM Cable 1 x Firmware Upgrade Cable 1 x Rack Mount Kit Long and Short L Brackets 1 x Grounding Wire 1 x Power Cord 1 x Installation Guide 1 x Warranty Car...

Page 5: ...5 System Requirements Computers VGA SVGA or MultiSync video graphics card with an HDB 15 port PS 2 mouse and keyboard ports 6 pin mini DIN or 1 USB port...

Page 6: ...se 1 Handle Bar 2 LCD Display 3 LCD Power Button 4 LCD Controls 5 Keyboard 6 Touchpad 7 External USB Mouse Port 8 Power LED 9 Num Lock Caps Lock Scroll Lock LED 10 Reset Button 11 Firmware Upgrade Rec...

Page 7: ...sole 1 2 5 4 7 6 8 9 3 7 Back view Grounding Terminal 1 Power Socket 2 Power Switch 3 External USB Mouse Port 4 External USB Keyboard Port 5 External PS 2 Mouse Port 6 External PS 2 Keyboard Port 7 Ex...

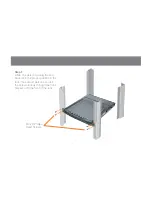
Page 8: ...nents to mount the LCD Console to the rack Note The Slide Mounting Brackets are pre installed onto the LCD Console 8 Rack Mounting Side Mounting Brackets L Bracket CAUTION Slide rail mounted equipment...

Page 9: ...While one person holding the LCD Console in the proper position in the rack the second person can lock the screws loosely through the front bracket onto the front of the rack 9 M4 x 6 Phillips Head S...

Page 10: ...ws Step 2 While the person continue holding the position of the LCD Console the second person can slide the L brackets from the back of the rack into the Slide Mounting Brackets Then you can lock the...

Page 11: ...ll devices are properly grounded Use the included grounding wire to ground the LCD Console by connecting one end of the wire to the grounding terminal and the other end of the wire to a suitable groun...

Page 12: ...ole Opening the Console Slide the 2 Slide Releases toward the center of the LCD Console then pull the console module out while holding the Slide Releases position Then simply open the console by raisi...

Page 13: ...of the console module towards yourself to release the safety lock Then slide the 2 Slide Releases toward the center of the LCD Console then push the console module all the way in while holding the Sli...

Page 14: ...S 2 USB CPU PS 2 USB CPU Console 14 Installation Please make sure the computer is powered off before you start Step 1 Connect the power cord to the power outlet and the power socket of the LCD Console...

Page 15: ...are available and sold separately please visit our website at www iogear com for details 15 USB KVM Cable Connection PS 2 KVM Cable Connection Step2 Connect a USB KVM Cable with a green connector or...

Page 16: ...PS 2 USB CPU PS 2 USB CPU Console 16 Step 3 Turn on LCD Console by using the power switch that s located in the back of the LCD Console Final Step Turn on your computer...

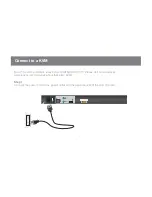
Page 17: ...Connect to a KVM Note This LCD Console is ideal for our GCS1808 GCS1716 Please visit our website at www iogear com for details about these two KVMs Step 1 Connect the power cord to the power outlet an...

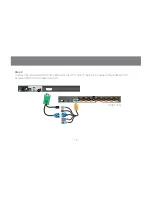
Page 18: ...12 13 14 15 16 17 18 PS 2 USB CPU CONSOLE PS 2 USB CPU PS 2 USB CPU Console 18 Step 2 Connect the provided USB KVM Cable from the CPU port of the LCD Console to the KVM switch s console VGA and USB ke...

Page 19: ...l for details on how to connect your computers to your KVM Step 4 Turn on LCD Console by using the power switch that s located in the back of the LCD Console Step 5 Refer to your KVM s manual for deta...

Page 20: ...external monitor keyboard or mouse rather then the built in LCD keyboard or touchpad you can connect your external VGA monitor USB or PS 2 keyboard and mouse to the external console ports that are lo...

Page 21: ...ternal mouse port in the front of the LCD Console next to the Power LED Simply plug in any USB connection of the mouse to that USB port to use an external mouse instead of the touchpad USB External Mo...

Page 22: ...the OSD Menu During an adjustment this button increases the value of the specific adjustment This button navigates left or down within the OSD Menu During an adjustment this button decreases the valu...

Page 23: ...orizontally V Position This function is to adjust the position of the LCD panel vertically Color Temperature This function is to adjust the color quality of the LCD The warmth value and color balance...

Page 24: ...ESET RESET 24 Use a paper clip or any kind of small object to press the reset button you will then hear a beep sound which indicates that it will perform a system reset on the LCD Console Reset Button...

Page 25: ...e built in keyboard and they are as follow Simply press and hold the Fn key then press the function key and release the Fn key to trigger the specific function Function Description Mute key Volume Dow...

Page 26: ...ription Ctrl Alt Shift P C Enter Set keyboard operating platform to PC compatible Ctrl Alt Shift S U N Enter Set keyboard operating platform to SUN compatible Ctrl Alt Shift M A C Enter Set keyboard o...

Page 27: ...ation mappings are listed in the table below PC Keyboard Mac Keyboard Shift Shift Crtl Ctrl Ctrl 1 Ctrl 2 Ctrl 3 Ctrl 4 Alt Alt Print Screen F13 Scroll Lock F14 Enter Return Backspace Delete Insert He...

Page 28: ...isted in the table below PC Keyboard Sun Keyboard Crtl t Stop Crtl F2 Again Crtl F3 Props Crtl F4 Undo Crtl F5 Front Crtl F6 Copy Crtl F7 Open Crtl F8 Paste Ctrl F9 Find Crtl F10 Cut Crtl 1 Crtl 2 Crt...

Page 29: ...r outlet and the LCD Console Then turn on the LCD Console by the power switch that s located in the back of the LCD Console Step 3 Go to www iogear com to download the latest available firmware or the...

Page 30: ...IN to proceed the firmware upgrade KB is a sub layer in the LCD Console firmware Step 7 Choose the correct device that you wish to perform firmware upgrade from the Device List and then click Next to...

Page 31: ...p again for 2nd part of the firmware upgrade KB 31 Step 8 If you have checked the Check Firmware Version checkbox then the utility will check the current firmware that is on your LCD Console If the cu...

Page 32: ...ne you will see Firmware upgrade OK in the Status Messages window Then simply click Finish to complete the whole firmware upgrade process Final Step Now the LCD Console will reset by itself and it wil...

Page 33: ...2 Slide the Firmware Upgrade Recovery Switch to the Recover position slide to the right Then connect power cord back to the LCD Console Step 3 Repeat the firmware upgrade process Please refer to Firm...

Page 34: ...ould never be placed on a soft surface bed sofa rug etc as this will block the ventilation openings Additionally the device should not be placed inside another enclosure bookcase etc unless adequate v...

Page 35: ...used with this device add the total ampere rating of each product plugged into the extension cord and verify that the total does not exceed the ampere rating of the extension cord Additionally make su...

Page 36: ...or the cabinet was damaged The device exhibits a distinct change in performance indicating a need for service When following the operating instructions the device does not operate normally Only adjust...

Page 37: ...nto or out of a rack as the slide rails can pinch your fingers After a device is inserted into the rack carefully extend the rail into a locked position and then slide the device into the rack Do not...

Page 38: ...1800 Power Consumption 29 6W Physical Properties Housing Metal Plastic Weight 25 94lb Dimension W x H x D 17in x 1 75in x 21in Environment Operating Temperature 0 40 C Storage Temperature 20 60 C Humi...

Page 39: ...rotection against harmful interference when the equipment is operated in a commercial environment This product generates uses and can radiate radio frequency energy If this product is not installed an...

Page 40: ...tive on the approximation of the law of member states relating to EMC Directive 89 336 EEC Low Voltage Directive 73 23 EEC and R TTE Directive 99 5 EC The product has been approved for LVD and covered...

Page 41: ...41 SJ T 11364 2006 The following contains information that relates to China Pb Hg Cd Cr VI PBB PBDE SJ T 11363 2006 SJ T 11363 2006 SJ T 11363 2006...

Page 42: ...anty or representation expressed implied or statutory with respect to the contents or use of this documentation and especially disclaims its quality performance merchantability or fitness for any part...

Page 43: ...43 IOGEAR 19641 Da Vinci Irvine CA 92610 P 949 453 8782 F 949 453 8785 Visit us at www iogear com Contact...

Page 44: ...EEN IOGEAR is an environmentally conscious company that emphasizes the importance of conserving natural resources The use of our technology solutions helps reduce electronic waste HEALTH IOGEAR suppor...

Reviews: