inverSOL Lumen User Manual Download Page 13

User Manual Lumen and inverSOL 5000 


                  www.inversolpr.com

13

Installation

Physical Installation

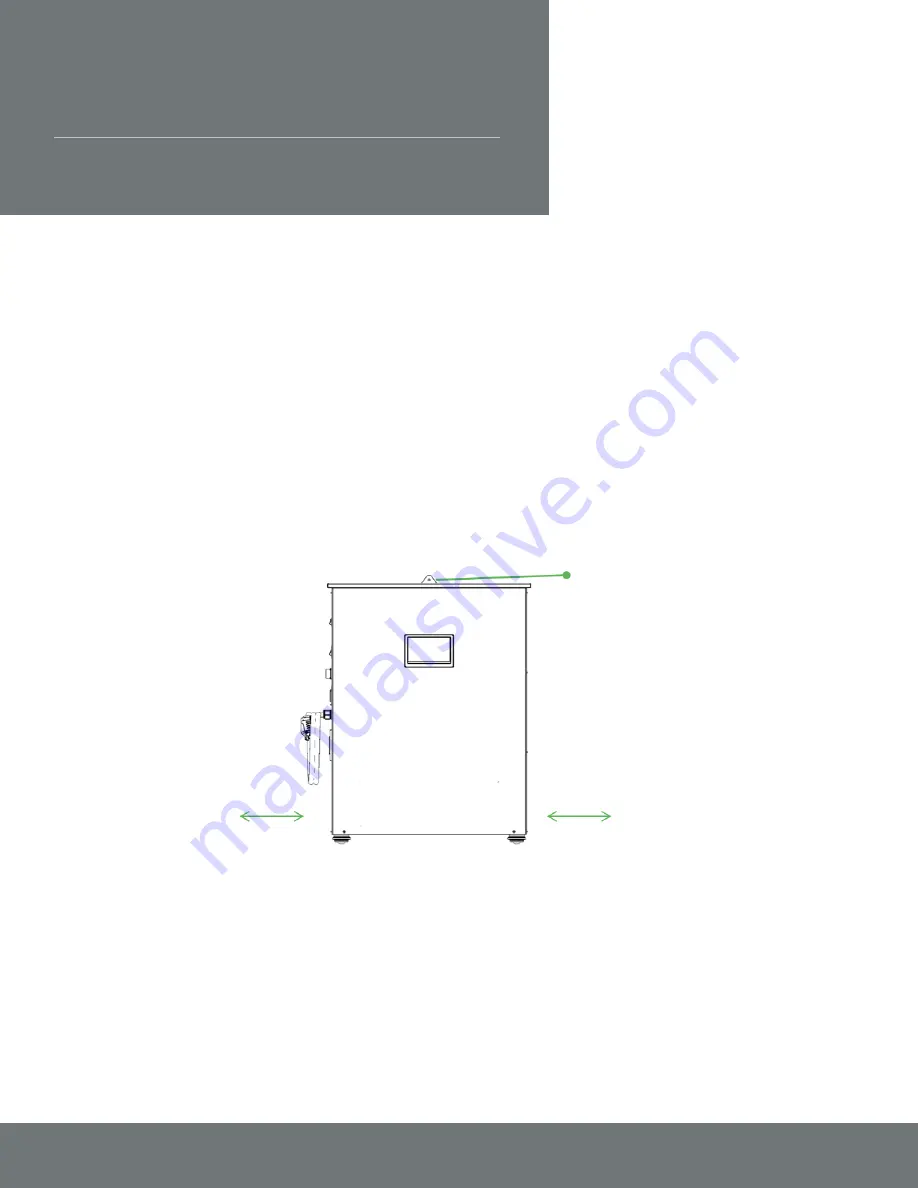
Your Lumen unit is fully sealed and does not need to be opened.  Place the unit against a wall 

where convenient to make the electrical connections to your main panel and the critical loads sub 

panel.  The unit should be placed in a location that provides good ventilation with at least 6 inches of 

clearance from the front and sides.  Once the unit is properly located, it must be secured to the wall at 

the top using the provided bracket.  Now you are ready to make the electrical connections.


Figure 3. Lumen Physical Installation

Solar Connections

The Lumen includes a 4-pin connector with two solar inputs (Figure 4). Each input can accommodate 

up to 2,000 W of solar power (total of 4,000W).  It is important to balance the solar to each of these 

inputs.  Common configurations are pictured below (Figure 5).


6 inches

6 inches

bracket

Installation

Summary of Contents for Lumen

Page 1: ...User Manual Lumen and inverSOL 5000 www inversolpr com 1 energy always Lumen User Manual www inversolpr com ...

Page 2: ...www inversolpr com User Manual Lumen and inverSOL 5000 2 ...

Page 3: ...y Modules 7 Conduct in Case of a Fire 8 Product Description 9 Available System Variants 12 Installation 13 Physical Installation 13 Solar Connections 13 AC Connections 16 Operations 17 User Interface Overview 18 Home Page 18 Weather Forecast Page 20 Hourly Forecast 21 Information Page 22 Historical Information Page 23 Solar Energy Page 25 Settings Page 26 WiFi Page 27 Administrador Page 28 Mainten...

Page 4: ...splay and smartphone app Wireless connectivity provides the latest weather information software updates and energy management features Lumen s intelligent power management system optimizes your energy production with your energy consumption An interactive touchscreen offers an enhanced user experience and real time information The Automatic transfer switch included in Lumen seamlessly merges solar...

Page 5: ...ary algorithm built in the Lumen brain continues to learn based on real time data and modifies usage to save you money whilst ensuring backup power is available The Lumen brain also allows you to track energy usage and savings real time via a mobile app or touchscreen display About Lumen ...

Page 6: ...ion of the battery modules outside of its storage system Failure to comply with the conditions of the warranty and the information specified in this document invalidates any warranty claims The solar storage system must only be operated as described in the product documentation Incorrect operation can lead to injury to yourself or others and cause damage to property Lumen is not intended for use a...

Page 7: ...ng effects 1 High heat generation on the surface of the battery cells 2 This may ignite and cause an explosive flame 3 The smoke from burning battery modules can irritate the skin eyes and throat Therefore proceed as follows 1 Do not open the battery modules 2 Do not mechanically damage the battery modules pierce deform strip down etc 3 Do not modify the battery modules 4 Do not allow the battery ...

Page 8: ... off the storage system to electrically isolate it see Switching the storage system off to electrically isolate it 2 Switch off the main circuit protection device in the building 3 If the storage system and or mains fuses cannot be safely switched off 1 Observe the minimum distances specified for the extinguishing agent used 4 The storage system works with an output voltage of 240 V AC and is ther...

Page 9: ...ary algorithm running in the Lumen s controller optimizes the use of solar All of the up to 4800 watts of solar energy produced is either consumed when produced or stored in the battery for later use Therefore there is no need for net metering In addition the energy storage system provides backup power when solar or utility power is not available Figures 1 and 2 depict how the energy flows with Lu...

Page 10: ... and utility power is not available the system will operate from the battery Lumen will reduce your utility bills by the amount of solar power that is generated At the heart of Lumen s energy storage system is an expandable 5000 Wh LiNMC battery The battery is designed for more than 10 years life under normal operating conditions The intelligent charging system is programmed to fully charge the ba...

Page 11: ... performance to be optimized to weather and utility grid conditions as well as to provide connectivity through the available smartphone app Tabel 1 Specifications Table 5 kWh 5 kWh 3 000 3 5 hr 93 110 220V 20A 240V 9600VA 30C to 50C 225 lbs up to 12 4 000W Battery Capacity Nominal Power Rating Number of Cycles Charging Time Round Trip Efficiency Output Voltage Max Load Surge Power Temperature Weig...

Page 12: ...iguration is split phase 120V 240V with a 5 000 Wh LiNMC energy storage system Both single phase and three phase configurations are also available and the outputs of multiple Lumens can be combined to provide up to 19 200 W The energy storage system is expandable up to 20 000 Wh in both LiNMC or Sealed Lead Acid SLA battery types Available System Variants ...

Page 13: ... with at least 6 inches of clearance from the front and sides Once the unit is properly located it must be secured to the wall at the top using the provided bracket Now you are ready to make the electrical connections Figure 3 Lumen Physical Installation Solar Connections The Lumen includes a 4 pin connector with two solar inputs Figure 4 Each input can accommodate up to 2 000 W of solar power tot...

Page 14: ...onnections BATTERY ON OFF AC OUTPUT ON OFF SOLAR INPUT AC OUTPUT 240V AC INPUT 240V AC OUTPUT 120V WIRE GAUGE AWG 12 AWG 10 AWG 8 AWG 6 AWG 4 AWG 40 12 2 62 9 19 2 100 30 5 159 48 4 253 77 1 60 CELL MODULES 11 8AMPS INPUT FEET METERS 17 9 5 5 28 5 8 7 45 3 13 8 72 21 9 114 7 34 8 72 CELL MODULES 8 7AMP INPUT FEET METERS Installation ...

Page 15: ...User Manual Lumen and inverSOL 5000 www inversolpr com 15 Figure 5 Lumen Solar Configurations Installation ...

Page 16: ...er and provides one 20A 240VAC connection to the desired critical loads 1 Connect input to main panel 2 Identify critical loads such as refrigerators air conditioning lights etc 3 Relocate critical loads to sub panel 4 Connect sub panel to output See Figure 6 for the wiring diagram with Lumen Figura 6 Lumen Wiring Diagram Installation ...

Page 17: ...ly 20 seconds for the unit to go through its initialization and self test before it is fully operational There is also a switch to turn on off the main AC output Place this switch to the on position as indicated by 1 on the switch and power will be flowing to your critical loads To turn the system off simply reverse this procedure Note that the main switch must be placed in the off position when t...

Page 18: ...tes of inactivity a screensaver will appear with the screen turning off after another one minute The manager will continue to run even when the screen is dark The green status bar across the bottom of the screen will appear on every page It displays the current state of charge of the battery the name of the WiFi router the unit is currently connected to the current date and time as well as warning...

Page 19: ...nit just the screen If the device is connected to Wi Fi displays the current temperature for your area in Fahrenheit To change this to Celsius please see the Weather Forecast page Tapping this or the weather icon will take you to the Weather Forecast page If the device is connected to Wi Fi displays the current weather for your area Tapping this or the thermometer will take you to the Weather Fore...

Page 20: ...d cloudiness To the right of this the sunset and sunrise times are displayed as well as the current wind speed In the top right corner is a switch Tapping this will switch all values from metric units to imperial units or vice versa Below this is the forecast for the next five days To see the hourly forecast for these days including the current day tap the weather icon of the day you wish to view ...

Page 21: ...predicted cloudiness weather and temperature Please use the information provided to note days where you will be getting more or less sun as this will affect the amount of energy your panel s generate The list continues to the right To see the rest of the forecast simply swipe left to see later items and right to see earlier To return to the Weather page tap the cloud in the upper left corner User ...

Page 22: ...e how much or how little each part of the unit is contributing in real time The time until the battery is fully charged is also displayed and disappears when the battery is fully charged The reported current and power will also disappear when the battery is not being used to power the household load Both the grid and the load report a frequency as well The unit relies on AC power so these are the ...

Page 23: ...ed The boxes along the top of the screen allow you to select which category of data you want to see as well as the scale for the time over which the data is shown The unit automatically deletes data that is over a month old To see a summary of the solar energy generated by the unit tap the Solar Energy button in the upper right corner To return to the previous screen tap the info icon in the upper...

Page 24: ... the data over the previous day Displays the data over the past week up to the current day Displays the data over the past month up to the current day Description The power generated by the solar panel s The voltage at which the power was generated by the panel s The voltage at which the grid supplied power The frequency at which the grid supplied power The power drawn by your household load The v...

Page 25: ...generated by the unit to power your household The amount displayed can be adjusted in terms of number of days up to 30 days or number of months up to 11 months Data that is older than 12 months is automatically deleted To return to the previous page press the Historical Charts button in the upper left corner User Interface Overview ...

Page 26: ...ted the current version of the software employed to help manage the unit The buttons on the right will take you to the Administrator page and the Wi Fi page If you have a smartphone and want to connect to your device through the smartphone app press the Pair with Phone App button to start the connection process To return to the previous page tap the home icon in the upper left corner The Current S...

Page 27: ... connected To return to the previous page press the gear icon in the upper left corner If you do not see a particular network press update to get the most recent list of available networks If you still do not see it and you know the network name you can tap on the SSID box to type it in yourself A keyboard will appear when the box is active If you want to disable Wi Fi connectivity press the Disab...

Page 28: ... an administrator s password these settings are unavailable These pages provide access to settings to change the unit s behavior They also allow you to reboot the service manager that collects data from the unit or the TELiG device the service manager is running on as well as restore the defaults of the settings To return to the previous page tap the gear icon in the upper left corner User Interfa...

Page 29: ...nergy will charge the battery as first priority Utility will only charge when solar energy is insufficient Solar Only Only solar energy will charge the battery whether or not there is grid energy available Appliance Voltage range will be between 65 140 Volts for AC power UPS Voltage range will be between 85 140 Volts for AC power 120 V Range will 106 132 Volts 110 V Range will be 97 121 Volts 101 ...

Page 30: ...Resolution 1 Check AC output switch is in the ON position indicated by a 1 2 Verify that the unit has one of the following a Battery Charge b Grid Power c Solar Power 1 Navigate to the settings page by clicking the gear icon in the top right of the main page 2 Select the Wireless Settings option and verify that the wifi is connected 1 Turn off the system as described in the Operation section Syste...

Reviews: