www.inventini.com
EN
13
ASSEMBLING OF INFLATABLE POLE
(STARTENT PASCAL NORMAL AND BIG)
Fig. 13
Fig. 14
Fig. 15
Fig. 17
Fig. 18
Fig. 20
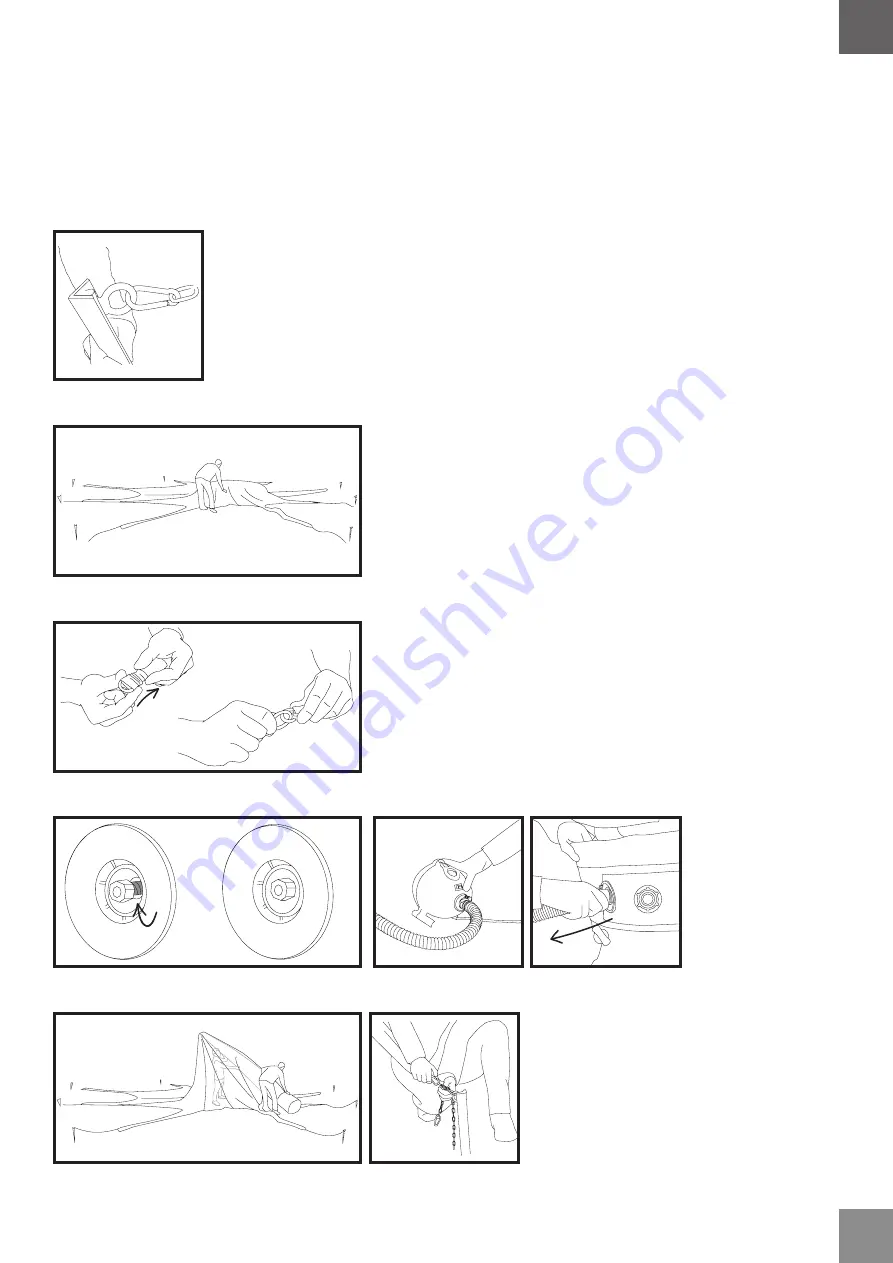
14. Fasten each carabiner with a metre chain to each anchor (each
try square) (Fig. 13).
15. Open the bag with your
Startent AIR
, then take the post out of the
bag and spread it towards the inside part of the tent. Then slip the
pole under the canopy (Fig. 14).
16. Fasten the carabiner attached to the end of the pole to the ring
sewn inside the tip of the tent (Fig. 15).
17. Make sure the pump valve is in the position CLOSE (Fig. 16).
18. Use the pump to inflate the pole until you feel it is completely taut
(you will hear the sound of the pump changing) (Fig. 17).
19. Disconnect the pipe from the pump from the pole, then turn the
pump off (otherwise the air will escape from the pole) (Fig.18).
20. Erect the pole by moving it under the canopy. Place the base of
the pole instead of the central spike of the measuring tool. (take
out the spike before placing the pole). This step is easier when 1
person moves the pole and 2 person lifts the pole (Fig. 19). If you
assemble a tent with two or more poles, for each pole repeat the
steps described in points 14-19 for each pole.
21. Shorten the chains connecting the corners of the tent with the
anchors. Try to get as short chains on each anchor as you can
(Fig. 20). Remember to do it with opposite anchors only. It’s better
you fasten the carabiners directly to the anchors.
22. After the canopy is fastened and slightly stretched by erected
pole(s) you can attach the sidewalls. Sidewalls can be attached
when try square anchors are measured according to the
measuring tool and the carabiners fastened directly to the
anchors.
Fig. 19
Fig. 16
STARTENT
ASSEMBLY
INSTRUCTIONS
CLOSE
OPEN


