background image

12

13

OPERATION

OPERATION

12

13

aV ALD ventilation device | Operating and cleaning instructions 

aV ALD ventilation device | Operating and cleaning instructions

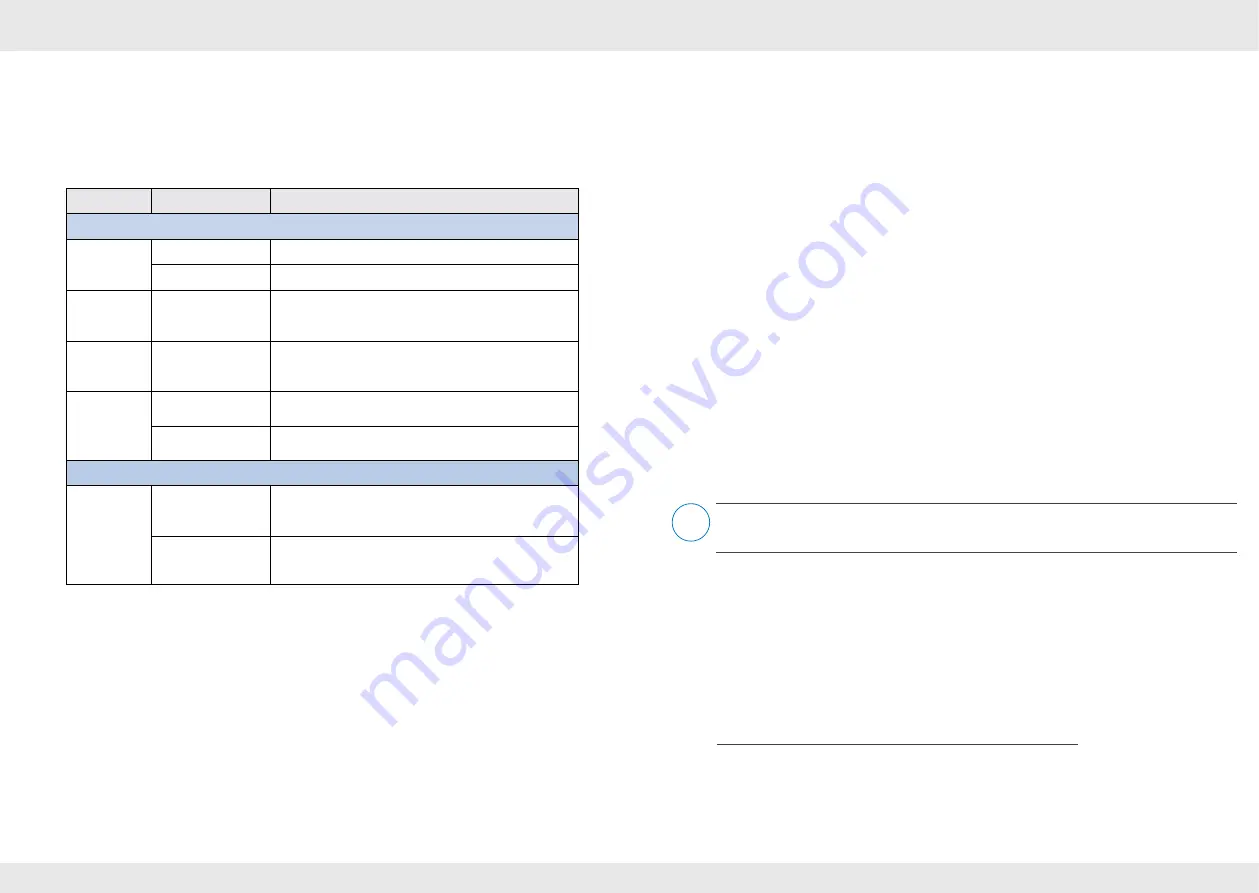
Cleaning recommendations

The measures and intervals listed here are recommended by inVENTer GmbH to maintain the 

functionality and performance of the aV ALD ventilation devices.

Depending on requirements and/or air quality, your personal cleaning plan may differ from these 

recommendations.

Interval

Module

Cleaning measure

Cleaning from the interior room

Monthly

Pollen filter

Replace the used filter.

Inner cover

Clean the surface of the cover with a damp cloth.

Quarterly

Dust filter

Wash the dust filter in warm water.

Or

Replace worn dust filters.

Half-yearly

Sound insulation 

lining made of 

Inventin

®

Wipe the sound insulation lining with a slightly damp, 

soft cloth.

Replace worn or defective sound insulation linings.

Yearly

Filter cartridge

Wash the filter cartridge with warm water and deter

-

gent.

Inner  

cover base plate

Clean the surface of the base plate with a damp cloth.

Cleaning from the outside

Yearly

Exterior closure of 

the weather protec

-

tion hood

Clean the surface of the cover and the protective grid at 

the outlet opening with a damp cloth.

Flat duct

Remove the reveal grille. Clean the inside of the flat 

duct with a damp cloth. Screw the reveal grille back 

onto the flat duct.

Brief summary of cleaning

To clean and check the components of the ventilation device, first remove the inner cover panel. 

Removal of the components is otherwise not possible.

1  Remove the inner panel's cover.

2  Remove the 

• filter cartridge, 

• sound insulation lining and/or Inventin

®1)

.

Clean the washable dust filter (the pollen filter cannot be washed).


Allow the filter to dry again completely afterwards.

Insert the cleaned or a new dust filter into the filter cartridge.

Wipe the interior of the wall sleeve with a damp cloth.

Insert the components in the reverse order back into the wall sleeve:


• Inventin® and/or sound insulation lining

1)

• Filter cartridge.

7  Close the inner cover 

Set the air flow.

On the following pages you will find detailed descriptions for cleaning the individual components 

of the ventilation device. Read these carefully before cleaning each component and pay particular 

attention to additional information that is not included in the brief summary.

1)  

Sound insulation lining and/or Inventin

®

 only available on the aV160 ALD and aV200 ALD

i

Summary of Contents for aV100 ALD

Page 1: ...ventilation device without heat recovery www inventer de Operating and cleaning instructions aV ALD ...

Page 2: ...entation represents the original operating and cleaning instructions After completion of the installation it must be given to the user tenant owner property management etc The content of this documentation has been checked for compliance with the described com ponents Nevertheless deviations may still occur therefore no guarantee of compliance can be provided This documentation describes the funct...

Page 3: ...ment system to a third party the operating and clean ing instructions have must be handed over also Before performing any work on the equipment system read the operating and cleaning instructions carefully and observe all information in this section regarding operation cleaning and care Also note the safety instructions that precede the described handling instructions Non observance of safety inst...

Page 4: ...m lengths All versions can be shortened on site Components Inner cover insulated closable Filter cartridge incl ISO coarse filter G1 Wall sleeve Sound insulation lining1 Inventin 1 Exterior closure2 3 Pollen filter optional Versions The ventilation devices of the aV ALD product range differ in their exterior closures This documentation only contains information on the Basic Light Standard and Plus...

Page 5: ...regulated via the lower part of the inner cover There is a mechanism for chang ing the opening angle Ventilation device Inner cover variant Wall sleeve Exterior closure variant aV100 ALD Ø 103 mm Basic ALD 100 R D103x495 wall sleeve WPG1 aV100 Plus WPH1 Flex aV100 Corner Reveal grille Nordic External grille aV160 ALD Ø 160 mm Light Light ALD R D160x495 wall sleeve 745 Sound insulation lining WPG1 ...

Page 6: ...air flow Stufe 1 Min Stufe 3 Max 2 4 Cleaning and care CAUTION Cleaning care by children and persons with limited abilities Injury to persons and or incorrect functioning of the ventilation system No cleaning or care activities may be performed on the ventilation device by children or persons who are not fully capable of safely doing so due to their physical sensory or mental capabilities inexperi...

Page 7: ...ec tion hood Clean the surface of the cover and the protective grid at the outlet opening with a damp cloth Flat duct Remove the reveal grille Clean the inside of the flat duct with a damp cloth Screw the reveal grille back onto the flat duct Brief summary of cleaning To clean and check the components of the ventilation device first remove the inner cover panel Removal of the components is otherwi...

Page 8: ...the filter cartridge out of the wall sleeve Remove the dirty filter from the filter cartridge Clean the dust filter under warm running water Wait until the dust filter is completely dry or dispose of the dust filter if it is defective Insert the cleaned or a new dust filter into the filter cartridge Slide the filter cartridge into the wall sleeve flush with the interior wall Ö You have cleaned cha...

Page 9: ...tin is a high performing patented material for use in decentralised ventilation devices It absorbs sound waves from outside and from the device itself sound transmission and inherent sound The sound insulation lining is part of the aV160 ALD On the aV200 ALD Inventin is also in stalled in addition to the sound insulation lining Below you will find general instructions for all ALD devices A more de...

Page 10: ...cartridge is installed Attach the top of the inner cover to the locking hook on the casing Fold the lower area onto the casing The inVENTer logo is located at the bottom right Ö All spacers noticeably snap in Ö You have attached the inner cover Flair Zero ALD inner cover Replace the cover on the four spacers The inVENTer logo is located at the bottom right Press the locking lugs inwards on the spa...

Page 11: ...weather protection hood North RAL 7011 1508 0164 Flex Zero weather protection hood anthracite RAL 7016 1508 0165 1508 01772 Flex Zero weather protection hood custom colour 1508 0166 1508 01782 Wall sleeve with Styrofoam discs and mounting wedges R D103x495 wall sleeve 1506 0099 R D160x495 wall sleeve 1506 0068 R D160x745 wall sleeve 1506 0069 R D200x495 wall sleeve 1506 0070 R D200x745 wall sleeve...

Page 12: ...rial Inner cover Light ALD 100 Flair Zero ALD PS SZ Recyclable material Dust filter TPU PES Domestic waste Pollen filter PES Domestic waste 7 Guarantee and warranty Guarantee The guarantee refers to the defect free condition of the product at the time of purchase and covers all defects that were present at the time of purchase Failure to observe the intended use will invalidate all guarantee claim...

Page 13: ...e cleaning intervals can be found in section 4 Cleaning and care Cleaning recommendations Date Num ber of devices inspected Cleaning control measure1 Comment Name Signature Component A B C 1 Cleaning control measure Control K Cleaning R Change W Component Description Scope Measure A Inner cover Clean B Wall sleeve Inventin sound insulation lining filter cartridge Clean Filter Check clean or replac...

Page 14: ...Item number 5012 0017 Version 1 0 11 2022 Subject to modifications No liability for printing errors inVENTer GmbH Ortsstraße 4a 07751 Löberschütz Germany www inventer de ...

Reviews: