background image

InterTest, Inc. • 908-496-8008 


MZ-

5™ HD-UV Inspection System 


EM14809 Rev B 

Page 

26


Version 2.0 • Sept 27 2019 


8) 

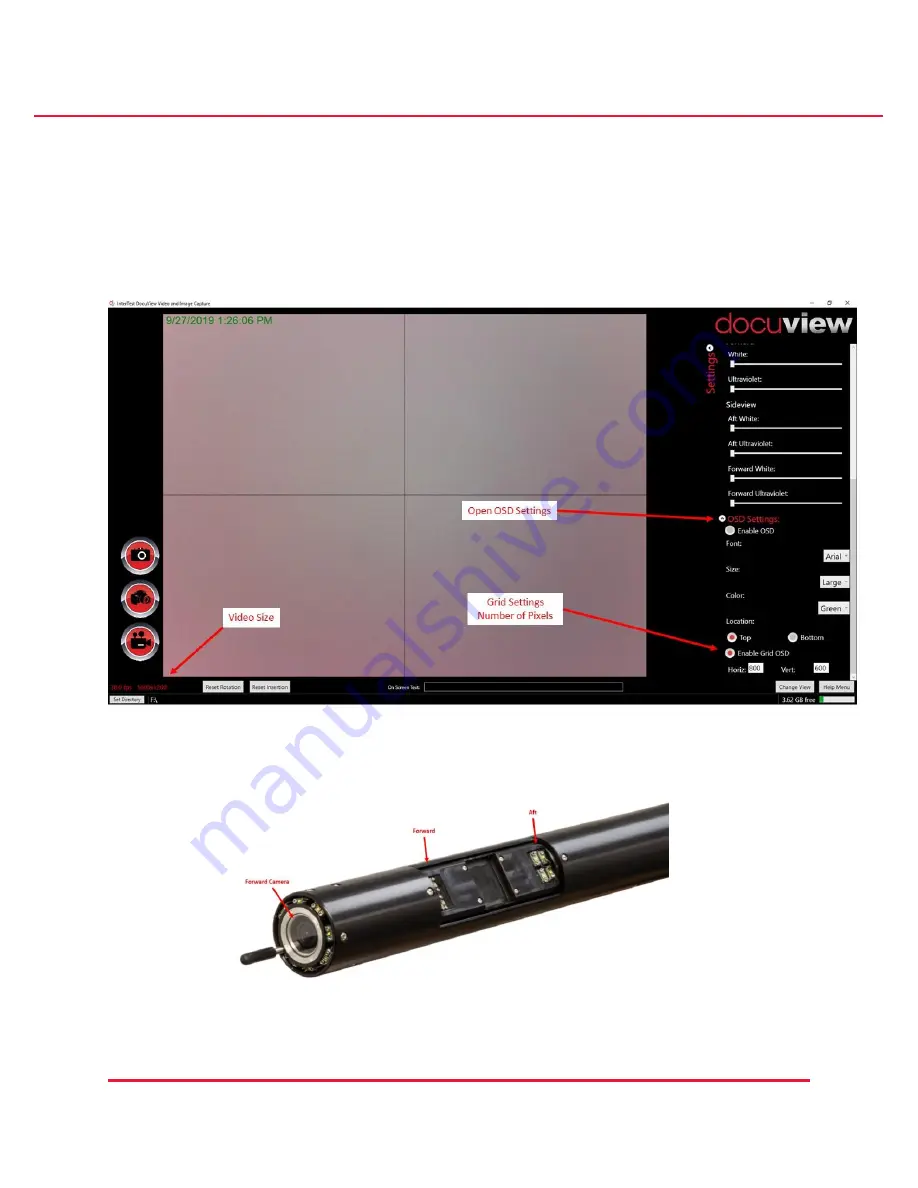
Refer to Figure 20 OSD & Grid Settings 

a.  OSD Setings Refer to where the text appers on the screen 

i.  Font 

ii.  Size 

iii.  Color 

Tip: Setting the Grid to half of fvideo frame size will put a reticle on the screen. 


Figure 20 OSD & Grid Settings 


Figure 21 Forward & Aft Sideview Lighting


Summary of Contents for EM13686

Page 1: ...MZ 5 HD UV Inspection System User Operation and Service Manual Version 2 0 September 2019...

Page 2: ...tions Registered Trademark Information XBlock is a registered trademark of InterTest Inc InterTest is a registered trademark of InterTest Inc iShot is a registered trademark of InterTest Inc iShot Ima...

Page 3: ...5 HD UV Components Description 10 System Features 11 System Functionality 11 Specifications 12 Customer Support 13 Warranty Statement 13 Returns for Repair or Service 14 Return Procedure 14 Unpacking...

Page 4: ...re 12 System Power ON OFF 21 Figure 13 Computer Start Screen DocuView Program 22 Figure 14 Opening General Settings Tabs 22 Figure 15 General Settings 23 Figure 16 General Settings 23 Figure 17 File S...

Page 5: ...Test Inc End Users Field Support Personnel Product Evaluators and qualified third party personnel It is primarily intended for personnel who are using the equipment and those responsible for test proc...

Page 6: ...electric shock DANGER WARNING CAUTION Refer to instruction manual DANGER WARNING CAUTION Explosion Hazard DANGER WARNING CAUTION Avoid exposure to water and liquids DANGER WARNING CAUTION Avoid eye an...

Page 7: ...ies listed in this manual are the only accessories considered suitable for use with this system Accuracy of the rotary encoder is compromised when the probe is operated at steep angles To avoid injury...

Page 8: ...hat were provided Using improper power cords could result in a fire or an electrical shock For safety reasons the use of an extension cord is not recommended If an extension cord must be used with the...

Page 9: ...Chapter 2 Introduction to the MZ 5 HD UV Inspection System Overview Figure 1 shows the MZ 5 HD UV Inspection System Figure 1 MZ 5 HD UV Inspection System as Installed on Central Rack Camera Assembly...

Page 10: ...V Inspection System Components are detailed below in Figure 2 MZ 5 HD UV Inspection System Components Description Not Assembled Table C MZ 5 HD UV Inspection System Components Description Item Descrip...

Page 11: ...the down tube or side view cameras System Functionality The intended use of the MZ 5 HD UV system is to inspect the interiors of large bore gun tubes It is able to find erosion cracks missing rifling...

Page 12: ...g Collar Set Allows for easy switching of centering rings Centering Rings 105 mm 120 mm and 155 mm Heavy Duty Camera Cable 25 meters 4K Monitor Dell 16 9 4K IPS Monitor Table E Front Camera Specificat...

Page 13: ...facility shall disclose to our satisfaction to be defective This limited warranty is in lieu of all other warranties express or implied including the warranties of merchantability and fitness for use...

Page 14: ...n to any other charges required Prior to any repairs being completed a repair evaluation will be issued and payment must be arranged Payment via credit card is preferred and will expedite the repair p...

Page 15: ...t level surface at all times To unplug a power cord pull using the plug body and not the cord Connect cables and cords for the system first before plugging the power into main power When disassembling...

Page 16: ...meets the base of the Camera Head snap together Repeat steps for other 7 poles so the measurement markings are in ascending numerical order The measurement markings on the poles should line up if snap...

Page 17: ...it is powered OFF Refer to Figure 6 Attach the large connector for the Power Fiber Cable connector on the right side Rack Mount Computer Control Unit Figure 5 Attach Fiber and Power Cable to Rackmount...

Page 18: ...4809 Rev B Page 18 Version 2 0 Sept 27 2019 5 Refer to Figure 7 Unlock the encoder handle Feed the camera poles into the Encoder assembly Lock the handle Note Centering rings can only be attached afte...

Page 19: ...appropriately sized ring 105 120 or 155mm around the camera and tighten the thumb screws Next place centering rings on the pole s as needed Refer to figure 9 on next page The Camera Head single pole a...

Page 20: ...st Pole to the camera ensure that graduations begin at 3 ft and ends at 7 ft 6 inches Figure 9 1st Pole Section Referring to Figure 10 when adding pole sections Be sure to grab the correct pole There...

Page 21: ...ion 2 0 Sept 25 2019 8 Refer to Figure 12 Power Up the System a Turn ON the UPS b Turn ON the Computer Open the Door press Power button i May need to turn ON the Computer with the rear power switch No...

Page 22: ...27 2019 Rack Mount Computer Control User Level Refer to Figure 13 1 Double Click on the Docuview Program Icon Figure 13 Computer Start Screen DocuView Program Refer to Figure 14 15 2 Click on the Set...

Page 23: ...us available in General Settings a File Naming i Date Time ii Ascending iii Custom Preface iv Combination of text numbers Will add four digits to the end of The filename Refer to Figure 17 4 Click on...

Page 24: ...ompression compared to Bitmap files Refer to Figure 18 5 Open General Unity Illumination and OSD On Screen Display Settings Note Settings are stored by the system DO NOT need to be set each time a Cam...

Page 25: ...s to open Zoom Focus Controls Front Camera is manual focus side view is autofocus a Focus i Select 1 or 3 Step Macro Close Focus 1 Clicking on Macro will Step the camera by either 1 or 3 steps based o...

Page 26: ...0 Sept 27 2019 8 Refer to Figure 20 OSD Grid Settings a OSD Setings Refer to where the text appers on the screen i Font ii Size iii Color Tip Setting the Grid to half of fvideo frame size will put a r...

Page 27: ...System EM14809 Rev B Page 27 Version 2 0 Sept 25 2019 9 Refer to Figure 23 OSD On Screen Display a On Screen Display b Font Size Color Location c User Entered On Screen Text d Camera Rotation e Camera...

Page 28: ...s Admin Mode a Image Capture File Type b Video Capture Type c File Name Type d Capture Control Location Figure 22 General Settings Note Date Time Done in sequential order Ascending Done in sequential...

Page 29: ...gh Resolution Still Image Capture Video Record Note During Video Record a Small Red dot will be visible in upper Right Corner Icon will be highlighted in green Click the Video Record Icon to stop reco...

Page 30: ...2019 Vison Gauge Software 1 Refer to Figure 26 To use the Vision Gauge Software a Make sure the License USB Stick is installed in the computer b Launch the program c While using vison Gauge only the c...

Page 31: ...31 Version 2 0 Sept 25 2019 2 Refer to Figure 27 to View Live Video a To View Live Image Click on Live Video b To Change Camera s 1 Settings Image Acquisition Camera Select Note Refer to the Vision G...

Page 32: ...InterTest Inc 908 496 8008 MZ 5 HD UV Inspection System EM14809 Rev B Page 32 Version 2 0 Sept 27 2019 Forward Camera Focus Adjustment Figure 26 Forward Camera Focus...

Page 33: ...s Do Not Use Reset Used to Reset UVC to Factory Default Unity Settings Focus 1 3 Step Macro Close Focus by 1 or 3 steps each button Press 1 3 Step Inf Far Focus by 1 or 3 steps each button Press Front...

Page 34: ...pture modes Specifications 1 Video performance a HD video for inspection of MPI at 1080p 30 or 1600 x 1200 down tube and side views b Sensor optimized for white and UV examinations c 13 MP 4192 x 3104...

Page 35: ...5000 hrs video or 2 1 500 000 stills image at 4K resolution ii 19 rack mount iii 4K NVIDIA graphics iv Windows 10 Pro OS network compatible b DocuViewtm display capture annotation and control interfa...

Page 36: ...r 4K image still capture 6 System Features mechanical a Control unit based on rack mount PC and power conditioning backup unit installed in fan cooled NEMA type enclosure on center conductor rack b Po...

Page 37: ...Rev B Page 37 Version 2 0 Sept 25 2019 1 Camera windows should only be cleaned with denatured alcohol lens wipes Chapter 6 Components and Part Catalog The following is a list of components and parts t...

Page 38: ...Version 2 0 Sept 27 2019 EM Number Description Reference Image EM14809 MZ 5 HD UV Inspection System EM62097 DELL 4K MONITOR 42 5 EM13425 SIMATIC IPC547G Rack PC 19 4HU 32GB PC has added 4TB HDD WD Pur...

Page 39: ...n Reference Image EM13498 EM1608231 EM160292 EM160293 EM160294 EM160295 EM160296 EM160297 EM160291 MZ5 OVERALL POLE ASSEMBLY 1ST POLE ASSY 2ND POLE ASSY 3RD POLE ASSY 4TH POLE ASSY 5TH POLE ASSY 6TH P...

Page 40: ...2019 EM Number Description Reference Image EM69441 20 Foot Display Port to Mini Display Port Commercially purchased StarTech com DisplayPort Cable Part DISPLPORT20L EM69442 USB Mouse Commercially Pur...

Page 41: ...MZ 5 HD UV Inspection System EM14809 Rev B Page 41 Version 2 0 Sept 25 2019 EM Number Description Reference Image Fiber Jumper Commercially Purchased Internal to Control Rack OM3 Fiber Optic Cable LC...

Page 42: ...MPH 900 OCUM Page 42 Version 2 0 October 2009 Chapter 7 Service and Maintenance Records Product MZ 5 HD UV Inspection System Serial Number Date of Purchase Date Service Performed...

Page 43: ...InterTest Inc 908 496 8008 MZ 5 HD UV Inspection System EM14809 Rev B Page 43 Version 2 0 Sept 25 2019 NOTES...

Page 44: ...InterTest Inc 908 496 8008 MZ 5 HD UV Inspection System EM14809 Rev B Page 44 Version 2 0 Sept 27 2019 NOTES...

Reviews: