background image

11

7. 

Don the face mask according to the instructions given in the face mask user manual.

8. 

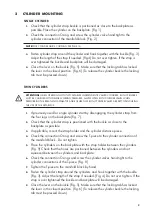
Open the cylinder valve fully.

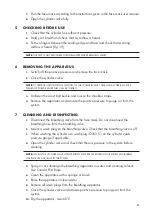
5  CHECKING BEFORE USE

1.

  Check that the cylinder has sufficient pressure.

2.

  Hold your breath and check that no airflow is heard.

3.

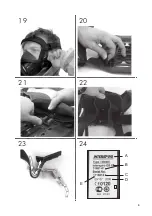
  Put two fingers between the sealing edge and face and check that a strong 

airflow is heard [Fig. 19].

NOTE:

 THIS TEST IS NOT APPLICABLE FOR NORMAL PRESSURE BREATHING VALVES.

6  REMOVING THE APPARATUS

1.

  Switch off the positive pressure and remove the face mask.

2.

  Close the cylinder valve.

NOTE:

 TO PREVENT UNINTENTIONAL CLOSING OF THE CYLINDER VALVE, SOME HAND WHEELS MUST BE 

PUSHED OR PULLED BEFORE THEY CAN BE TURNED.

3.

  Unfasten the waist belt buckle and loosen the shoulder straps.

4.

  Remove the apparatus and activate the positive pressure to purge air from the 

system.

7  CLEANING AND DISINFECTING

1.

  Disconnect the breathing valve from the face mask. Do not disconnect the 

breathing hose from the breathing valve.

2.

  Mount a wash plug on the breathing valve. Check that the breathing valve is off

.

3

  When washing the cylinder use wash plug 32350-51 on the cylinder valve 

pressure gauge if applicable.

4.

  Open the cylinder valve and check that there is pressure in the system before 

cleaning. 

NOTE:

 HAVING THE CYLINDER VALVE OPEN PREVENTS WATER FROM ENTERING THE SYSTEM AND BUBBLES 

WILL INDICATE ANY LEAKS IN THE SYSTEM.

5.

  Spray on or submerge the breathing apparatus in water and cleaning solvent. 

Use Curacid PSA Rinse. 

6.

  Clean the apparatus with a sponge or brush.

7.

  Rinse the apparatus in clean water. 

8.

  Remove all wash plugs from the breathing apparatus. 

9.

  Close the cylinder valve and activate positive pressure to purge air from the 

system.

10.

 Dry the apparatus, max 60°C

Summary of Contents for QS II

Page 1: ...QS II Basic Model 31267E94 ENGLISH SRPSKI User manual Korisni ki priru nik...

Page 2: ...2 1 2 3 4 5 6...

Page 3: ...3 7 10 9 8 11 12...

Page 4: ...4 13 15 14 17 16 18...

Page 5: ...5 23 19 22 20 A B C D E 24 21...

Page 6: ......

Page 7: ...omatic series 400 Series ATTENTION BREATHING APPARATUS WITH TWIN CYLINDER CONFIGURATIONS SPIROLITE 6 7L COMPOSITE 6 8L OR 9 0L AND STEEL CYLINDERS 4L OR 6L EXCEEDS THE TOTAL WEIGHT LIMIT ACCORDING TO...

Page 8: ...y the work load When taking air from the extra air connection which some models are equipped with the air consumption increases and the duration of the apparatus decreases When operating with two sepa...

Page 9: ...URING THE USE OF THE APPARATUS 1 If previously used for single cylinder start by disengaging the cylinder strap from the four lugs on the backplate Fig 7 2 Check that the cylinder strap is positioned...

Page 10: ...sh the ring of the quick coupling towards the backplate Fig 12 Lift away the cylinder Fig 13 3 ADJUSTING THE HARNESS NOTE WHEN STANDING STRAIGHT WITH THE BREATHING APPARATUS DONNED THE MAJORITY OF THE...

Page 11: ...tivate the positive pressure to purge air from the system 7 CLEANING AND DISINFECTING 1 Disconnect the breathing valve from the face mask Do not disconnect the breathing hose from the breathing valve...

Page 12: ...he tool is still in position Mounting 1 Place the hip belt attachment into the track in the backplate Push the size adjustment tabs together and slide the complete hip belt down in the track 2 Mount t...

Page 13: ...anifold located on the right hand side as worn of the waist belt When operating on supplied air from the airline hose the cylinder valve on the SCBA should be closed Should the supply from the airline...

Page 14: ...testing shall be performed according to Service and testing schedule 97307 Visit www interspiro com for latest revision AFTER EACH USE 1 Switch off the positive pressure if applicable 2 Open the cyli...

Page 15: ...ije Spiromatic Serije 400 PA NJA APARAT ZA DISANJE SA DVOBOCNIM KONFIGURACIJAMA SPIROLITE OD 6 7 L KOMPOZITNE OD 6 8 L ILI 9 0 L I ELI NE BOCE OD 4 L ILI 6 L PREMA UJU OGRANI ENJE UKUPNE TE INE PROPIS...

Page 16: ...e specifi na kod svakog nosioca opreme i na koju uti e radno optere enje Prilikom udisanja vazduha iz dodatnog priklju ka za vazduh kojim su opremljeni neki modeli pove ava se potro nja vazduha i skra...

Page 17: ...OVI VENTILI BUDU OTVORENI TOKOM KORI ENJA APARATA 1 Ako se remen boce prethodno koristio za jednobocni aparat oslobodite remen iz etiri u ica na plo i slika 7 2 Postavite remen tako da kop a bude to b...

Page 18: ...nice ka plo i Slika 12 Odvojite bocu podizanjem nagore Slika 13 3 PRILAGO AVANJE SAMARA NAPOMENA KADA STOJITE USPRAVNO SA APARATOM ZA DISANJE NA LE IMA TE INA JE UGLAVNOM NA BOKOVIMA A NE NA RAMENIMA...

Page 19: ...aktivirajte pozitivni pritisak da biste odzra ili sistem 7 I ENJE I DEZINFEKCIJA 1 Odvojite ventil za disanje od maske Nemojte da odvajate crevo za disanje od ventila za disanje 2 Postavite ispusni ep...

Page 20: ...ta a 1 Postavite priklju ak za pojas za kukove u usek na plo i Pritisnite oba jezi ka za pode avanje veli ine i gurnite itav pojas za kukove niz usek 2 Postavite titnik za ramena na plo u Provucite re...

Page 21: ...sa desne strane gledano iz perspektive nosioca opasa a Prilikom kori enja vazdu nog napajanja iz creva za dovod vazduha potrebno je zatvoriti ventil na boci izolacionog aparata U slu aju prekida dovod...

Page 22: ...u sa rasporedom servisiranja i testiranja 97307 Poslednje prera eno izdanje potra ite na www interspiro com NAKON SVAKE UPOTREBE 1 Isklju ite pozitivni pritisak ako je primenljivo 2 Otvorite ventil na...

Page 23: ...23...

Page 24: ...Interspiro AB P O Box 2853 187 28 T by Sweden Phone 46 8 636 51 00 www interspiro com...

Reviews: