Chapter 2 — Installation Process
24
Vehicle Power Supply Installation Guide
4
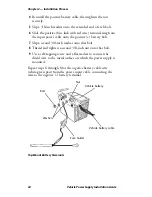
Reinstall the positive battery cable, then tighten the nut
securely.
5
Slip a 3/8-inch washer onto the extended end of each bolt.
6
Slide the positive (fuse link with red wire) terminal ring from
the input power cable onto the positive (+) battery bolt.
7
Slip a second 3/8-inch washer onto that bolt.
8
Thread and tighten a second 3/8-inch nut onto that bolt.
9
Use a self-tapping screw and a flat washer to connect the
shield wire to the metal surface on which the power supply is
mounted.
Repeat steps 6 through 8 for the
negative
battery cable wire
(white-green pair) from the power input cable, connecting the
wire to the
negative
(-) battery terminal.
Top-Mount Battery Terminals
Bolt
Nut
Vehicle battery
Vehicle battery cable
Fuse holder
Washers
Summary of Contents for CV60
Page 1: ...Vehicle Power Supply Installation Guide ...
Page 4: ...iv Vehicle Power Supply Installation Guide ...
Page 10: ...Vehicle Power Supply Installation Guide x ...
Page 20: ...Chapter 1 Introduction 10 Vehicle Power Supply Installation Guide ...
Page 46: ...Chapter 3 Troubleshooting Information 36 Vehicle Power Supply Installation Guide ...
Page 47: ...Chapter 3 Troubleshooting Information Vehicle Power Supply Installation Guide 37 ...


