background image


© 2018 UTC Fire & Security Americas Corporation, Inc. 

1 / 8 

P/N 466-

5410 (EN) • REV D • ISS 19MAR18 


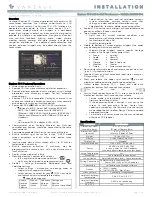
Concord 5” TouchScreen Installation Sheet 


Description 

Concord 5” TouchScreen, model 60-924-3-C4TS5, features a 
5-inch color LCD screen with a graphical user interface 
designed to control basic functionality of Concord 4, version 
4.5 or later. 

Multiple touch screens can be added to each Concord panel. 
An internal speaker provides system status beeps for trouble 
and alarm indications.


The touch screen provides a convenient option for the 
following system operations: 

• 

Easily obtain home/building status using At-A-Glance 
(AAG) sensor status. 

• 

Arm the system (doors, windows, motion sensors, and 
property). 

• 

Disarm the system. 

• 

Activate a panic alarm to call the central monitoring station 
in a non-medical emergency. 

Equipment 

• 

Alphanumeric keypad (for panel and end user 
programming) 

• 

4-conductor, 18 to 22-gauge wire 

• 

#6 screws and anchors (included) 

• 

Super bus power supply (optional), PN 600-1019 

Tools 

• 

2.5mm flat-blade screwdriver 

• 

#2 Phillips screwdriver 

• 

Drill and drill bits for opening wallboard (3/16- and 1/2-inch 
bits) 

Safety information 

IMPORTANT SAFETY INFORMATION. READ ENCLOSED 
WARNINGS AND SAFETY INFORMATION. 

 WARNING! 

Disconnect panel power before servicing.


CAUTION: 

Use static electricity precautions when 

handling electronic components.


Installation guidelines 

The touch screen can be the primary interface to the panel or it 
can act as auxiliary interface working in conjunction with 
alphanumeric keypads (such as Interlogix P/N 600-1070-E or 
60-983).  

• 

The touch screen is not listed to UL Fire Standards and 
may not be programmed for use with a Fire System in 
California per CSFM Regulations. 

•   Mount the touch screen in an environmentally-controlled 

area (32

°F to 120°F/0°C to 49°C). 

• 

Do not exceed the maximum available power given in the 
panel. Refer to the total system power and guideline 
section in Concord installation instructions. See Table 1 
for touch screen power usage and Table 2 for maximum 
wire length between touch screen and panel. 

• 

Depending on system loading, multiple touch screens can 
be installed on a Concord 4 system. See the examples in 
Table 3 and Table 4. 

Table 1: Touch Screen Power Usage 

Current (mA) 

Conditions 

400 

Maximum alarm current with the buzzer sounding and 
the touch screen illuminated from a button press 

100 

Typical operation 

40 

Power saving mode (no panel AC power) 

Table 2: Maximum SuperBus Lengths 

Wire gauge 
(shielded or 
unshielded) 

Max. touch screen wire length between touch 
screen and panel 

22 

120 feet 


Summary of Contents for 60-924-3-C4TS5

Page 1: ...NINGS AND SAFETY INFORMATION WARNING Disconnect panel power before servicing CAUTION Use static electricity precautions when handling electronic components Installation guidelines The touch screen can be the primary interface to the panel or it can act as auxiliary interface working in conjunction with alphanumeric keypads such as Interlogix P N 600 1070 E or 60 983 The touch screen is not listed ...

Page 2: ...ktop stand at the removal tab marking until it separates Figure 1 with the other Figure 1 Desktop stand removal 2 Remove the touch screen from the mounting base pressing the opening button on the bottom of the touch screen as shown in Figure 2 In case the parts stick to each other try to separate them by inserting a small screwdriver into the opening slot beneath the protruding opening button Figu...

Page 3: ...uch screen into the lower part of the mounting base until you hear an audible click Note If necessary use a soft cloth to clear smudges on the touch screen Do not use glass cleaner Power up and bus communication Follow the steps below for powering up the panel and for verifying that the TouchScreen and other products like an alphanumeric keypad are properly communicating with each other Note On po...

Page 4: ...tion assignment With this menu assign bus devices to work in the desired partition To assign bus devices to partitions 1 With the display showing the desired bus device press 2 Press A or B until the display shows DEVICE PTN and then press The display shows PARTITION ASSIGN 3 Press 1 to 6 to select the desired partition The display flashes the entered selection 4 Press and the display shows the ne...

Page 5: ...Help menu which displays a list of help topic buttons Touch the buttons for information on a given topic Set Date Time Touch the related button to access the Date Time menu Code Required Access Touch the On or Off buttons to toggle this feature When turned on it will require a user access code to be entered for most touch screen functions With code required access not all icons will be displayed N...

Page 6: ...ral groups may result in a continuously red AAG motion icon Can both door and motion text be used in a sensor Not recommended Degraded or inhibited touch screen functionality Check wiring Confirm wire length is not exceeding 120 ft 22 gauge Re calibrate touch screen Problem Actions Solutions Trouble condition not displayed under status Refer to event buffer in touch screen and or view full status ...

Page 7: ...BILITY OR FITNESS FOR A PARTICULAR PURPOSE WITH RESPECT TO ITS CONCORD 4 PRODUCTS AND RELATED SOFTWARE MANUFACTURER FURTHER DISCLAIMS ANY OTHER IMPLIED WARRANTY UNDER THE UNIFORM COMPUTER INFORMATION TRANSACTIONS ACT OR SIMILAR LAW AS ENACTED BY ANY STATE USA only SOME STATES DO NOT ALLOW THE EXCLUSION OF IMPLIED WARRANTIES SO THE ABOVE EXCLUSION MAY NOT APPLY TO YOU THIS WARRANTY GIVES YOU SPECIF...

Page 8: ...8 8 P N 466 5410 EN REV D ISS 19MAR18 ...

Reviews: