background image


D-0112389-I  – 2022/04   
Sera™ - Instructions for  Use  - EN 


Page 

48


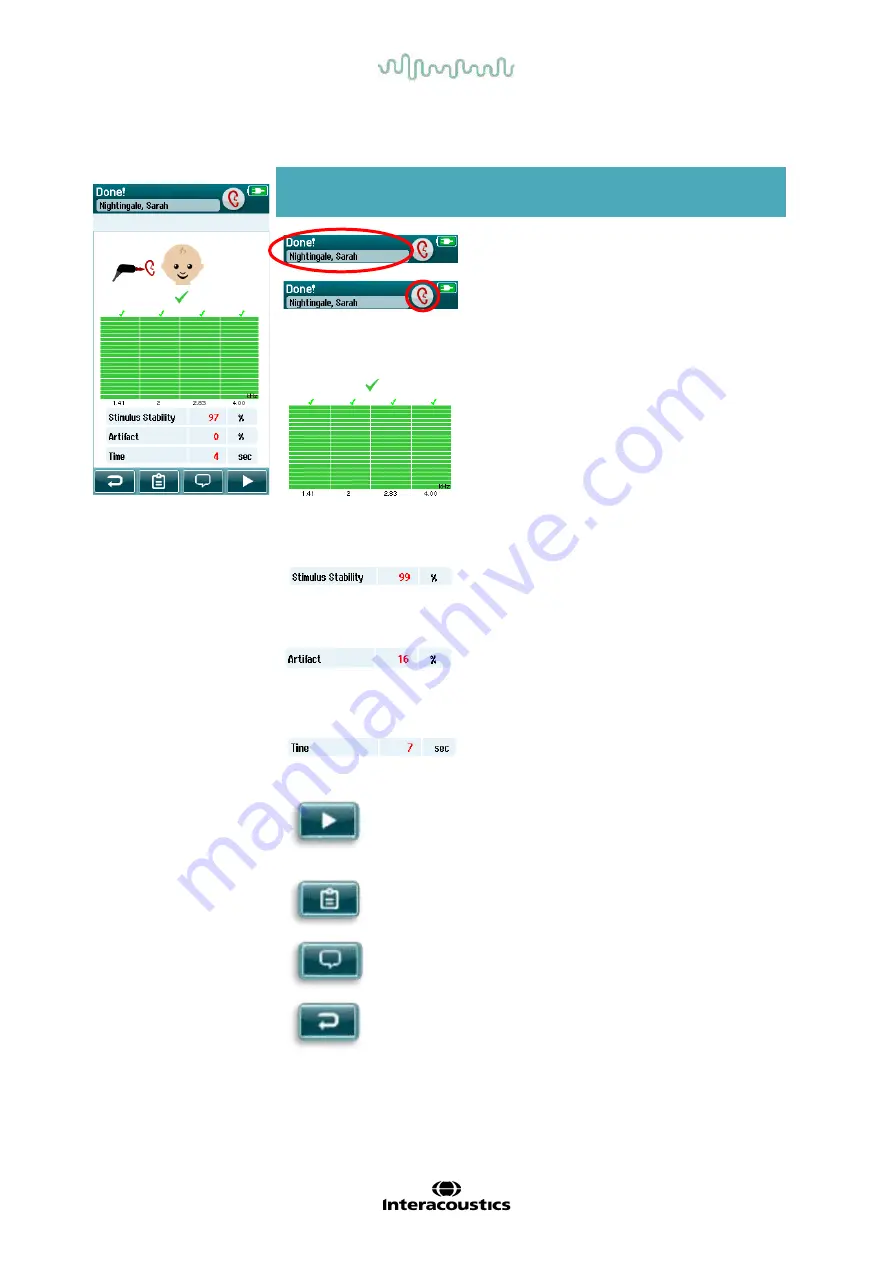
Table 14: 

TEOAE


Test done screen. 


Screen area/graphic


Function name 

Description 


Patient information and 

“Test  Done” status.  


Shows current patient. 


Ear selection buttons 

return after test is done. 

Choose ear to  test;  or 

toggle to view the 

results for the opposite 

ear tested in this 

session. 


Test  result bars and 

symbols and additional 

information about the 

test. 


Feedback about the 

result(s) of the most 

recent screening 

performed in this test 

session. Overall result 

appears at the top.  

Results for individual 

frequencies appear 

above ear bar. 


Stimulus stability %. 
 

Indicates the stability 

of the stimulus 

throughout the test.   


Artifact %.  


Indicates the 

percentage of artifacts 

measured during the 

test.  


Time. 


Total test time. 


Start button.  


Begins OAE  probe fit 

check.  


Test list view. 

Opens list of all tests 

performed in this 

session; can print from 

here if printer is setup. 


Back button. 

Returns to  prior screen 

(before initial test 

screen). 


Comment. 

Select to open a 

screen for inserting a 

comment about the 

test just performed 


Summary of Contents for Sera

Page 1: ...Instructions for Use EN Sera Science made smarter 8501165 D 0112389 I 2022 04...

Page 2: ......

Page 3: ...13 3 4 3 Turning the printer on and off 13 3 4 4 Connecting the wireless printer to the SeraTM 13 3 4 5 Printer offline 14 3 5 The SeraTM hardware 15 3 6 Connecting the probe cable to the SeraTM 16 3...

Page 4: ...3 2 Time bar 39 4 7 3 3 Test done screen 39 4 8 OAE testing 41 4 8 1 OAE initial test screen 41 4 8 2 Probe check screen 42 4 8 3 OAE measurement screen 44 4 8 3 1 Probe stability bar 45 4 8 3 2 Noise...

Page 5: ...3 3 Disposables 64 6 4 Cleaning the OWA probe tip 65 6 5 Cleaning the SnapPROBETM 67 6 6 Accessories replacement parts 67 6 7 Repair 68 6 8 Warranty 68 7 General technical specification 69 7 1 SeraTM...

Page 6: ......

Page 7: ...ns The target population for SeraTM with TEOAE includes all ages The SeraTM with ABRIS is intended for use in the audiologic evaluation and documentation of ear and nerve disorders using auditory evok...

Page 8: ...different transducers and cable configurations The table below shows which transducers and cable configurations are possible for use with the SeraTM TRANSDUCER CABLE CONFIGURATION DPOAE TEOAE ABRIS S...

Page 9: ...Optional Snap Electrodes Optional Tab electrodes Optional Optional Gauze swaps Optional Conductivity gel Optional Alcohol pads Optional Printer label paper Optional Optional Probe tip kit Disposables...

Page 10: ...mportant to protect patients users and other persons against harm Therefore if the product has caused or potentially could cause such harm it must be quarantined immediately Both harmful and harmless...

Page 11: ...device If the instrument is damaged return it to the manufacturer for repair and or calibration Do not use the instrument if any damage is suspected This product and its components will perform relia...

Page 12: ...Do not touch the contacts on the bottom of the instrument and the patient at the same time The consequence could be a too high leakage current to the patient Do not open the case of the instrument Re...

Page 13: ...or damage the parts Within the European Union it is illegal to dispose of electrical and electronic waste as unsorted municipal waste Electrical and electronic waste may contain hazardous substances a...

Page 14: ...D 0112389 I 2022 04 Sera Instructions for Use EN Page 8...

Page 15: ...perfections Inspect before connection Prior to connecting the product it should once more be inspected for damage The cabinet and the accessories should be checked visually for scratches and missing p...

Page 16: ...tion Refer to instructions for use Follow Instructions for Use WEEE EU directive This symbol indicates that when the end user wishes to discard this product it must be sent to separate collection faci...

Page 17: ...ction provided by the enclosure against ingress of objects Effective against objects greater than 12 5 mm IP02 Degree of protection provided by the enclosure against ingress of liquid Effective agains...

Page 18: ...ement in the cradle is needed to ensure charging of the battery Grasp the upper portion of the SeraTM above the cradle placement guides and lift it out of the cradle 3 4 Installing the HM E200 label p...

Page 19: ...urn the printer on and press the feed button on the left side so that the printer can properly align the labels with the print head Optionally thermal paper can be used with the HM E200 thermal printe...

Page 20: ...ect to the other SeraTM device successfully If you want to print measured results on the connected printer it is recommended to switch on the printer before doing the measurements This will allow the...

Page 21: ...ng icons Viewing your SeraTM from the front side you will see the touch screen display 1 and the On Off Home button 2 and a charging light indicator LED 3 On the top of the device an ABR preamp OAE pr...

Page 22: ...and push it securely into place The SeraTM is designed to guide the probe plug preamplifier into the correct position 3 7 Connecting transducers to the preamplifier The preamplifier cable is required...

Page 23: ...daptor The transducer is labeled Calibrated for use with EarCups The IP30 stereo ID EarCups can also be used with EARturtleTM The EARturtleTM Click requires a special adapter see picture while the EAR...

Page 24: ...ecker The Pass Checker is not required for patient testing 3 11 Transducers and calibration The transducers used with SeraTM use a special omnetics plug that allows the calibration data to be stored w...

Page 25: ...other connectors has formed a Medical Electrical System and is therefore responsible for the system to comply with the requirements If in doubt contact qualified medical technician or your local repre...

Page 26: ...switched off during charging Table 1 Estimated time of charging the SeraTM in hours 3 13 1 Indication lights on SeraTM The table below summarizes the LED indicator light colors displayed on SeraTM un...

Page 27: ...osoft supported operating systems that are kept fully security updated 3 15 Licenses When you receive the SeraTM it already contains the license s for the modules you have purchased If you would like...

Page 28: ...evice 1 Ensure you have the last released version of the SeraTM software bundle 2 Connect the SeraTM device to the PC via the supplied USB cable 3 Run the FirmwareUpgradeSera exe file located in the T...

Page 29: ...ach day to ensure that the transducers the probe and or cable is functioning correctly for Automated ABR TEOAE and DPOAE measurements 9 Clean the probe tip regularly to ensure wax or other debris stuc...

Page 30: ...nterference may introduce noise into the recording prolonging the test time and increasing the chances of a refer result Therefore testing while the device is connected to a PC or to mains power is no...

Page 31: ...30 minutes of active test time remaining 5 Testing cannot be performed recharge ASAP 3 Automatic shutdown 4 5 SeraTM operation and button overview 4 5 1 The SeraTM screen format The general SeraTM scr...

Page 32: ...ds Proceed to test start test Pause test Stop test Resume test Quick add of new patient Both ears test Right ear Left ear Sort order alphabetical Sort order chronological Change screener 4 5 3 Keyboar...

Page 33: ...D 0112389 I 2022 04 Sera Instructions for Use EN Page 27 Special characters are available from the following English alphabet characters A C D E G I L N O R S T U Z...

Page 34: ...e Patient Information The Change User control will be unavailable for selection if user login is disabled Select Change User to log out of the current user and display the User list for selection of a...

Page 35: ...ID can be overwritten when entering the patient data Configuring SeraTM to use an automatically entered ID number is accomplished via HearSIMTM When you have completed entry of data you can proceed i...

Page 36: ...only matching entries Page down or up using the arrow keys to find the desired patient name Select the patient of interest to open the Patient information screen After selecting the patient you can p...

Page 37: ...in The electrodes used by SeraTM with ABRIS are intended for use on intact external skin around the ears and on the scalp They should not be used if the skin is not intact of the baby has a contagious...

Page 38: ...t to patient and potentially affect the delivery of the correct stimulus level to the patient s ear Ensure that the EarCup and EARturtleTM Slide is correctly fitted to the EarCup adaptor or in case of...

Page 39: ...amplifier must be connected with an appropriate transducer to see Automated ABR tests Please refer to the SeraTM Additional Information for further information about the protocols 4 6 7 Test related f...

Page 40: ...provided in Table 3 Table 3 Screening Result Symbols 4 6 9 Stop reason for incomplete test The administrator can enable a feature in SeraTM via HearSIMTM for automatically displaying a Select Stop Re...

Page 41: ...small green checkmark appearing on a printer icon at the right side of the row You can deselect a test by touching the symbol You can select other tests in the list for printing according to your pre...

Page 42: ...t screen The initial Automated ABR screen displays the following information and instructions Table 4 Table 4 Initial Automated ABR screen Displayed graphic Function name Description Patient informati...

Page 43: ...r impedance persists it may be necessary to remove the electrode and use the skin preparation product to clean the skin again or use a conductive gel It may be possible to reapply the same electrode b...

Page 44: ...be accepted and processed by the response detection algorithm If the incoming EEG samples contain high noise due to myogenic or electrical noise the checkmark will disappear and the noise bar will re...

Page 45: ...esting or can repeat a test measure on the same ear The ear selection control can also be used to toggle between the last Automated ABR test performed on the right and left ear during the session Tabl...

Page 46: ...he ear test has just passed and asks for confirmation of a desire to retest the same ear again Users can select the checkmark to proceed with a retest or can select the cancel button to cancel the ret...

Page 47: ...initial test screen The initial OAE screen displays the following information and instructions Table 8 Table 8 OAE initial test screen Displayed graphic Function name Description Patient information D...

Page 48: ...heck terminates and the OAE measurement phase begins automatically Table 9 DPOAE Probe check screen Displayed graphic Function name Description Probe check status Displays the probe check status in ea...

Page 49: ...ear canal Ensure the baby is relaxed and quiet or sleeping and or attend to any acoustical noise in the test environment Displayed graphic Function name Description Probe check status Displays the pr...

Page 50: ...ogress appear When noise and probe stability are acceptable a checkmark appears next to the horizontal bar Table 11 DPOAE measurement screen Screenarea graphic Function name Description Test status in...

Page 51: ...ugh to be accepted and processed by the response detection algorithm If the incoming data sample contains high noise the checkmark will disappear and the noise bar will reflect noise exceeding the rej...

Page 52: ...the test will terminate automatically 4 8 4 Test done screen At the conclusion of a screening the result of the most recently completed screening will continue to be visible The ear selection control...

Page 53: ...the result s of the most recent screening performed in this test session Overall result appears at the top Results for individual frequencies appear above ear bar Probe stability Indicates the quality...

Page 54: ...e result s of the most recent screening performed in this test session Overall result appears at the top Results for individual frequencies appear above ear bar Stimulus stability Indicates the stabil...

Page 55: ...ing during testing 4 8 4 2 Stimulus stability TEOAE only When the measurement is finished the Stimulus stability provides an indication of how stable the stimulus level was throughout the measurement...

Page 56: ...ermanently deleted from SeraTM Please note Quick test functionality can be enabled disabled by an Administrator via HearSIMTM If Quick Test is disabled on your device then the Quick Test button will n...

Page 57: ...the Test List screen that can be accessed from either the Test Done screen or from the Patient Information screen Print from the Test Done screen Print from the Patient Information Screen 4 10 2 Labe...

Page 58: ...use the Search button in the control bar to open a keyboard screen Type in all or a portion of the patient s last name or ID number and select Search again to return to a shortened list containing onl...

Page 59: ...tton only appear on the screen if your SeraTM has the wireless and Printer settings enabled via HearSIMTM and if an HM E200 printer has been paired with the device Otherwise these controls are hidden...

Page 60: ...d in HearSIMTM and transferred to the SeraTM will display after the device boots up Select your username from the list to proceed to the password entry screen Up and down arrows in the control bar all...

Page 61: ...t password If an incorrect password is entered a message will appear indicating that the password you entered was incorrect The message will display for several seconds and then it will disappear clea...

Page 62: ...Spanish French Italian Portuguese Dutch Polish Finnish Russian Chinese Korean Norwegian Turkish and Japanese 4 13 2 Device Set your time preference for Power Save and Power Off features Power Save Sta...

Page 63: ...eted Warning sound a warning sound is presented when an electrode becomes detached during Automated ABR testing or when the battery charge is low Select the Checkmark button in the control bar to conf...

Page 64: ...2022 04 Sera Instructions for Use EN Page 58 4 13 5 About Select the About item to view information about the SeraTM including Firmware versions Serial numbers and calibration dates Battery informati...

Page 65: ...ss checker for automated ABR optional The optional SeraTM ABRIS Pass Checker accessory can be used to perform an integrity check of the electrode cables and transducer used for Automated ABR testing w...

Page 66: ...leshooting make sure that the Pass Checker is still switched on during your tests 5 Perform a standard binaural or monaural for probe Automated ABR test 6 The test should proceed quickly through the i...

Page 67: ...a standard TEOAE test Let the test run until it stops automatically Do not stop the test manually 3 If the probe is functioning correctly no TE bands get a checkmark it is possible to continue with da...

Page 68: ...TEOAE test Let the test run until it stops automatically Do not stop the test manually 3 If the probe is functioning correctly no DP frequency points get a checkmark it is possible to continue with da...

Page 69: ...olution of water and detergent or similar Always disconnect the mains power adaptor during the cleaning process and be careful that no fluid enters the inside of the instrument or accessories 5 After...

Page 70: ...o clean the plastic parts of the SeraTM and cradle If disinfection is required use a disinfectant wipe rather than a spray product Make sure that excess liquid from the wipe does not seep into any sen...

Page 71: ...channels of probe tip Use the Thornton Bridge Implant Floss or the Thornton 3 in 1 Floss for cleaning Discard used floss after use Never clean the probe tip while the tip is still attached to the prob...

Page 72: ...asket back into place after cleaning Reattach the probe tip to the probe and screw the gasket into place DO NOT try to clean the probe tip while it is mounted on the probe Only insert the cleaning flo...

Page 73: ...inspection of the probe and its filters should therefore be made prior to every measurement If any traces of ear wax debris or the like are present the filters of the probe need to be replaced Remove...

Page 74: ...e carried out at Interacoustics expense subject to the terms of this warranty The product requiring service should be returned promptly properly packed and postage prepaid Loss or damage in return shi...

Page 75: ...z 400 mA 5 0V DC 1 6A MAX Operation environment Temperature Relative Humidity Ambient Pressure Boot up time Warm up Time 5 40 C 41 F 104 F 15 93 non condensing 98 kPa 104 kPa 5 sec Nil Transport Stora...

Page 76: ...eight 85 g 0 19 lbs Preamplifier dimensions 8 5 x 0 5 x 2 5 cm 3 4 x 0 2 x 0 9 inches Printer Thermal printer Optional Type HM E200 Connection Wireless Battery Rechargeable Li polymer DC 7 4 V 1300 mA...

Page 77: ...Artifact noise rejection system 30 dB SPL Residual noise An RMS average measurement in the DP bin frequency area 26 bins at frequencies 2500 Hz 60 bins 2500 Hz Test Pressure Ambient Display Transducer...

Page 78: ...sis time 60 seconds Recording window 2 5 14 1 ms A D Resolution 24 bit Artifact noise rejection system 55 dB SPL Test pressure Ambient Residual noise A RMS value for each octave band based on the Baye...

Page 79: ...nalog balanced in 6 Microphone input Analog balanced in Microphone input Analog balanced in 7 Power supply 3 5V Power supply 3 5V 8 CH2 out CH2 out 9 CH2 GND CH2 GND 10 I2C CLK I2C CLK 11 I2C DATA I2C...

Page 80: ...ulus Probe and insert stimuli are calibrated in SPL values using an ear simulator coupler made in accordance to IEC 60318 4 Transducer peRETSPL dB re 20 Pa RadioEar IP30 with ear tips 35 dB SPL RadioE...

Page 81: ...ometer All 1 5500 Middelfart Denmark Tel 45 6371 3555 Fax 45 6371 3522 E mail info interacoustics com Web www interacoustics com 7 7 Appendix A Stimulus Another stimulus than specified in the standard...

Page 82: ...er than 30 cm 12 inches to any part of this equipment including cables specified by the manufacturer Otherwise degradation of the performance of this equipment could result in improper operation This...

Page 83: ...ironment in which radiated RF disturbances are controlled The customer or the user of the SeraTM can help prevent electromagnetic interferences by maintaining a minimum distance between portable and m...

Page 84: ...nment Surge IEC 61000 4 5 1 kV differential mode 2 kV common mode 1 kV differential mode 2 kV common mode Mains power quality should be that of a typical commercial or residential environment Voltage...

Page 85: ...RF communications equipment should be used no closer to any parts of the SeraTM including cables than the recommended separation distance calculated from the equation applicable to the frequency of t...

Page 86: ...eur radio AM and FM radio broadcast and TV broadcast cannot be predicted theoretically with accuracy To assess the electromagnetic environment due to fixed RF transmitters an electromagnetic site surv...

Page 87: ...Returned according to agreement with Interacoustics Other Date Person Please provide e mail address or fax No to whom Interacoustics may confirm reception of the returned goods The above mentioned ite...

Reviews: