InTemp CX500 Series Temperature Logger Manual
www.prosensor.com
2
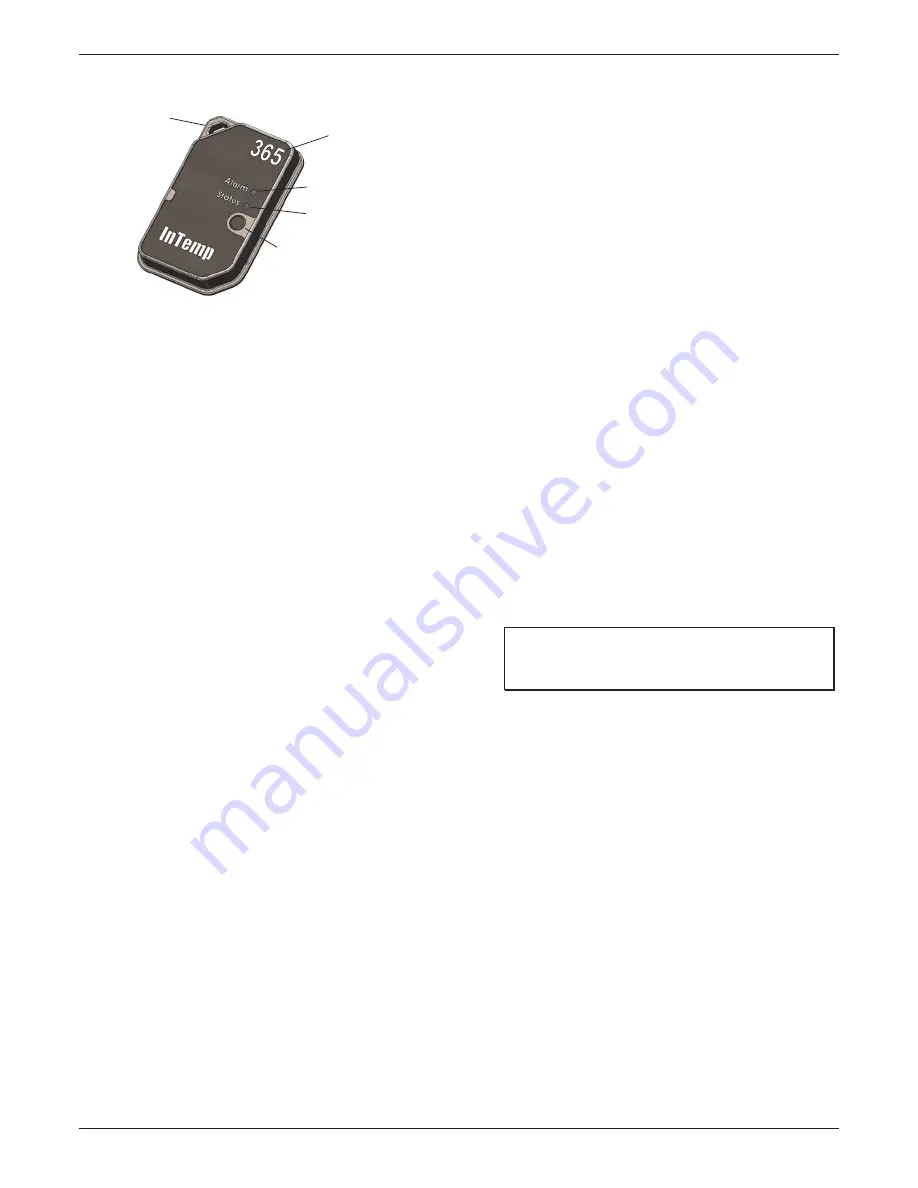
Logger Components and Operation
Mounting Loop:
Use this to tie the logger to the
materials being
monitored.
Duration:
This number indicates how many days the logger will
last: 90 days for the CX502 model or 365 days for the CX503
model.
Alarm LED:
This LED blinks red every 4 seconds when an alarm
is tripped. Both this LED and the status LED will blink once when
you press the st
art button to w
ake up the logger before
con
fi
guring it. If you select Page Logger LED in the InTemp app,
both LEDs will be illuminated for 4 seconds.
Status LED:
This LED blinks green every 4 seconds when the
logger is logging. If the logger is wai
tin
g to start logging
(because it was con
fi
gured
to start “On button push,” “On
button push with fixed delay,”
or with a delayed start), it will
blink green every 8 seconds.
Start Button:
Pre
ss this button
for 1 second to wake up the
logger to begin using it. Once the logger is awake, press this
button for 1 second to move it to the top of the
loggers list in
the InTemp app. Press this bu
tton for 4 seconds
to start the
logger when it is configured to start “On button push” or “On
button push with fixed delay
.
”
Both the Alarm and Status LEDs
will blink four
ti
mes when you press the
start button to b
egin
logging. You can also press this b
utton to stop the logger whe
n
it is configured to “Stop on button push
.
”
Getting Started
InTempConnect is web-based so
ft
ware where you can monitor
CX500 series logger configurations and
view downloaded data
online. Using the InTemp app, yo
u can configure the logger
with your phone or tablet and then download reports, which
are saved in the app and automa
tically upload
ed to
InTempConnect. The CX5000 Gateway is also available to
automatically
configure and
download loggers and upload data
to InTempConnect. Or, anyone can download a logger using the
InTempVerify app if the loggers are enabled to be used with
InTempVerify. See www.intempconnect.com/help for details on
both the gateway and InTempVerify. If you do not need to
access logged data via the cloud-based InTempConnect
software, then
you also have th
e option to use the logger with
the InTemp app only.
Follow these steps to begin using the loggers with
InTempConnect and the InTemp app.
1.
Administrators:
Set up an InTempConnect account
. Follow
all steps if you are a new administrator. If you already have
an account and roles assigned, follow steps c and d.
If you are using the logger with the InTemp app only, skip
to step 2.
a.
Go to www.intempconnect.com and follow the prompts
to set up an administrator account. You’ll receive an
email to activat
e the account.
b.
Log into www.intempconnect.com and add roles for the
users you will be adding to the account. Click Se
tti
ngs
and then Roles. Click Add Role, enter a descrip
tion
, select
the privileges for the role and click Save.
c.
Click Se
ttings and then Users to
add users to your
account. Click Add User and enter the email address and
first and last nam
e of the user. Select the roles for the
user and click Save.
d.
New users will receive an email to ac
ti
vate their user
accounts.
2.
Download the InTemp app and log in.
a.
Download InTemp to a phone or tablet from the App
Store® or Google Play™.
b.
Open the app and enable Bluetooth in the device se
ttings
if prompted.
c.
InTempConnect users:
Log in with your InTempConnect
user creden
ti
als. (Your device must be able to connect to
the internet for the
initial
login.) Make sure to check the
box that sa
ys “I am an InTempConnect user
” w
hen
signing in.
InTemp app only users:
If you will not be using
InTempConnect, create a user account and log in when
prompted. DO NOT chec
k the box that says
“I am an
InTempConnect user
”
when signing in.
3.
Configure the logger.
Important:
CX502 loggers cannot be restarted once
logging begins.
Do not continue with these ste
ps
until
you are ready to use these loggers.
InTempConnect users:
Configur
ing the logger requires
privileges. Administrators or those with the required
privileges can also set up custom
profiles and trip
information fi
elds. This should be done before comple
tin
g
these steps. If you plan to use the logger with the
InTempVerify app, then you must
create a logger profile
with InTempVerify enabled. See
www.intempconnect.com/help for details.
InTemp App only users:
The logger includes preset
profil
es.
To set up a cust
om profile, tap the Settings icon
and tap
CX500 Logger before comple
ting th
ese steps.
a.
Press the button on the logger t
o wake it up.
b.
Tap the Devices icon in the app. Find the logger in the list and
tap it to connect to it. If you are working with mul
ti
ple
loggers, press the button on the
logger again to bring it to the
top of the list.
If you are having
trouble connecting:
•
Make sure the logger is within range of your mobile
device. The range for successful wireless communic
ation
is approximately 30.5 m (100 ft
) with full line-of-sight.
•
If your device can connect to the logger intermi
tt
ently or
loses its conne
ction, mov
e closer to the logger, within
sight if possible.
Dura
ti
on (CX503
model shown)
Alarm LED
Status LED
Moun
ti
ng
Loop
Start Bu
tton


